Settings
Account Settings
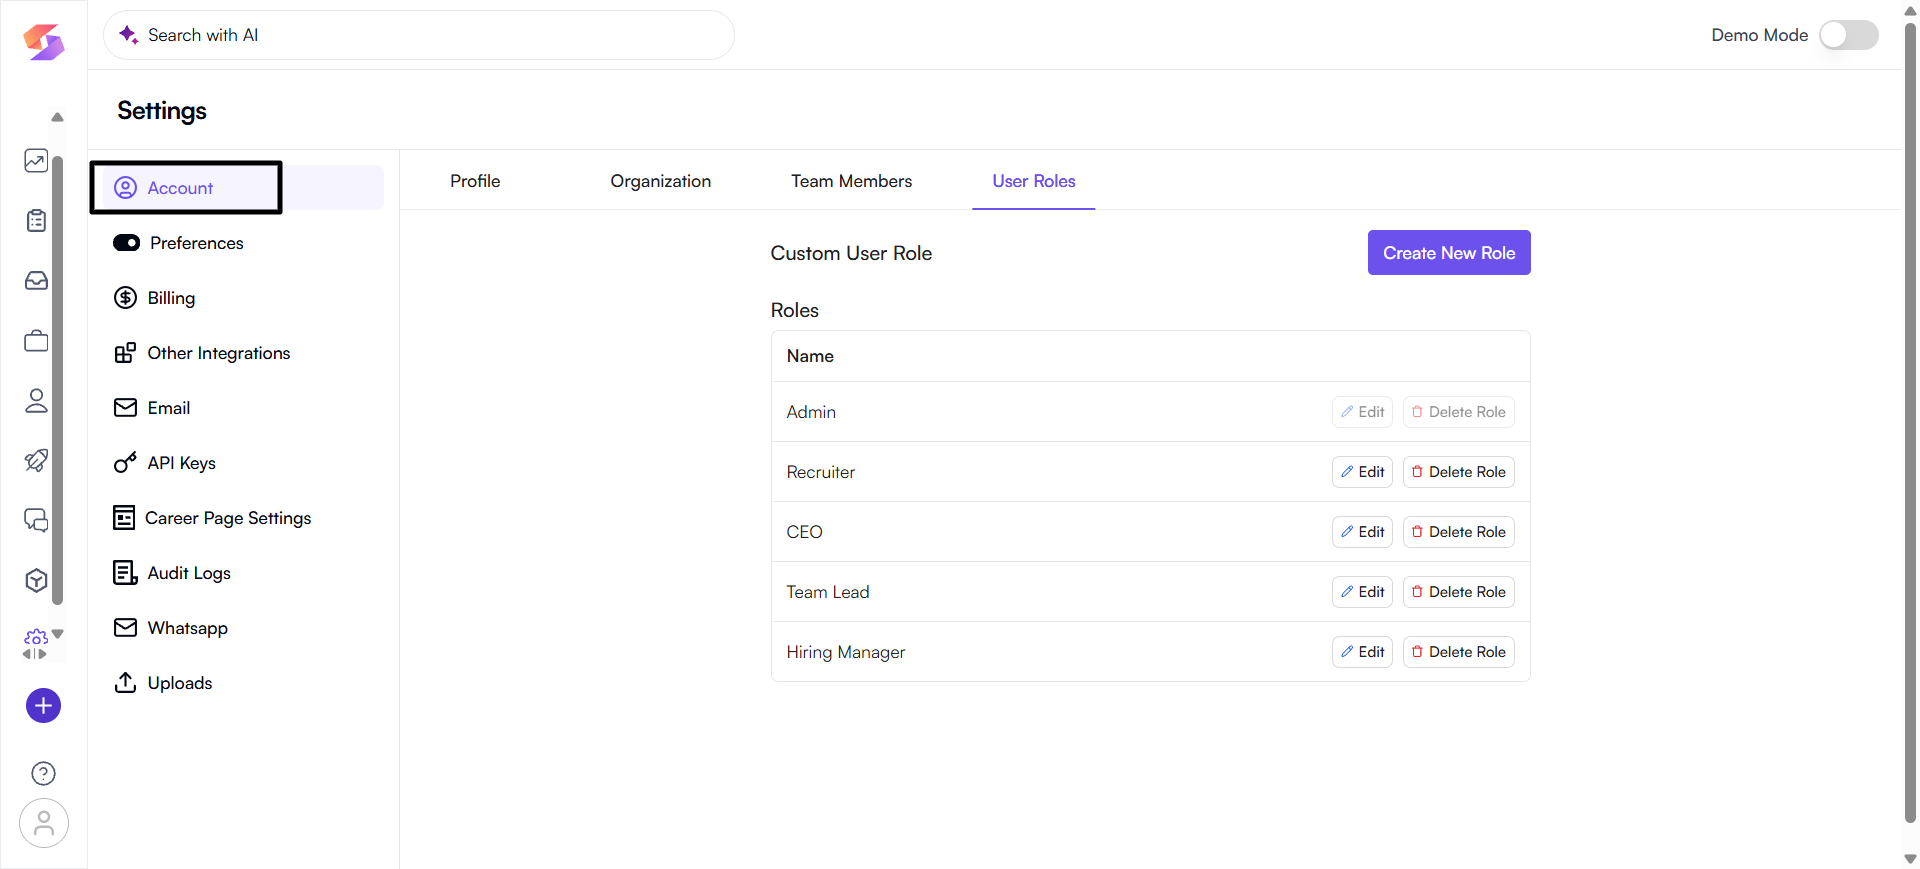
The Account Settings section is the central place to manage everything related to your account and organization. From updating your personal profile details to configuring organization branding, managing team members, and defining user roles, this area brings all account-related controls together in one place.
The Account menu is divided into four key tabs:
- Profile– Manage your personal information and password.
- Organization – Configure your organization name, favicon, and logo.
- Team Members – Invite, view, and manage users within your organization.
- User Roles – Define and customize roles with specific permissions.
1. Profile
The Profile tab contains user-specific settings.
Here you can:
- View and Edit Personal Details: Update your first and last name.
- Email Address: Displays the registered email (non-editable for security reasons).
- Change Password: Update your password by entering the old password, then setting and confirming the new one.
This ensures users can maintain secure and up-to-date account credentials.
2. Organization
The Organization tab is for managing organization-wide details.
Here you can:
- Organization Name: Update the name of your organization.
- Organization Fav-icon: Upload a small icon (max 100KB, PNG/JPEG/JPG/SVG/ICO) that appears in browser tabs.
- Organization Logo: Upload your organization’s logo (max 100KB, PNG/JPEG/JPG/SVG) to personalize the platform branding.
These settings help in maintaining consistent brand identity within the platform
3. Team Members
The Team Members tab manages users within the organization.
Here you can:
- View Active Members: See the list of all team members along with their assigned roles.
- Invite New Members: Use the Invite Member button to add new users by email by selecting their role.
- Role Assignment: Assign roles such as Admin, Recruiter, etc. to control access and permissions.
- Seat Count: Displays the total seats purchased and currently used.
This section helps administrators manage collaboration by controlling who has access to the platform and what permissions they hold.
4. User Roles
The User Roles tab allows customization of permissions and roles within the organization.
Here you can:
- Default Roles: Roles such as Admin, Recruiter, CEO, Team Lead, and Hiring Manager are available.
- Edit/Delete Roles: Modify permissions of existing roles or delete them when not needed.
- Create New Role: Define custom roles tailored to your team’s structure and needs.
This provides flexibility in managing responsibilities and access levels across your organization.
Preferences Settings
The Preferences section is where you can fine-tune the platform's behaviour to match your specific workflow and communication needs. This area is dedicated to customizing system-wide actions, from email automations to hiring stages and job status labels.
The Preferences menu is divided into** six **key tabs:
- General– Configure basic account settings like time-zone and job search preferences.
- Email Outreach – Manage and enable automated email communications for various hiring events.
- Credit Usage Limit – Set and monitor credit usage limits for your account.
- Hiring Stages – Define and organize the stages of your recruitment pipeline.
- Notifications– Control what types of updates you receive from the platform.
- Custom Job Status – Create and manage custom status labels for jobs.
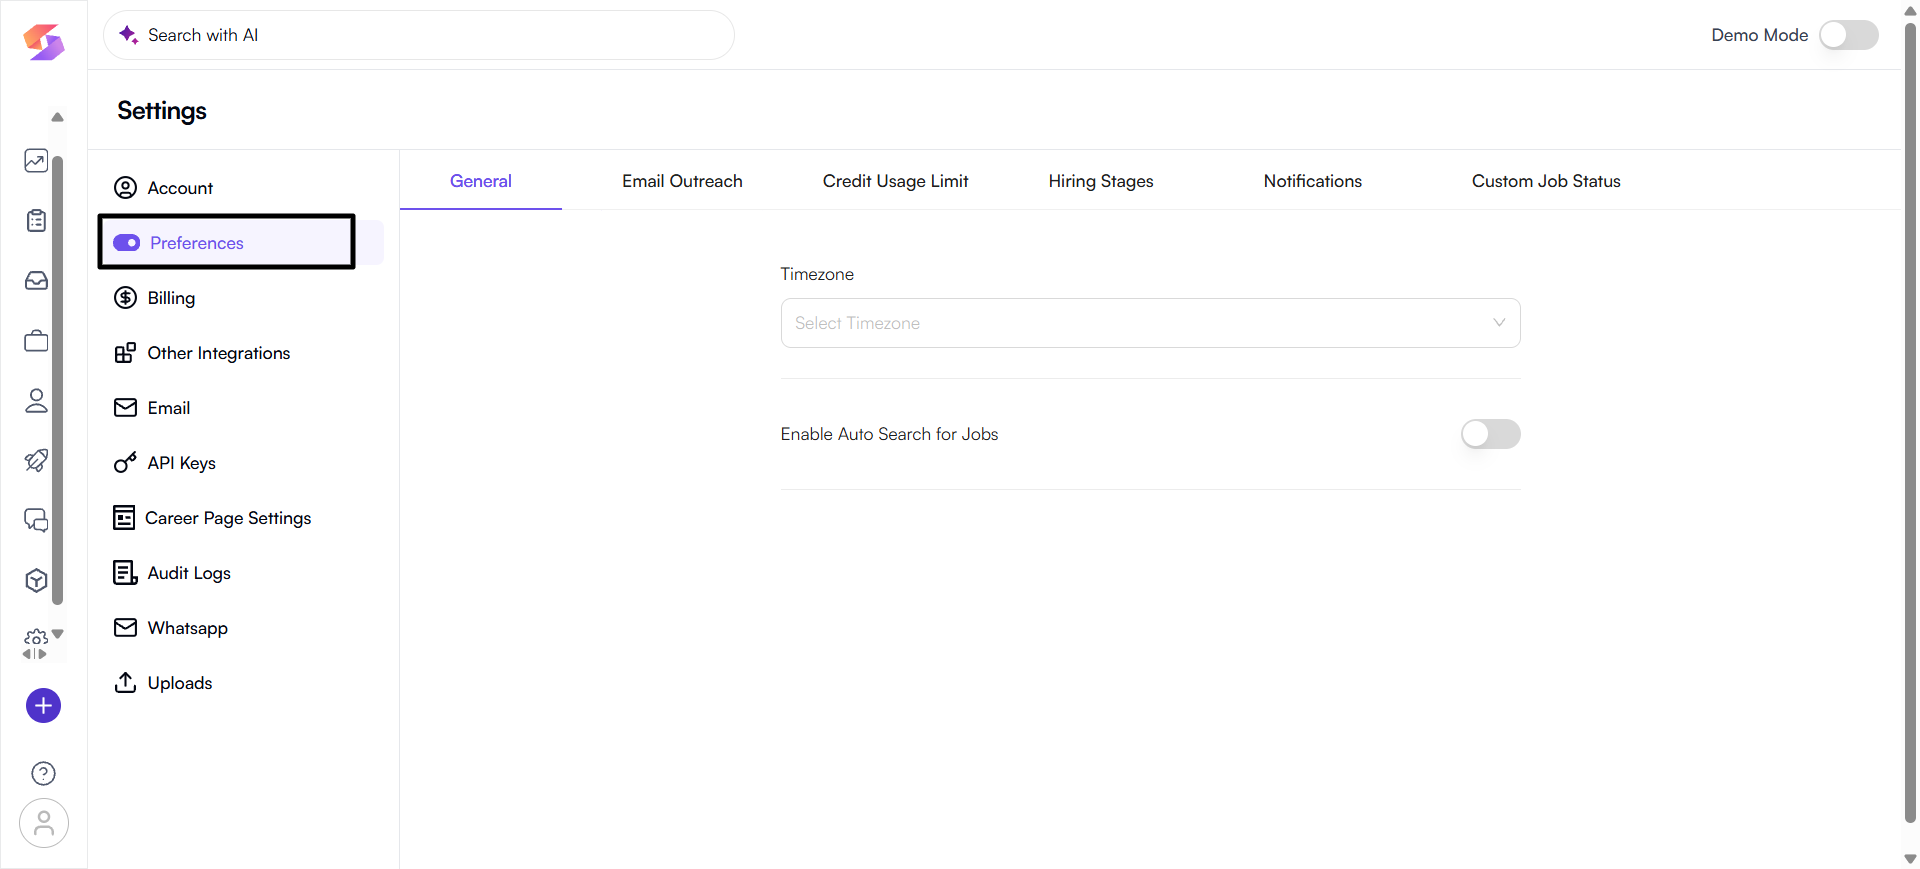
1. General
The General tab contains fundamental settings that affect your account's core functionality and display.
- Time-zone: This setting allows you to select your preferred timezone. By setting this, you ensure that all timestamps, scheduling, and logging within the platform are accurately reflected in your local time.
- Enable Auto Search for Jobs: This is a toggle switch that, when enabled, automatically triggers the system to search for relevant jobs based on your predefined criteria.
2. Email Outreach
The Email Outreach tab is the central hub for managing automated email communications. This feature helps you save time and ensure consistent communication with candidates and recruiters.
Here you can enable or disable automated email triggers:
- Send list of top candidates when a new job is created: When a new job is posted, the system will automatically analyse your database and send an email containing a ranked list of the most relevant candidates directly to your inbox.
- Send Bulk Emails to relevant candidates: This automation sends a mass email to a curated list of candidates from your database when a new job is created. It's an efficient way to notify a broad pool of potential applicants about a new opening.
- Send email to recruiter whenever a candidate applies for a published job: This feature ensures that recruiters are immediately notified when a candidate applies through a public job link. The system sends an automated email notification, allowing for prompt follow-up.
- Send automated email to shortlisted candidates: Once a candidate is moved to the "shortlisted" stage, an automated email can be sent to them. This helps in keeping candidates informed about their application status and the next steps in the hiring process.
3. Credit Usage Limit
The Credit Usage Limit tab is designed to help you monitor and manage your platform's credit consumption.
Here you can:
- View Usage: See a detailed breakdown of your current credit usage.
- Set Limits: Define a maximum credit limit to prevent overages and control spending.
4. Hiring Stages
The Hiring Stages tab allows you to customize the different steps in your hiring process. By creating and arranging these stages, you can accurately track a candidate's progress through the pipeline.
Here you can:
- Create New Stage: Add a new, custom stage to your pipeline that aligns with your specific recruitment process.
- Edit: Modify the name or other properties of an existing stage.
- Delete: Remove a stage that is no longer needed.
- Reorder: Change the sequence of the stages by dragging and dropping them, which updates the visual representation of your hiring pipeline.
5. Notifications
The Notifications tab lets you control the types of informational and marketing updates you receive from the platform.
Here you can:
- Send me marketing tips and news about Skima updates: By checking this box, you opt in to receive regular emails with helpful marketing tips and important news about new features, improvements, and other updates to the platform
6. Custom Job Status
The Custom Job Status tab allows you to define and manage the different statuses for your job postings. This is useful for organizing and filtering jobs based on their current state (e.g., Active, On Hold, Rejected).
Here you can:
- Create New Status: Add new status labels tailored to your organization's specific needs.
- Pre-defined Statuses: The platform comes with several default statuses, such as Active, Published, On hold, Approved, Rejected, Pending Approval, and Closed.
- Edit/Delete: You can modify the properties of custom statuses or delete them if they are no longer required.
Billing
The Billing section is where you manage all aspects of your subscription, payments, and credit usage. It is divided into four main tabs:
- Overview
- Saved payment modes
- Invoices
- Billing Settings
1. Overview
This tab gives you a summary of your account's financial status.
- Available Credits: Displays your current credit balance. You can also click Add Credits to purchase more.
- Subscription Plan: Shows your current plan (e.g., "FREE Subscription Plan") with an option to Upgrade to Premium.
- Recent Credit Usage: A log of all recent actions that consumed credits, including the action taken (e.g., Profile View, Phone, Email View) and the number of credits used.
2. Saved payment modes
This section allows you to manage your saved payment methods.
- Add New Card: Use this button to securely add a new credit or debit card for future payments.
- Saved Cards: Displays a list of all payment cards you have saved.
3. Invoices
This tab provides a history of your billing and payments.
- View Invoices: Displays a list of all your invoices, including the invoice number, date, and amount.
- Status: Shows whether an invoice has been paid (e.g., "Paid").
4. Billing Settings
This section is for configuring your billing details.
- Organization Name: The name that will appear on your invoices.
- Billing Email: The email address where invoices and billing notifications are sent.
- Billing Address: The physical address of your company, used for calculating sales tax. This includes fields for street address, city, state, zip code, and country.
Other Integrations
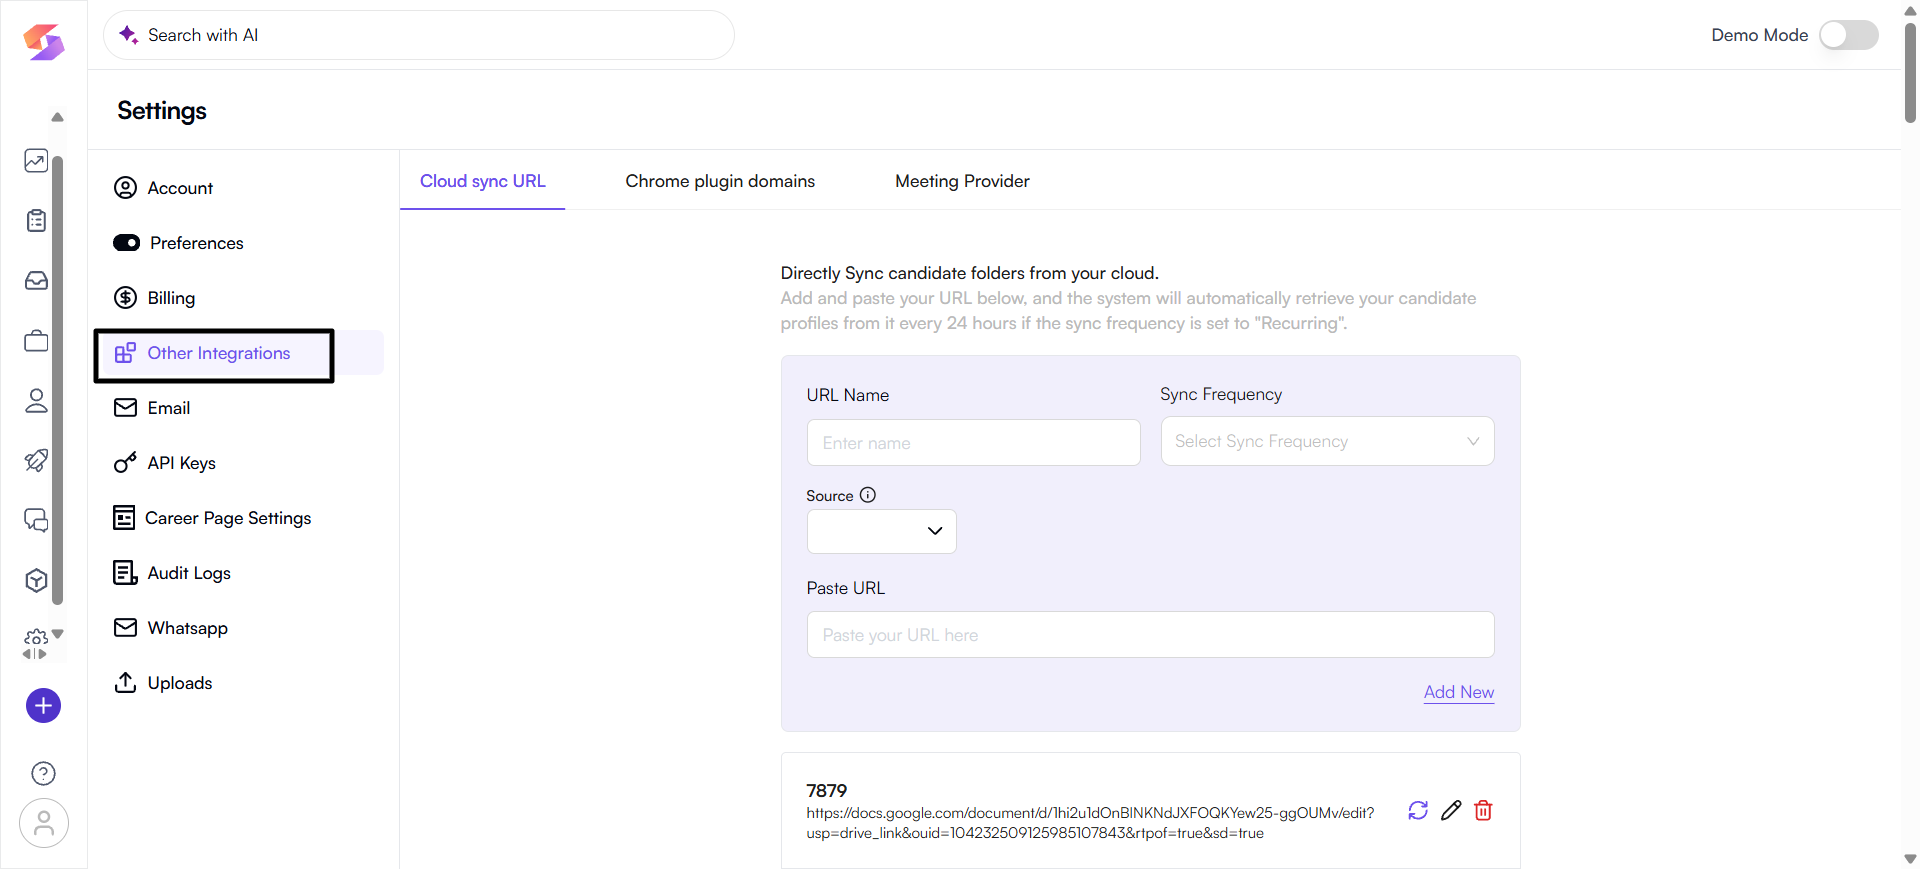
The Other Integrations section allows you to connect the platform with various third-party services to enhance your workflow and data synchronization. This area is divided into four main tabs:
- Cloud sync URL
- Chrome plugin domains
- Meeting Provider
- LinkedIn email forwarding
1. Cloud sync URL
This tab enables you to sync candidate folders directly from your cloud storage.
- Functionality: You can add a URL from a cloud folder (e.g., Google Drive) and the system will automatically retrieve candidate profiles from it every 24 hours.
- Configuration: You need to provide a URL Name, select a Sync Frequency, specify the Source (cloud service), and Paste URL.
- List of Sync URLs: A list of previously configured sync URLs is displayed, showing the URL name, the link, and options to edit or delete them.
2. Chrome plugin domains
This section manages the domains where the platform's Chrome plugin is active.
- Functionality: You can request to enable the Chrome plugin on specific websites.
- Domain List: It shows a list of domains (e.g., lever.com, naukri.com, indeed.com) with their status.
- Status: The status can be Approved (plugin is active) or Domain requested (awaiting approval).
- Request a domain: Use this button to submit a new domain for plugin activation.
3. Meeting Provider
This tab is for integrating a meeting service with the platform.
- Functionality: Connect your meeting provider to easily schedule meetings within the platform.
- Providers: Shows a list of available providers, such as Zoom.
- Status: Displays the connection status.
- Action: The Connect button allows you to link your account with the meeting provider.
Email
The Email section is where you manage email accounts for campaign sending and create reusable email templates. This area is divided into two main tabs:
- Campaign Email Configuration
- Templates
1. Campaign Email Configuration
This tab is for managing the email accounts used to send out campaigns.
- Create Email Account: Use this button to add a new email account.
- Current Email Accounts: This table displays all connected email accounts, showing:
a. Email Account Id: A unique identifier for the account.
b. Created on: The date and time the account was added.
c.** Management type:** How the account is managed (e.g., "Organization Managed").
d. Sending Method: The service used to send emails (e.g., "Skima," "Google").
e. Status: The current status of the account (e.g., "Pending").
2. Templates
This section allows you to create and manage email templates for different purposes.
- Create New Template: Use this button to design a new, custom email template.
- Template List: Displays a list of existing templates.
a. Each entry shows the template name and a brief description (e.g., "Default Template for sending shortlisting email to candidate").
b. An edit icon allows you to modify the template.
API Keys
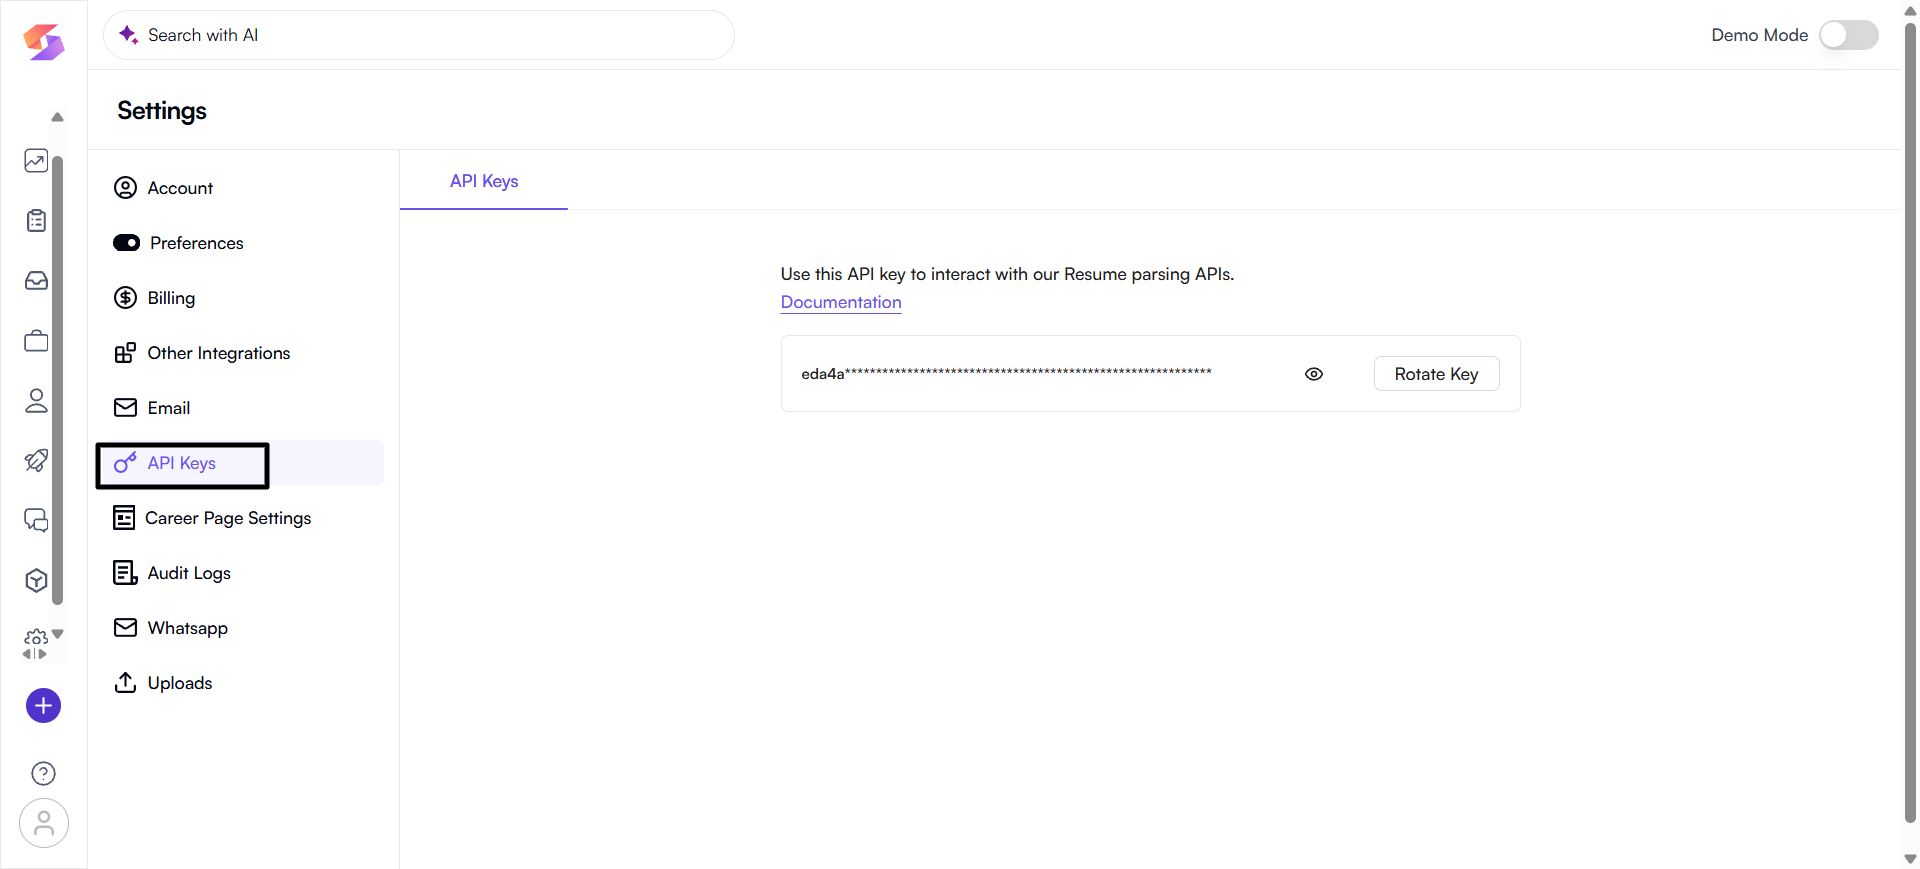
The API Keys tab is a powerful tool for clients who want to integrate the platform's core technology directly into their own systems. An API key is like a unique, secret password that allows your external applications such as your company's career page or your internal database to securely communicate with our platform's services.
The primary use of this API key is to access our Resume Parsing APIs. This means you can automatically send resumes to the platform, and our system will extract all the key information for you.
Where to find your API Key?
Your unique API key is located in the Settings menu.
- In the left-hand navigation, click the gear icon for Settings.
- Select the API Keys tab.
- Your key will be displayed, partially hidden for security reasons.
Managing Your Key Securely
Your API key is essential for keeping your data secure. Treat it like a password.
- Rotate Key: If you believe your key has been compromised or if you are updating your security policies, you can generate a new one instantly by clicking the Rotate Key button. This will deactivate the old key and create a brand new one.
How the API is Used (API Functionality)
The API key grants you access to a set of powerful endpoints that automate the resume parsing process. Here are the key things you can do with our API:
1. Parse a single resume
- Purpose: This is for handling one-off resume uploads. For example, when a candidate applies through your website and submits their resume, your system can use this API to send that single resume to us for parsing.
- Benefit: It instantly extracts all the important information (like contact details, work experience, and skills) from the resume and returns it in a structured format, saving you from manual data entry.
2. Parse multiple resumes (in bulk)
- Purpose: This is for efficiently processing large batches of resumes. For instance, if you have a folder of hundreds of resumes from an event or a previous campaign, you can send them all to our API in a single request.
- Benefit: It saves a huge amount of time by allowing you to process many documents at once, automating a typically time-consuming task.
3. Check the status of a parsing job
- Purpose: After you submit a request to parse multiple resumes, the job may take some time to complete. This API allows your system to periodically check on the status of that job.
- Benefit: You don't have to wait for the entire process to finish. Your system can query the status and know exactly when the results are ready to be retrieved.
4. Get the overall status
- Purpose: This API provides information about the overall status of your parsing tasks, giving you a high-level overview of what's currently in progress.
- Benefit: It helps you monitor your API usage and the status of ongoing jobs, ensuring that your automated processes are running smoothly.
Career Page Settings
The Career Page Settings section allows you to customize the public-facing career page for your organization. This includes configuring basic information, domain settings, and branding.
1. Basic Information
This section is for providing fundamental details that will be displayed on your career page.
- Name: The name of your organization.
- Description: A brief description of your organization.
- Website/URL: The URL of your organization's official website.
2. Domain Configuration
This section lets you set up the web address for your career page.
- Use a SIGMA AI Subdomain: You can use a recommended subdomain provided by the platform (e.g., careers-jobs.skima.ai).
- Custom Domain: The platform also offers instructions on how to set up your own custom domain.
3. Branding & Appearance
This section is for personalizing the visual identity of your career page.
- Primary Color: Select a primary color to match your brand's color scheme.
- Organization Favicon: Upload a small icon (max 100KB, PNG/JPG/JPEG/SVG/ICO) that appears in browser tabs.
- Organization Logo: Upload your organization's logo (max 100KB, PNG/JPG/JPEG/SVG) for branding on the page.
- Career Page Banner: Upload a banner image (Aspect Ratio: 4:8) to serve as a prominent header on your career page.
- Query successful
Audit Logs
The Audit Logs section provides a chronological record of all significant activities within the platform. This feature is crucial for tracking user actions, monitoring system changes, and maintaining accountability.
Filters: You can filter the logs to find specific events.
- All Members: Filter by a specific user.
- All Actions: Filter by the type of action performed (e.g., Create, Update, Delete).
- Date Range: Specify a start and end date to view logs within a certain period.
- Log Table: The main table displays the audit trail with the following columns:
- Name: The name and email of the user who performed the action.
- Event: The type of event that occurred (e.g., Create, Update).
- Actions: The specific action related to the event (e.g., Create, Job, Logged In).
- Created on: The date and time the event took place.
- Description: A detailed description of the action, including what was changed or created.
This section provides transparency and a clear history of all activities on the platform.
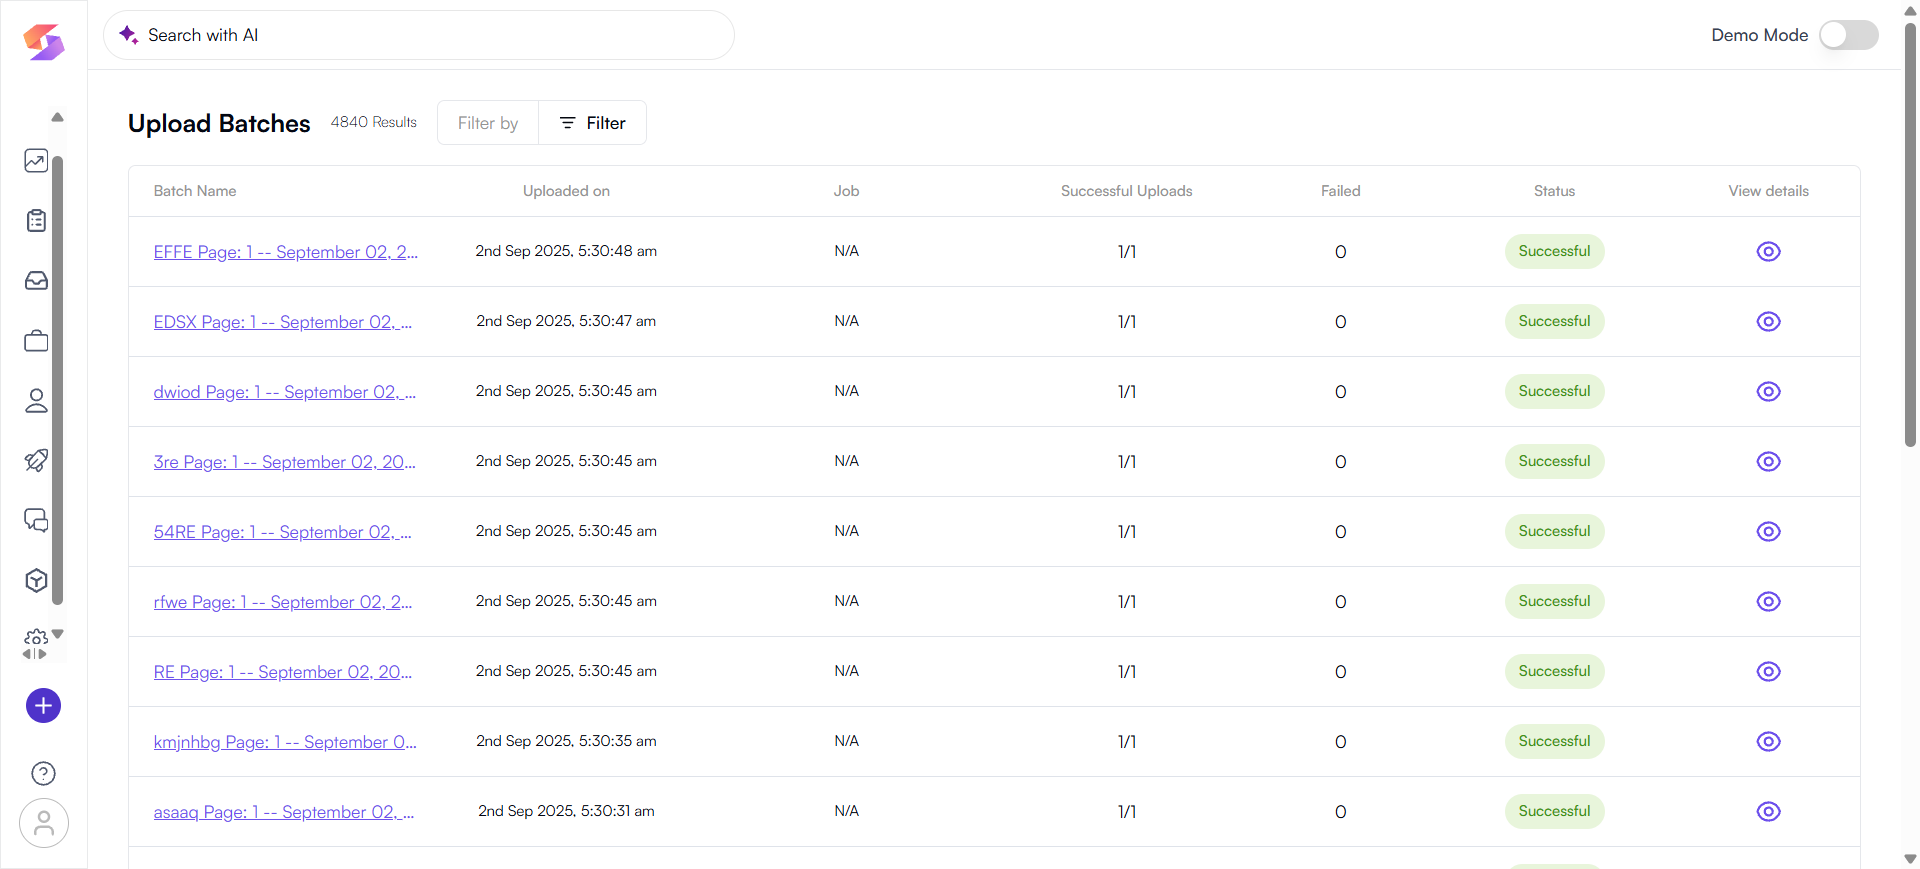
Upload Batches
The Upload Batches section logs all data imports.
- Filters: Use the Filter button to search by Status or Job. You can also search for a specific Batch name.
The table displays the details of each upload, including the batch name, upload date, associated job, success/failure counts, and overall status.
