Tabs and Filters
Jobs List View
The Jobs List View acts as the central workspace for managing all active, closed, draft, and synced jobs inside Skima AI. From this page, recruiters can search, filter, organize, sort, and manage jobs before opening an individual role workspace.
Recruiters can also control how job data is displayed, configure custom table views, manage approvals, and access additional job-level actions directly from this page.
view More
Job Filters
At the top of the Jobs page, recruiters can filter jobs using multiple criteria to quickly locate relevant roles across large hiring pipelines.
Available filters include Source ID, Job Status, ATS Status, Location, Created Date Range, Client, Primary Recruiter, Open or Closed Jobs, Custom Fields, and deleted jobs visibility.
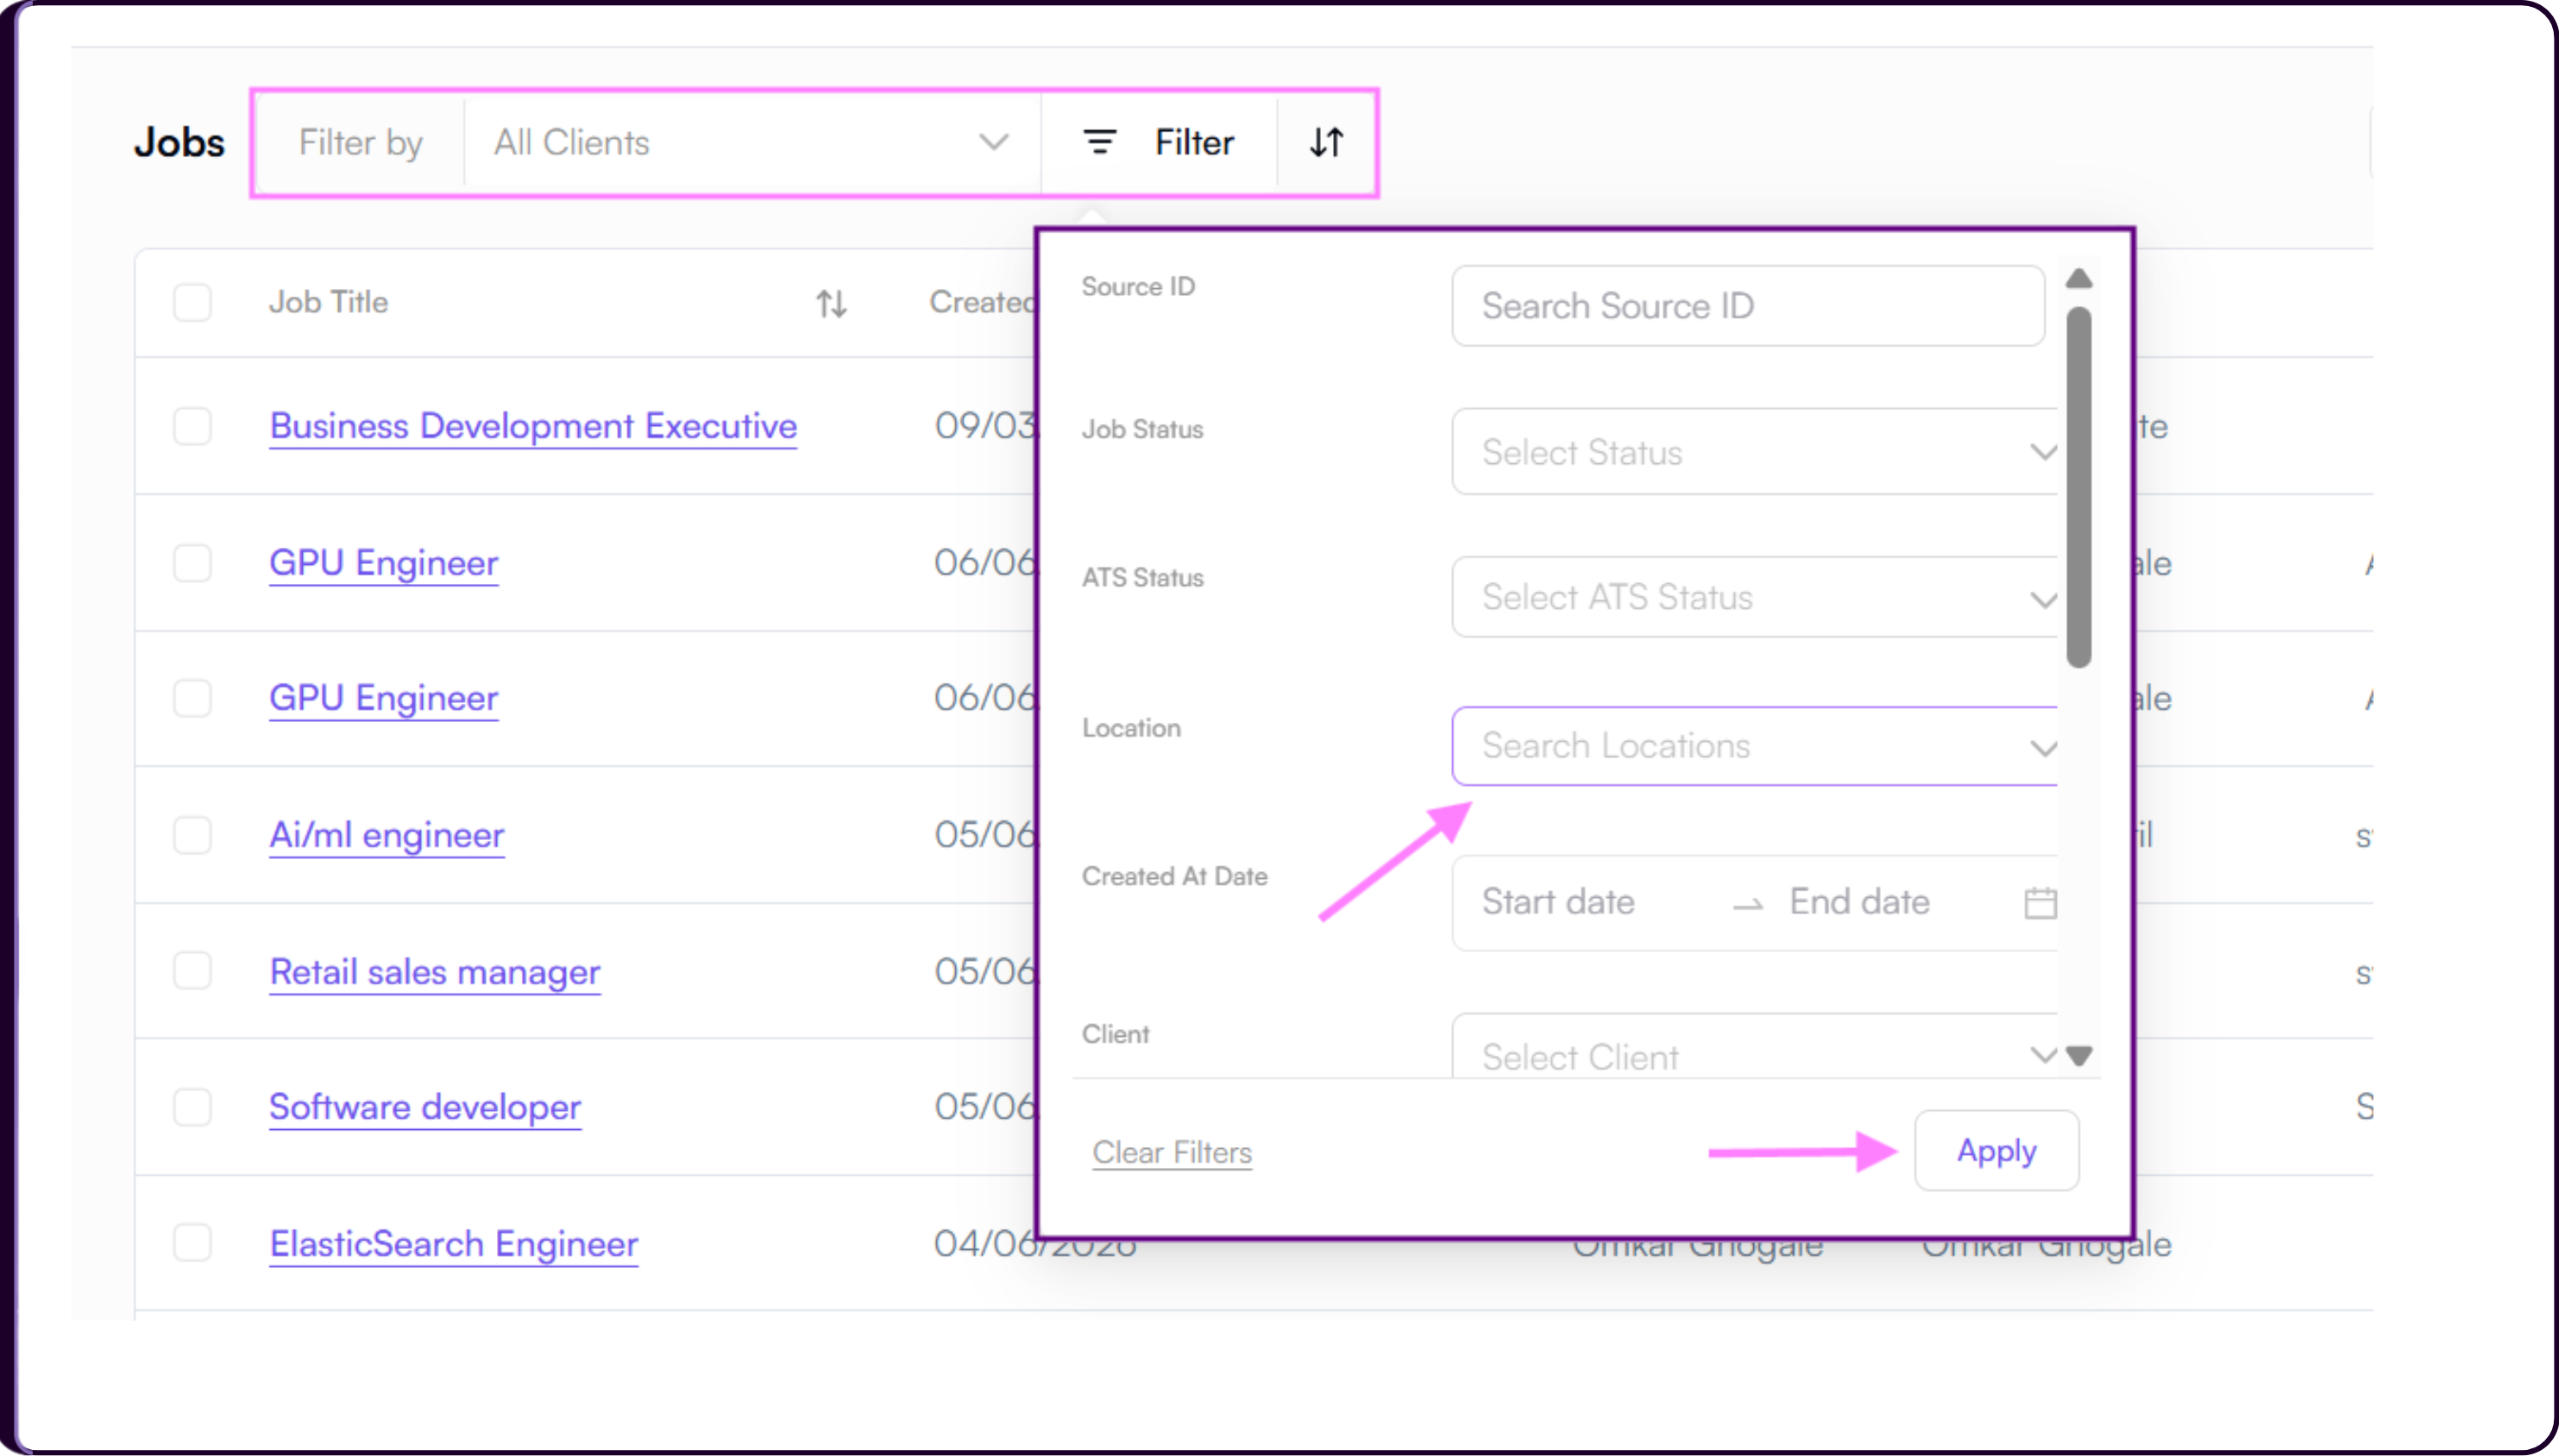
These filters help recruiters narrow down jobs based on ownership, ATS sync status, geography, workflow stage, or internal operational fields configured within the organization.
- Select the required filters.
- Click on 'Apply' to view matching jobs.
- Use 'Clear Filters' anytime to reset all active filters.
Search Jobs
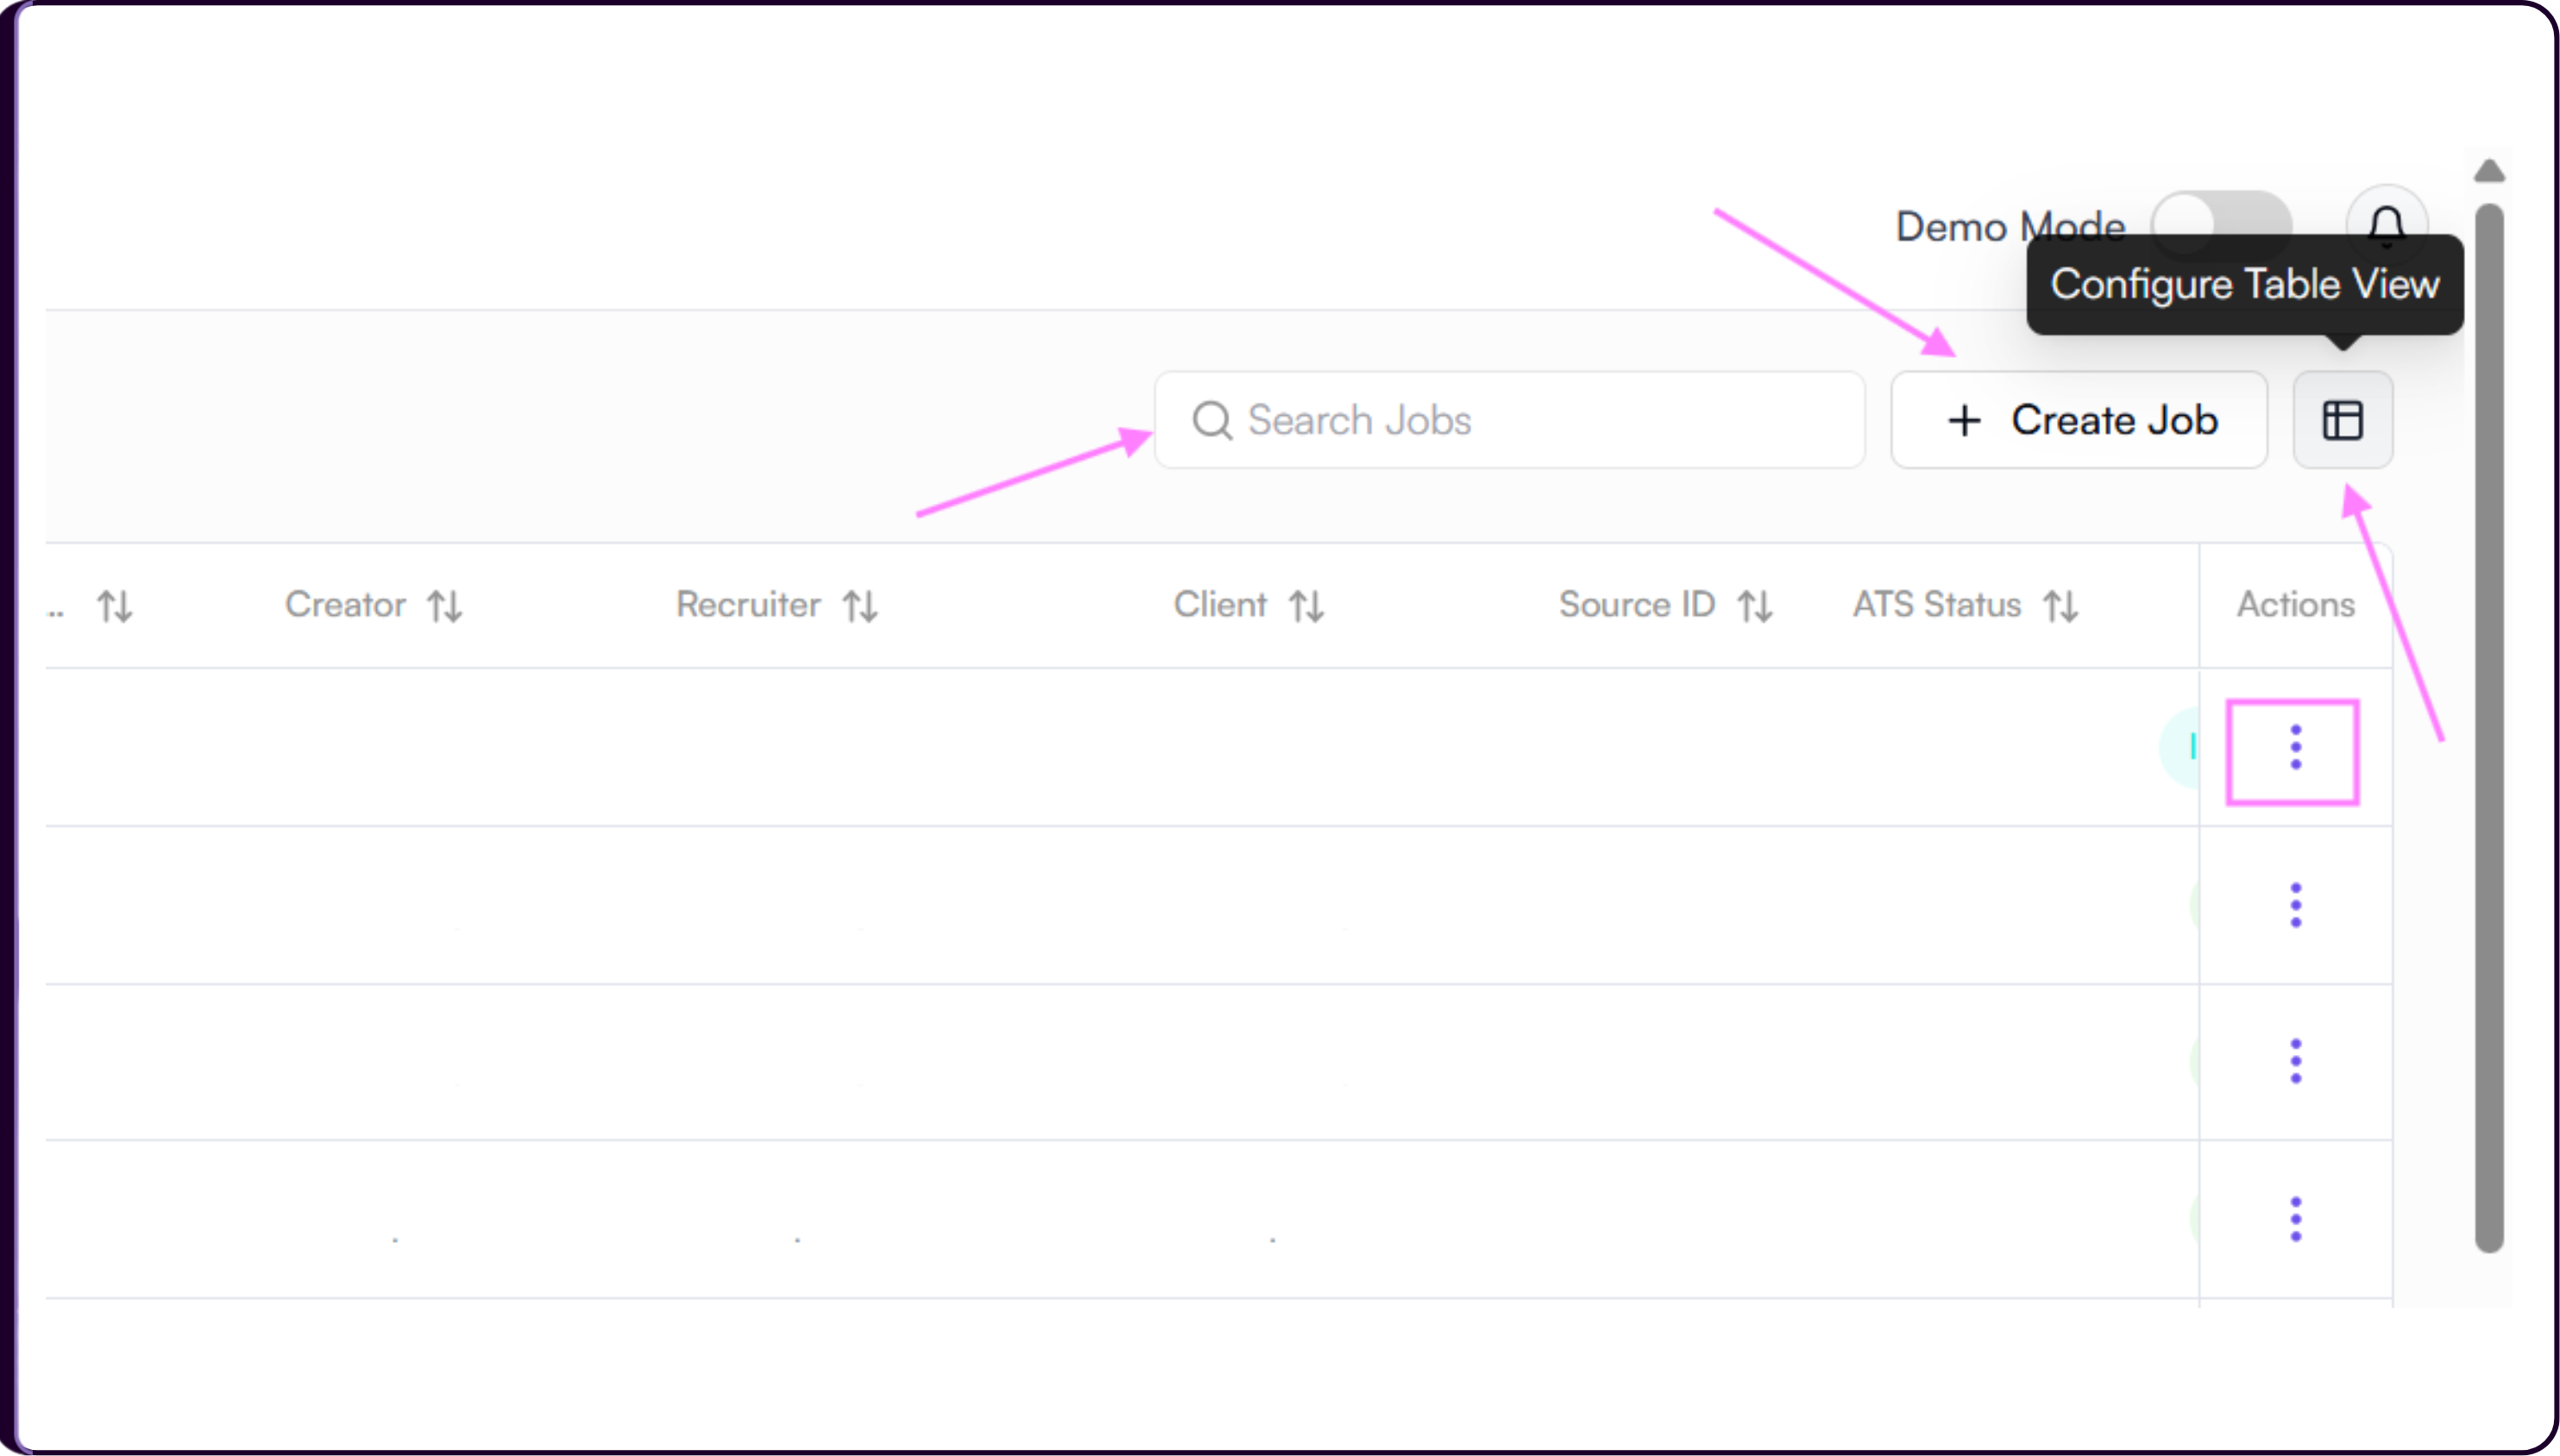
The search bar allows recruiters to quickly locate jobs by searching job titles or related identifiers without manually browsing the entire jobs list.
This becomes especially useful for organizations managing large hiring pipelines across multiple recruiters, departments, or clients.
Create Job
Click on 'Create Job' to start creating a new role inside Skima AI.
This opens the complete job creation workflow where recruiters can add job details, upload or generate a Job Description, configure screening logic, apply AI calibration, and begin candidate screening.
Configure Job Table View
Recruiters can customize how the jobs table appears using 'Configure Job Table View'.
This section allows recruiters to toggle column visibility, reorder columns, and control which custom fields appear inside the jobs table.
Any custom fields added from Settings automatically become available here for display configuration. This helps teams personalize the table view based on their workflow and reporting preferences.
Default Job Table Columns
The jobs table displays important operational information for every role including Job Title, Created On, Application Count, Creator, Recruiter, Source ID, ATS Status, Status, and Location.
These columns help recruiters quickly review job activity, ownership, hiring progress, and ATS synchronization status without opening the role individually.
Recruiters can sort job data directly from the table headers. Clicking the arrow icons beside a column name switches the sorting order between ascending and descending values. This helps recruiters quickly organize jobs by latest activity, oldest jobs, application volume, creation date, or other visible fields.
Job Actions Menu
On the extreme right side of every job row, recruiters will find the Actions menu represented using the three-dots icon.
This column remains fixed and cannot be removed from the table configuration view.
The Actions menu provides quick access to important workflows without opening the full job workspace.
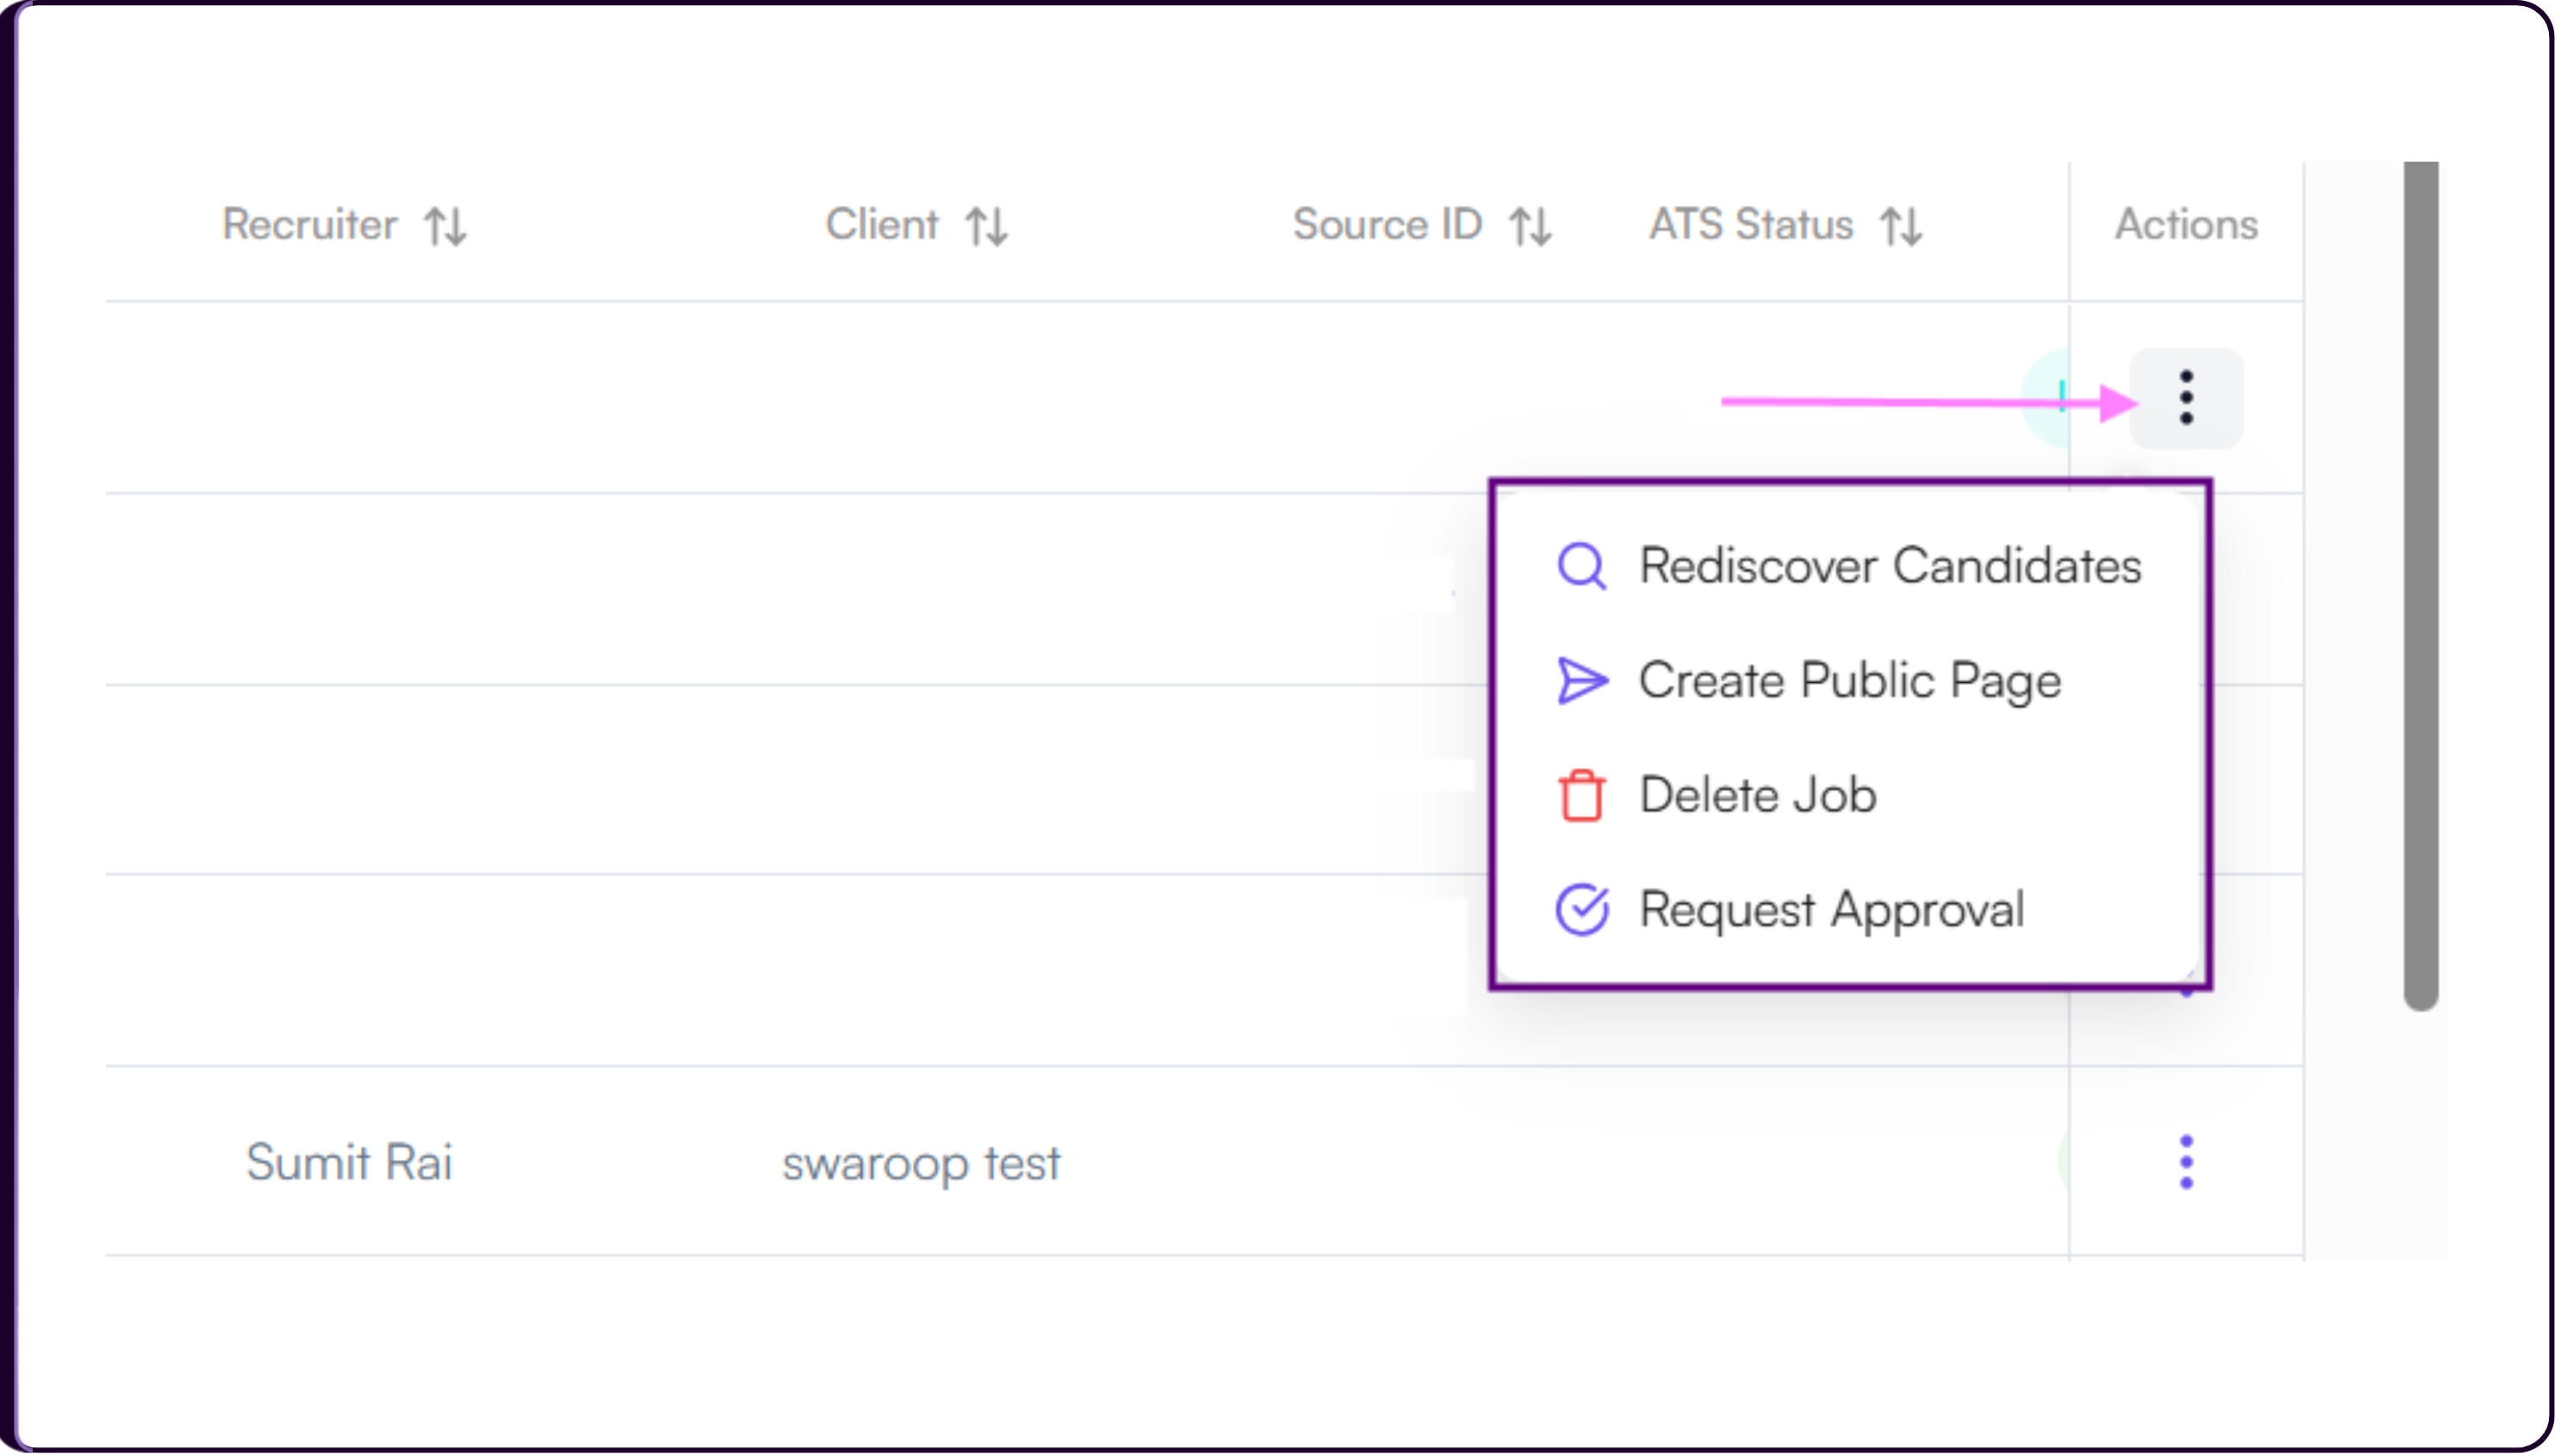
Rediscover Candidates
Allows recruiters to run candidate rediscovery workflows against the existing database to identify previously screened or existing candidates who may match the current role.
Create Public Page
Generates a public job posting page that can be shared externally for candidate applications and hiring campaigns.
Delete Job
Allows recruiters to permanently remove jobs that are no longer active or required.
- Open the three-dots menu beside the job.
- Click on 'Delete Job'.
- Confirm the deletion request.
Deleting a job is a permanent action. Ensure the role is no longer required before confirming deletion.
Request Approval
The Request Approval workflow allows recruiters to send the generated Job Description to hiring managers or stakeholders for review and approval.
Recruiters can either send approval requests via email or directly share a generated magic link without email communication.
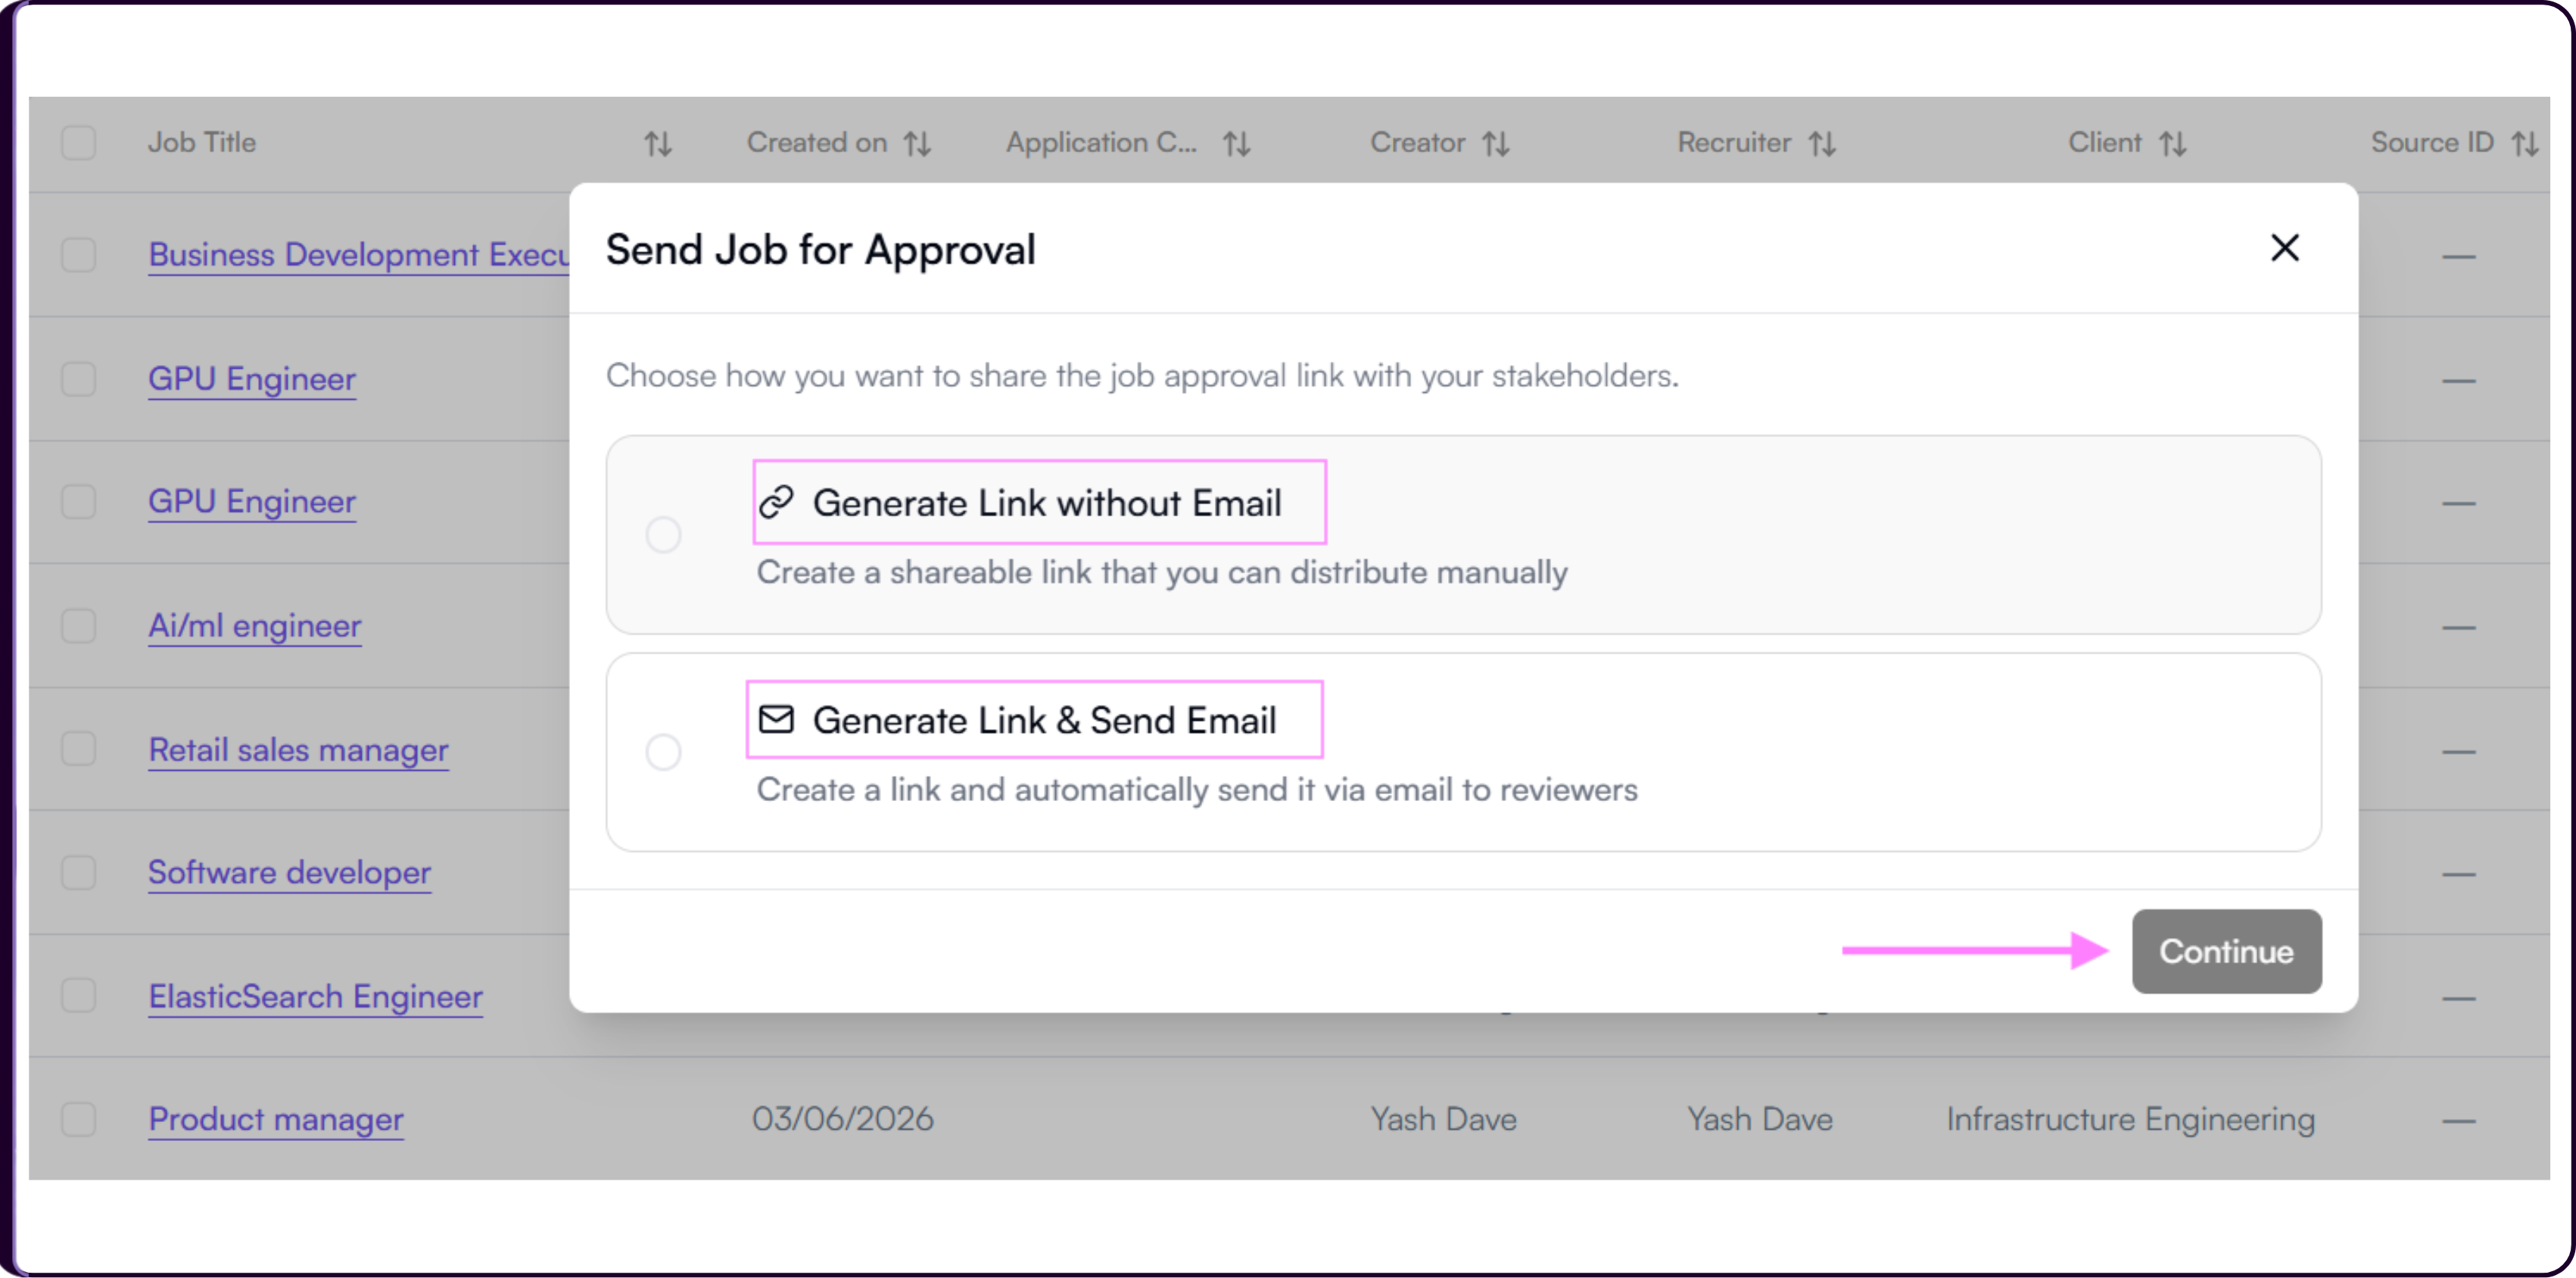
From the approval interface, hiring managers can review the complete Job Description, edit the content, add notes or comments, and approve or reject the role with feedback.
This helps create a more collaborative and structured hiring approval workflow before candidate screening begins.
- Open the three-dots menu beside the job.
- Click on 'Request Approval'.
- Choose whether to send the request via email or share a magic link directly.
- Share the approval request with the hiring manager or stakeholder.
1. View Candidates
The View Candidates tab is the primary workspace recruiters use to screen, review, shortlist, communicate with, and manage applicants for a specific role. This section centralizes candidate insights, AI scoring, screening filters, interview scheduling, recruiter collaboration, and application workflow management inside a single interface.
View more
Job Header
The top section of the View Candidates page contains the primary job controls and recruiter actions required for managing the hiring workflow.
i) Job Details Recruiters will first see the job name, which can be edited anytime using the pencil icon. Alongside the title, the current job status such as Active or Inactive is displayed along with the location configured in the Job Description.
ii) Assign To The Assign To section displays the recruiter who originally created the role. Using the plus icon, recruiters can additionally assign or update the primary recruiter, secondary recruiter, or hiring manager responsible for the role.
iii) Create Job Posting Clicking on 'Create Job Posting' opens the publishing workflow for the role so recruiters can make the position publicly accessible to candidates.
Refer to the detailed Publishing Jobs guide for the complete workflow.
iv) Export Candidates The Export Candidates icon allows recruiters to download the candidate list for the job in CSV format for reporting, sharing, or offline analysis.
v) Upload Resume The Upload Resume option helps recruiters manually upload candidate resumes directly into the job for screening and scoring.
Refer to the Add Candidates to the Job section from the Create Job guide for the complete upload workflow.
vi) Actions Menu The three-dots Actions menu provides additional job-level controls including Talent Rediscovery, Update Job Status, and Update Job Workflow for managing hiring stages and pipeline structure.
Job Workspace Tabs
Below the job header, recruiters will see the primary workspace tabs used to navigate different parts of the hiring workflow. These include View Kanban, View Candidates, View JD, View Screening Questions, and View Interviews.
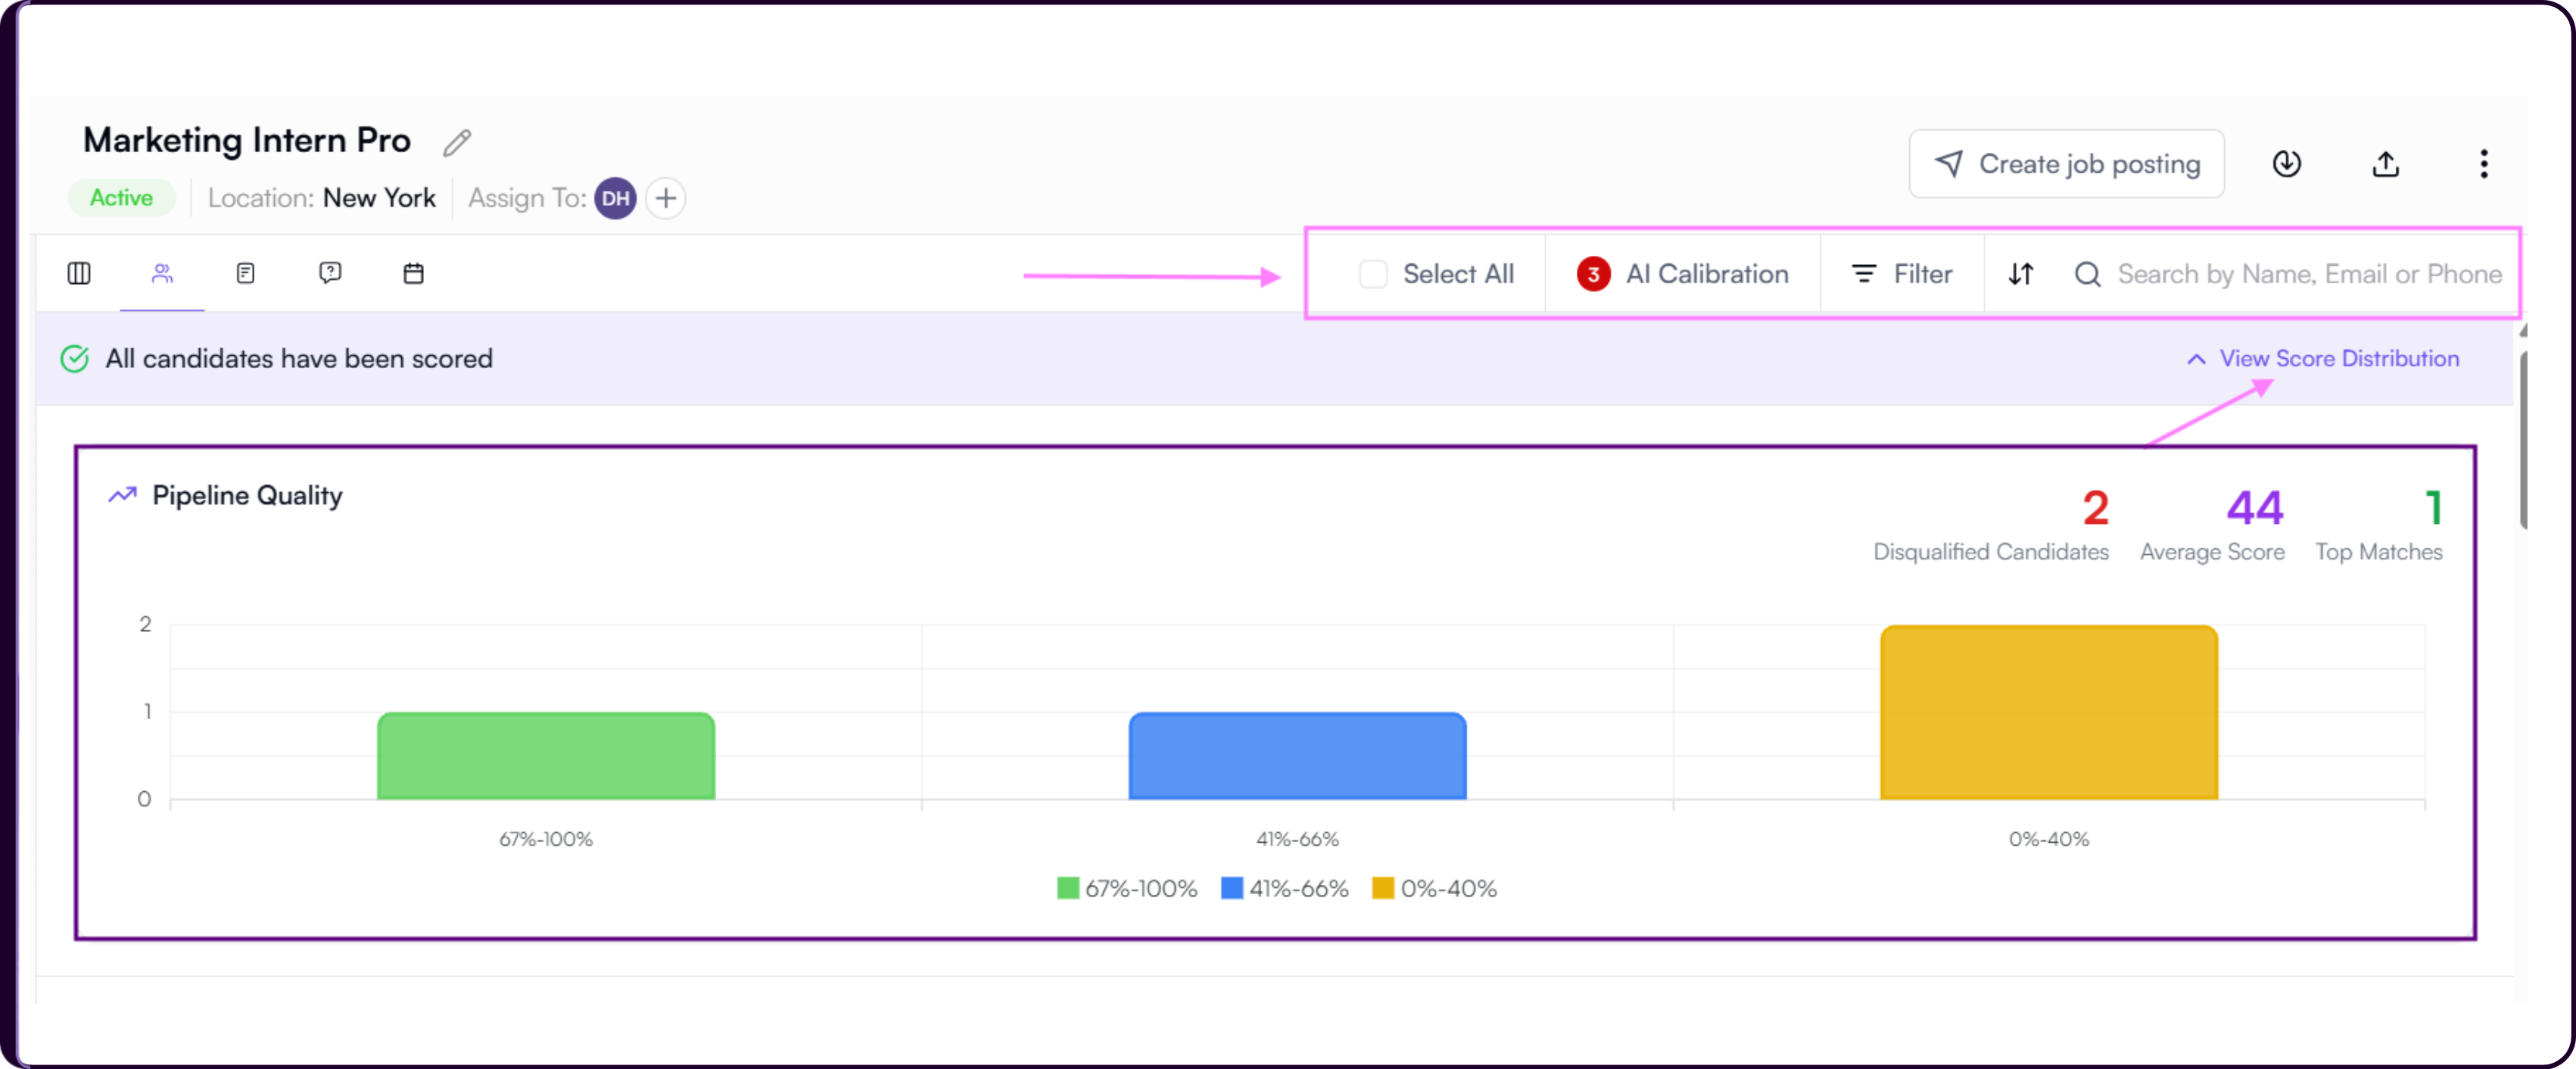
Candidate Selection and AI Calibration
The Select All checkbox allows recruiters to select all visible candidates at once. This is commonly used for bulk actions such as moving candidates, sending profiles for hiring manager approval, or managing large candidate pipelines faster.
The AI Calibration button displays all active and inactive knockout filters currently configured for the job. Recruiters can quickly toggle filters on or off to reassess candidates without editing the Job Description itself. If deeper screening changes are required, navigate to the View JD tab to edit screening logic, update calibration requirements, and regenerate candidate scoring conditions.
Filters and Sorting
Clicking on Filter opens the candidate filtering modal where recruiters can narrow down applicants using multiple hiring conditions and candidate attributes.
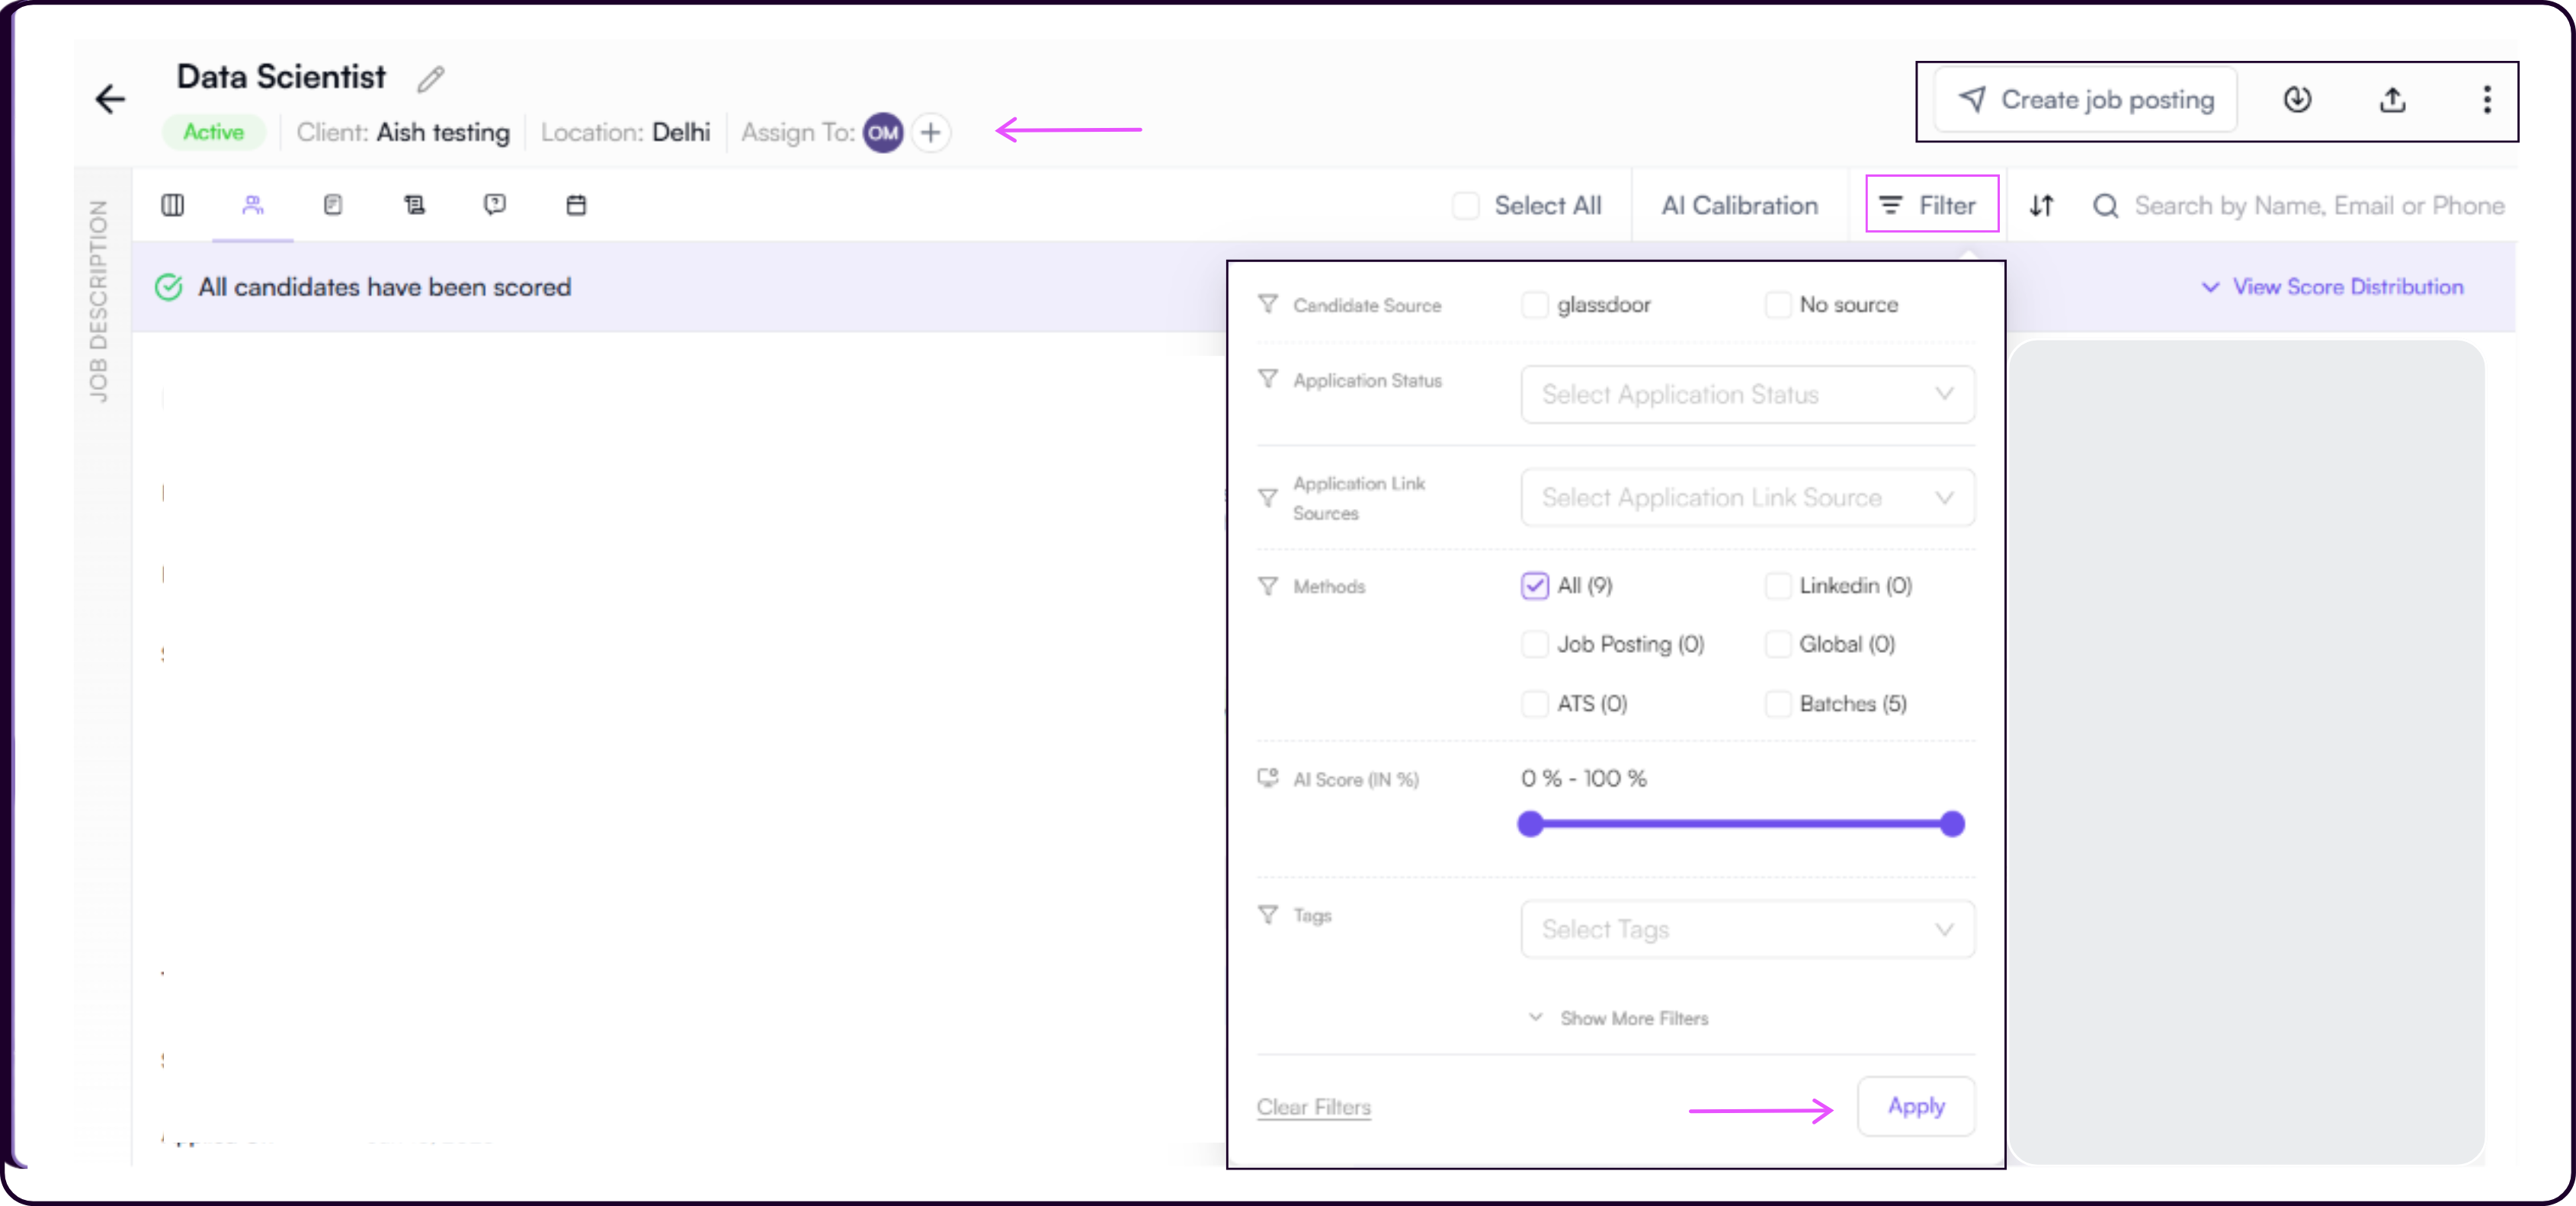
Recruiters can filter candidates based on
- Candidate Source to identify where applicants were sourced from,
- Application Status to review candidates within a specific hiring stage,
- Application Link Source and Methods to understand how candidates entered the pipeline,
- AI Score to focus on stronger or weaker profile matches,
- Tags to group candidates using internal labels,
- Experience, Salary, Notice Period, and Location to shortlist candidates based on operational hiring requirements,
- Education and Screening Question responses to validate qualification fit, and
- Custom Fields to filter candidates using organization-specific hiring data.
After selecting the required conditions, click 'Apply' to update the candidate list instantly.
Sort By
The Sort By option helps recruiters organize candidates by JD Fit Score to review the strongest AI-matched candidates first, Application Status to group candidates according to pipeline stages, or Uploaded Date to prioritize recently added applicants.
Search Bar
The search bar allows recruiters to quickly locate candidates using their name, email address, or phone number.
View Score Distribution
This section provides a summarized breakdown of the hiring pipeline showing Disqualified Candidates to understand how many applicants failed knockout or screening conditions, Average Score to measure the overall quality of the applicant pool, and Top Matches to identify the strongest AI-matched candidates for the role.
Candidate Card View
Each candidate card provides a fast and structured screening overview directly inside the workspace.
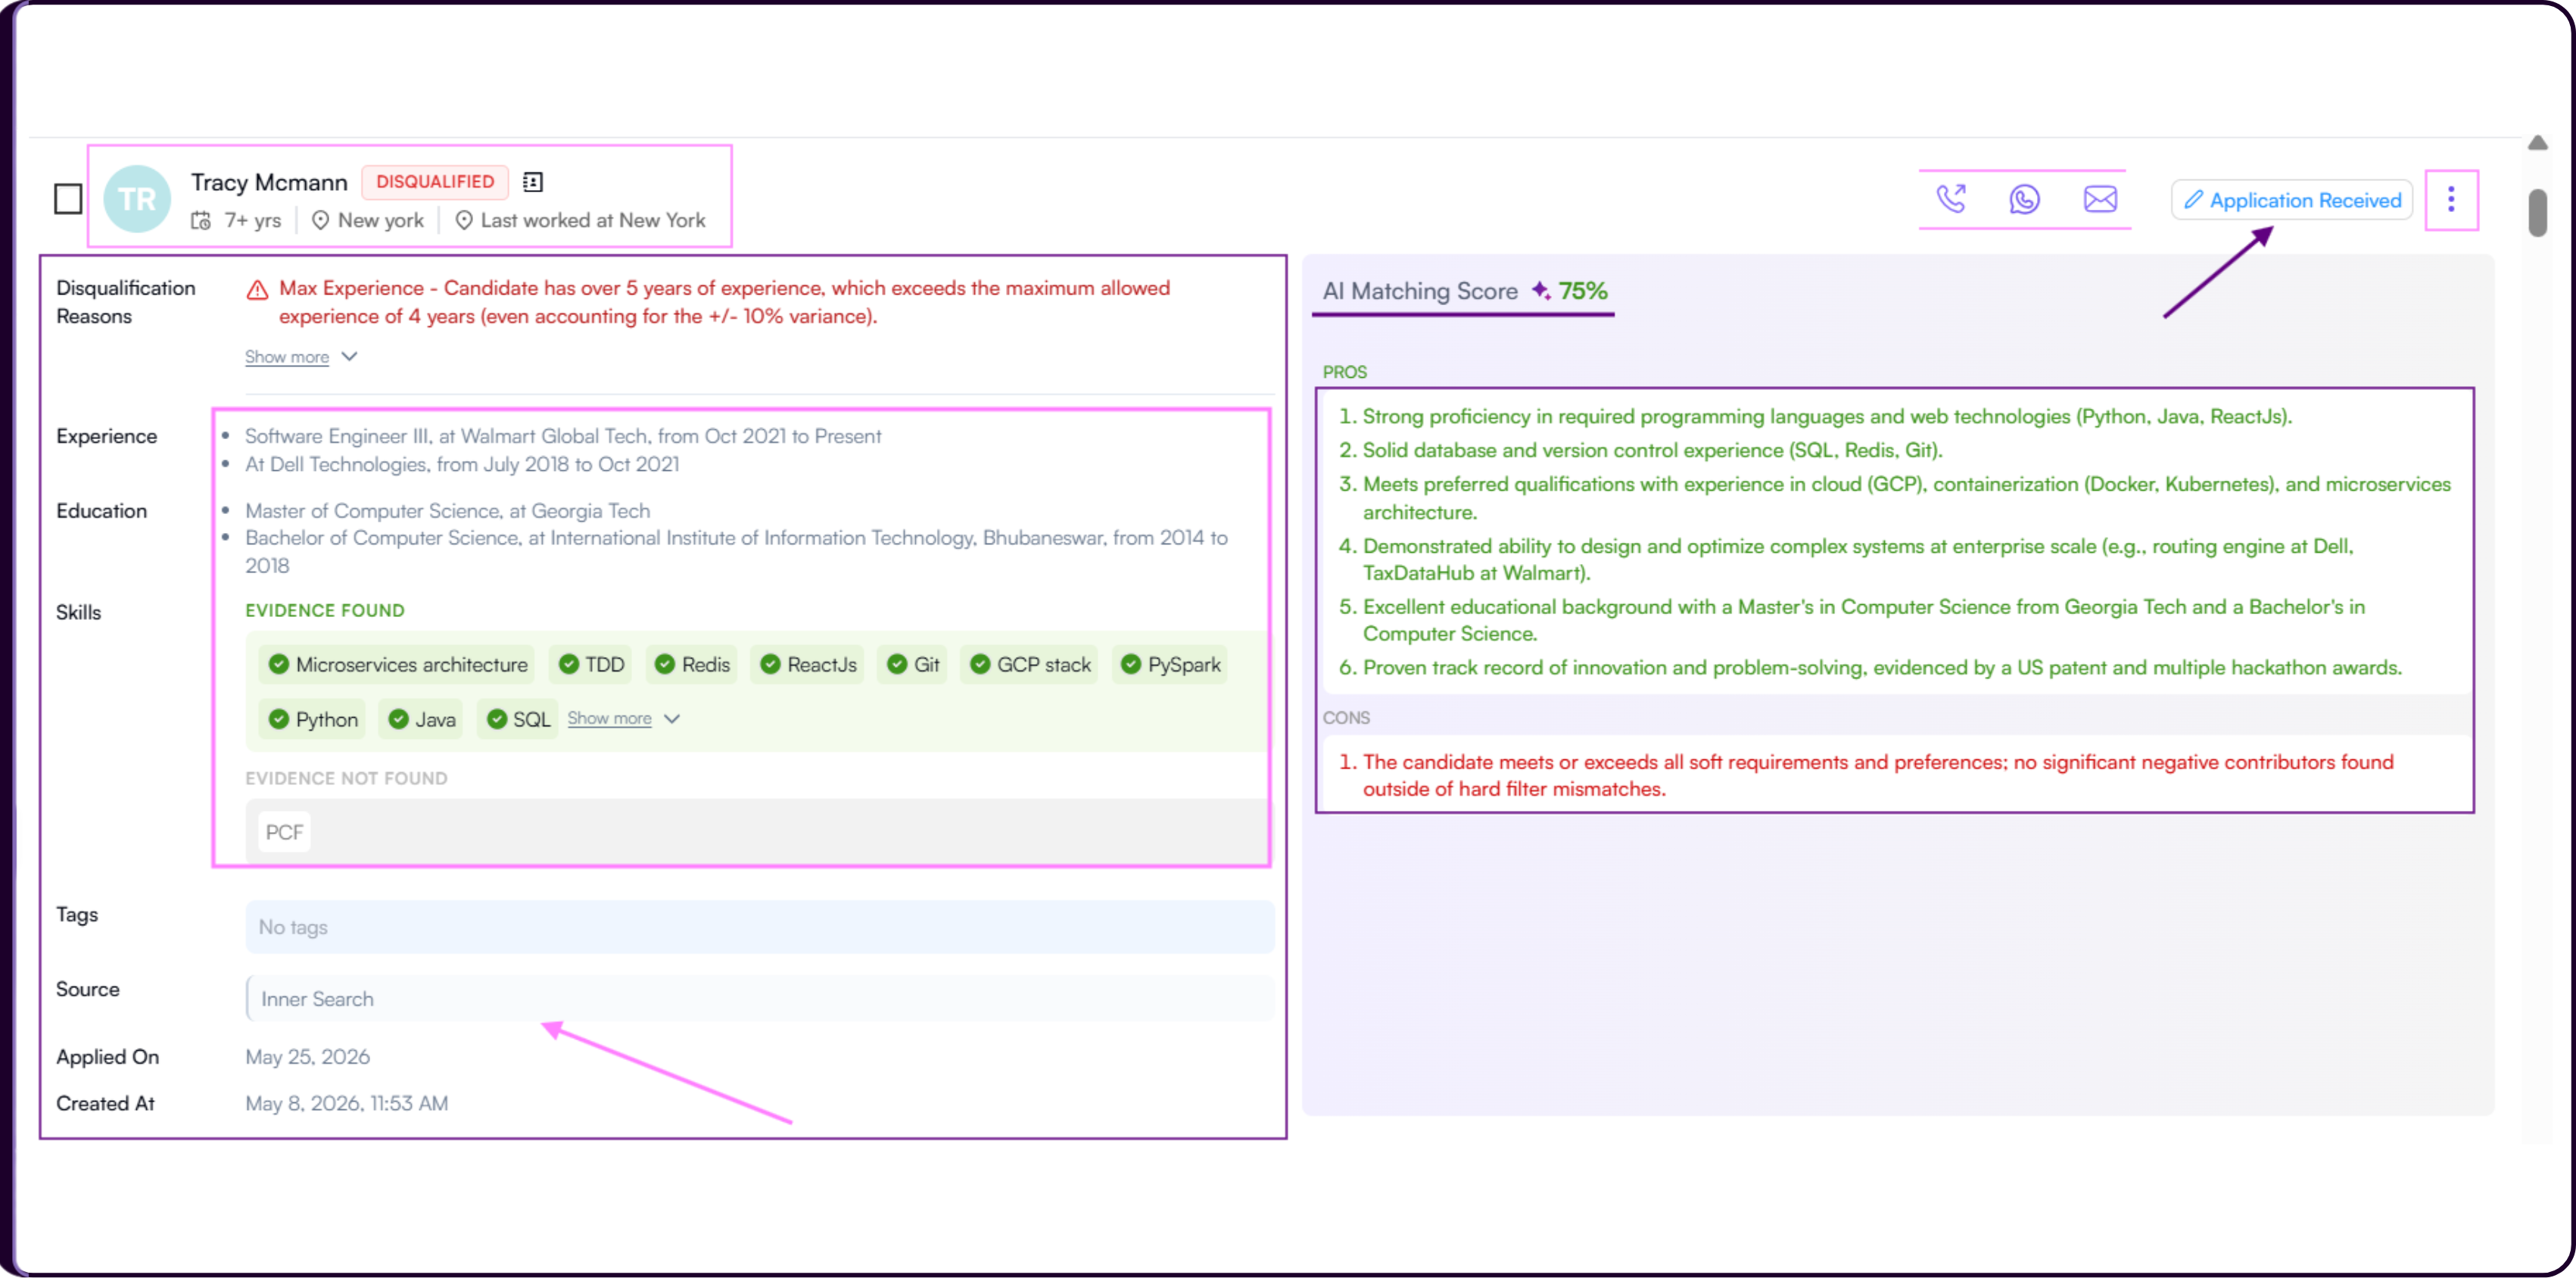
Recruiters can review the candidate's name and profile information, disqualification status and reasons if applicable, years of experience and current location, previous company details, AI Matching Score, candidate pros and cons generated from the Job Description comparison, education and experience details, skills evidence found and missing based on JD requirements, tags and sourcing information, and candidate upload or creation date.
Candidate Communication and Actions
Recruiters can directly communicate with candidates from the profile section using Email, WhatsApp, or Call options depending on the communication channels configured inside Skima AI.
Recruiters can also update the candidate's application status directly from this view to keep the hiring pipeline updated in real time.
The three-dots action menu beside each candidate provides additional workflow controls.
- Link to Another Job associates the candidate with additional roles.
- View Custom Fields reviews organization-specific candidate information.
- View Responses shows candidate answers and submitted responses.
- Add Tags organizes and groups candidates internally.
- Schedule an Interview begins interview coordination directly from the candidate profile.
- AI Interview schedules an AI-led interview for the candidate.
- Unlink from this Job removes the candidate from the current role workflow.
1a. Schedule an Interview
Scheduling an interview from the candidate view helps recruiters move quickly from screening to coordination without leaving the job workspace.
View more
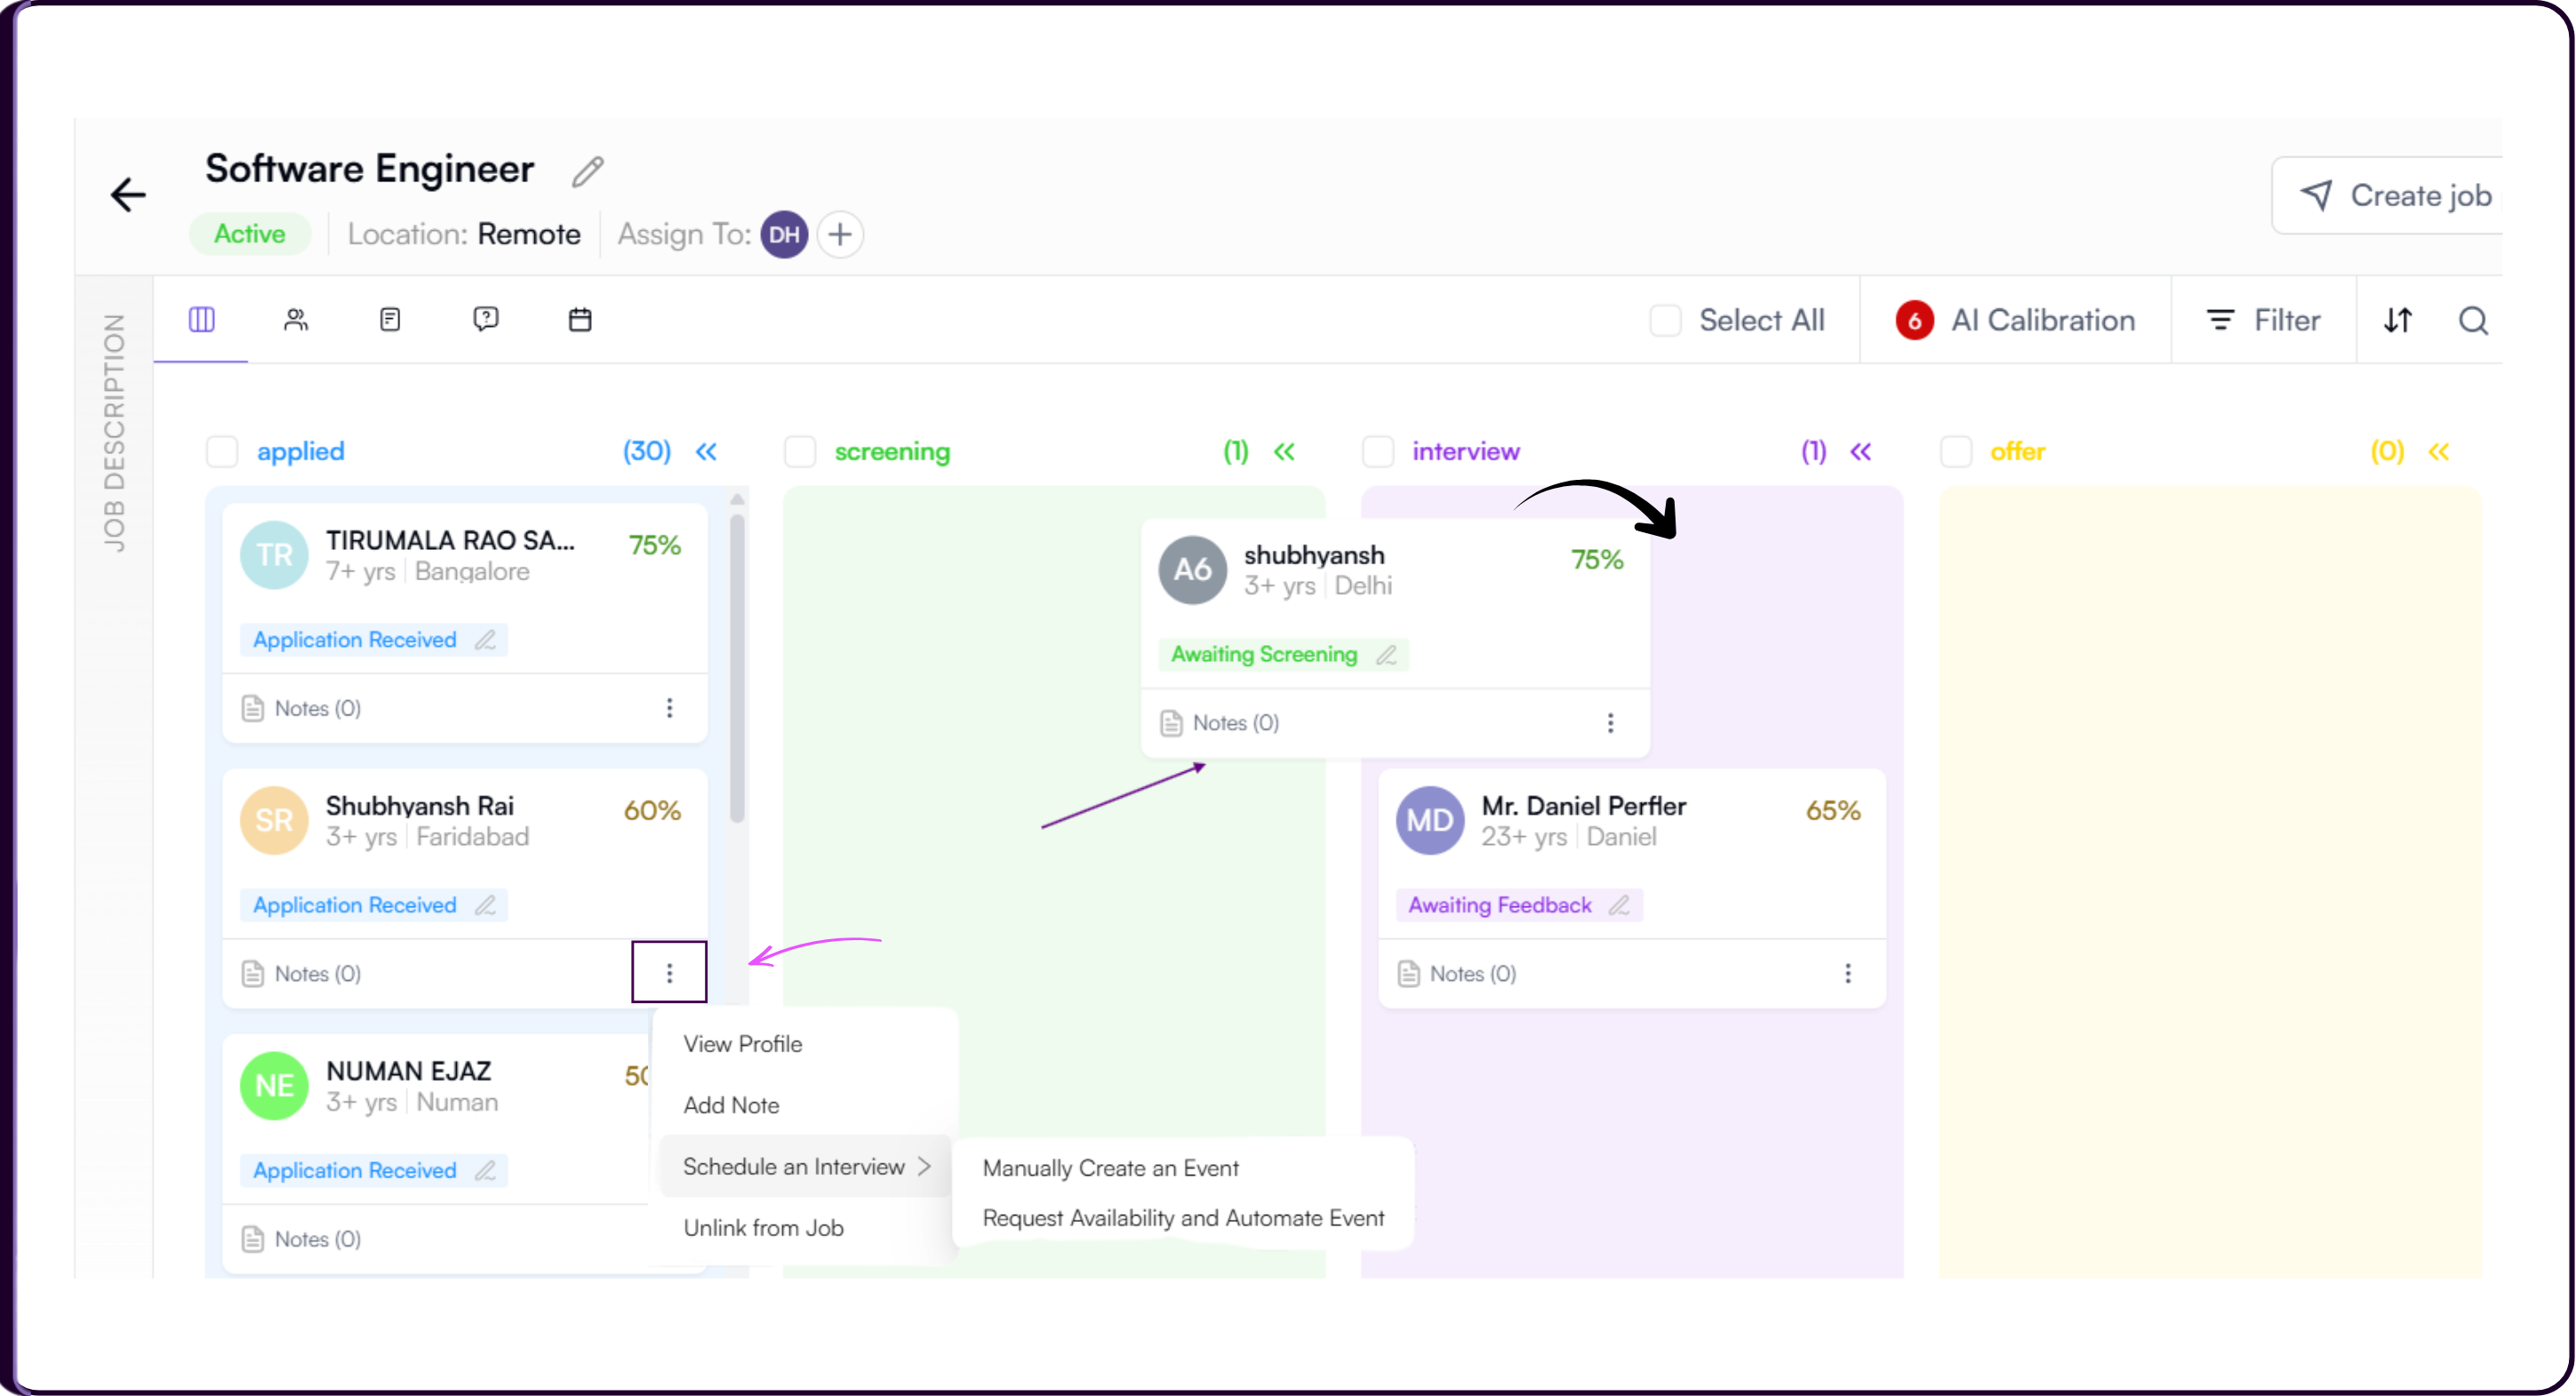
Manually Create an Event
Click on 'Schedule an Interview' from the candidate's three-dots action menu.
Choose 'Manually Create an Event' when the interview time is already confirmed and you want to set up the meeting directly.

Sign in with the Gmail or Microsoft account you want to use for sending the scheduling email and creating the interview event.
A Schedule Interview Event modal will appear where you can enter the interview title, candidate, participants, event date, time, duration, platform, attachments, and description.

Select the interview platform from the dropdown. Depending on the connected account, this may show Google Meet, Zoom, or other supported meeting options.
Attach the Job Description or any supporting files if needed, then click 'Send Invitation'.
Request Candidate Availability
Choose 'Request Availability and Automate Event' if you want the candidate to select a suitable interview slot from your available times.
The Request Interview Availability modal will appear with two tabs at the top: Draft Email and Preview.
Draft Email Tab
The Candidate Email Address is pre-filled from the candidate's profile.
Enter the Send to Interviewer (Email Address). This field is required before you can move to the Preview tab.
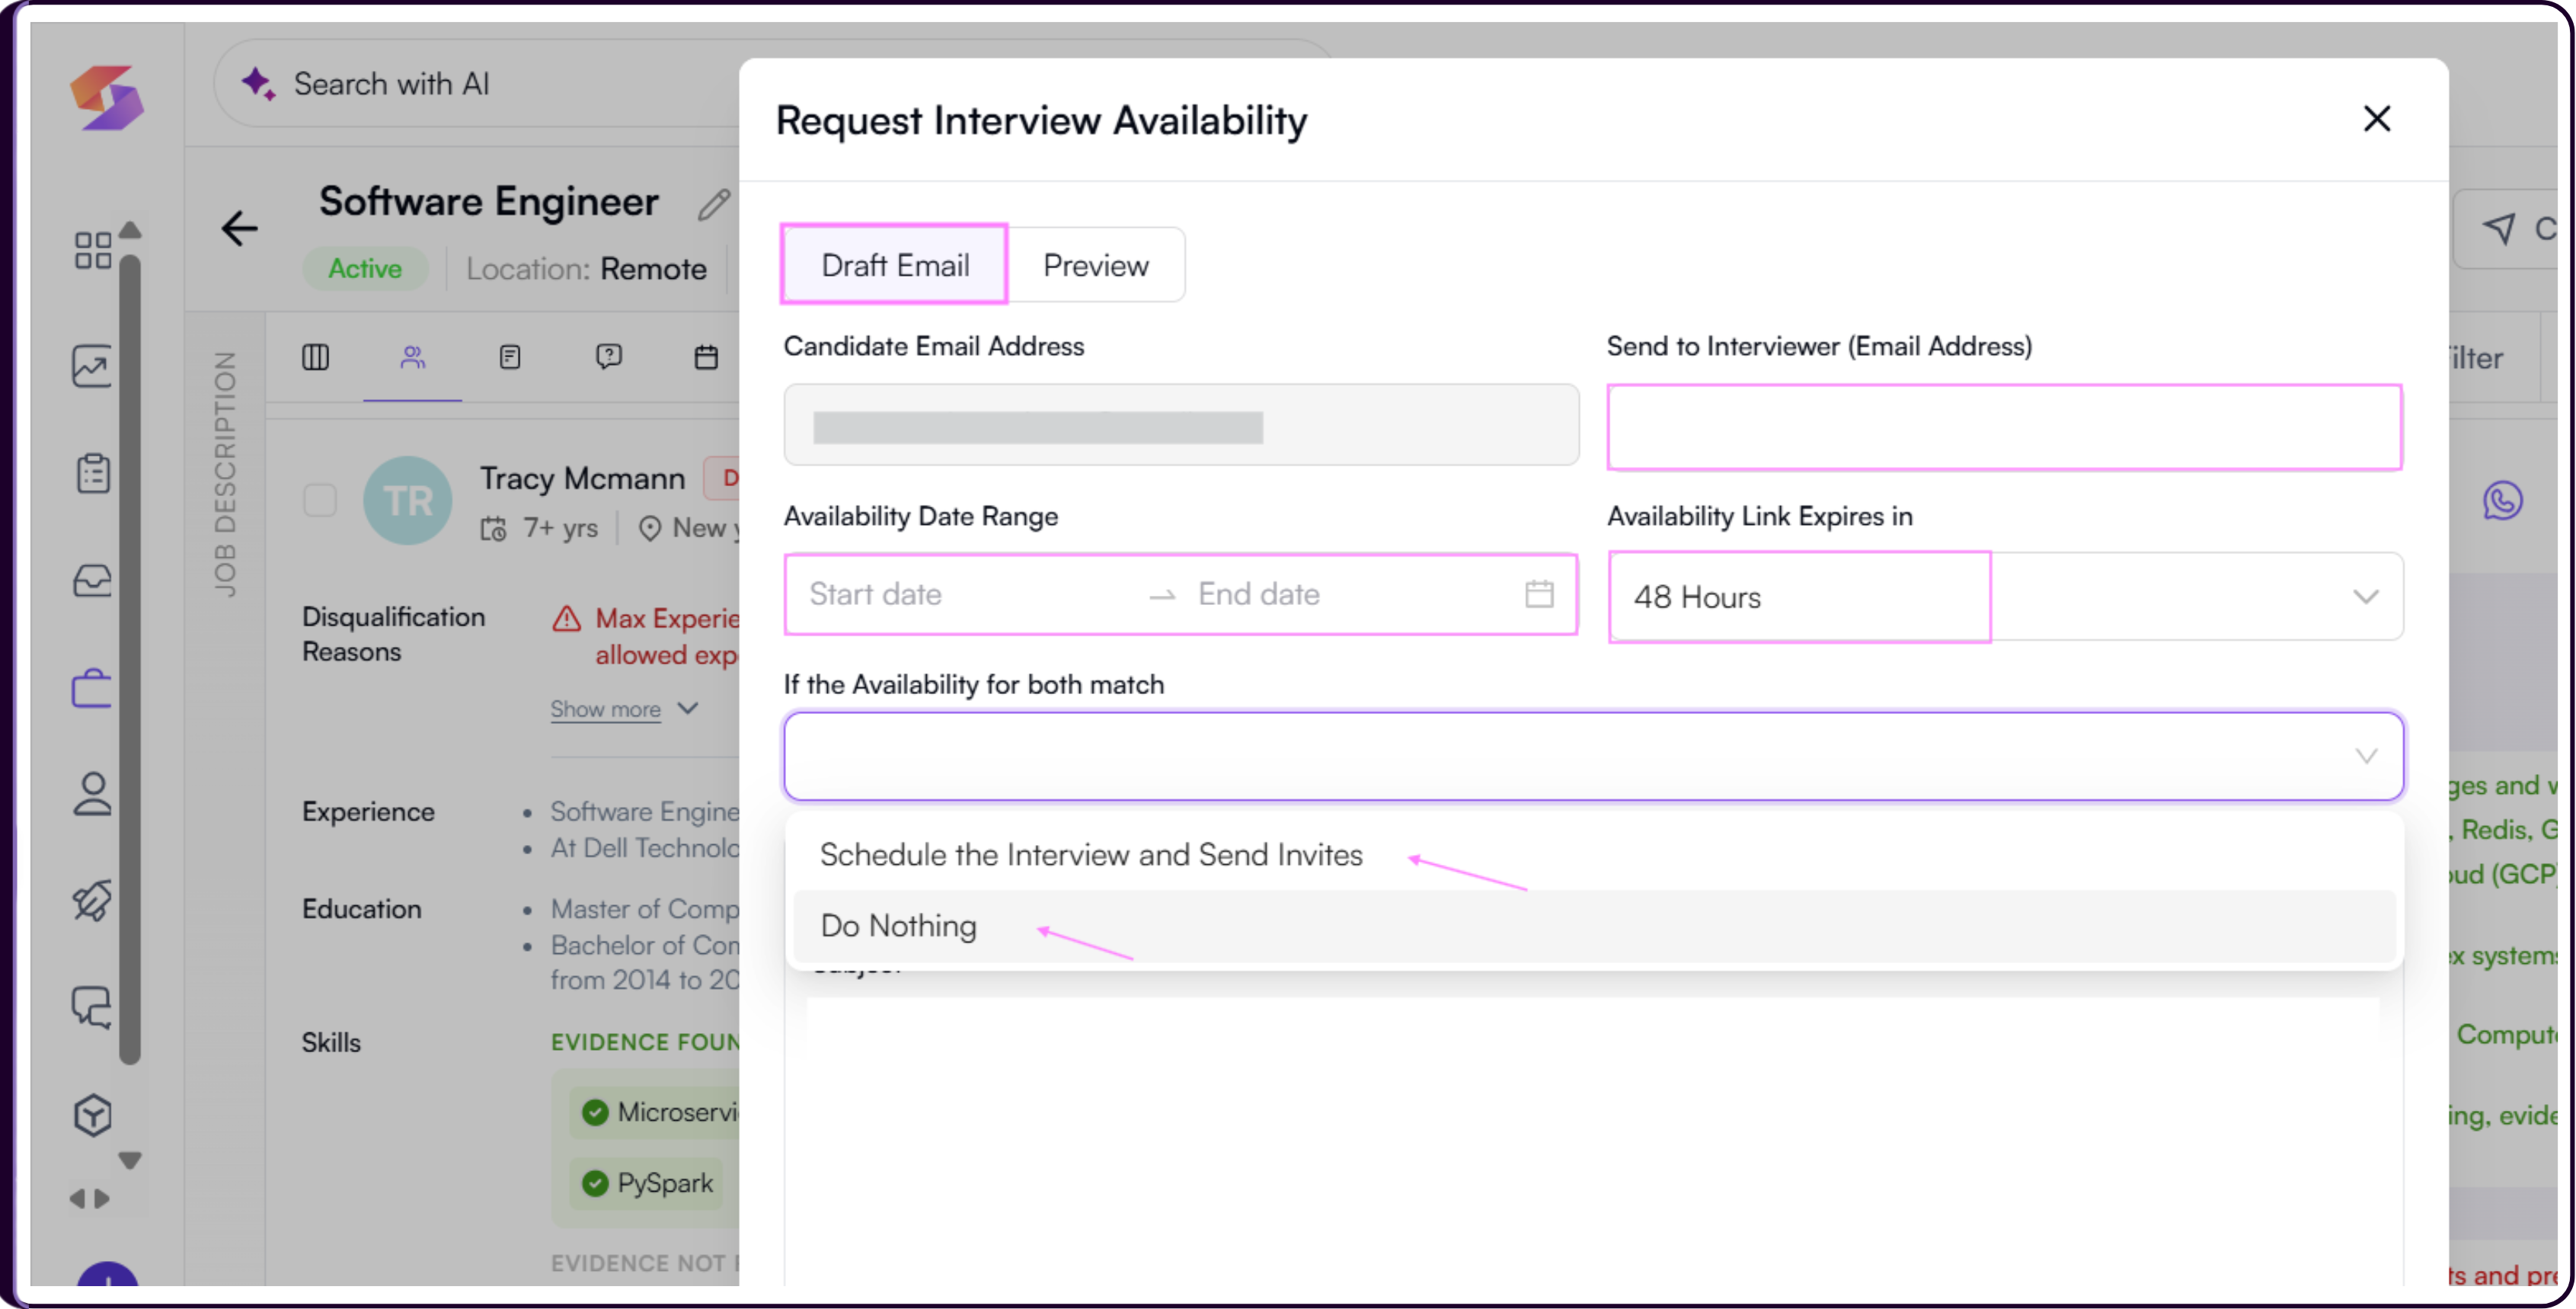
Set the Availability Date Range to define the window within which the candidate can select a slot.
Set Availability Link Expires in to control how long the scheduling link remains active. The default is 48 hours.
Under If the Availability for both match, select the action Skima AI should take when the interviewer and candidate availability overlap. The default is Do Nothing.
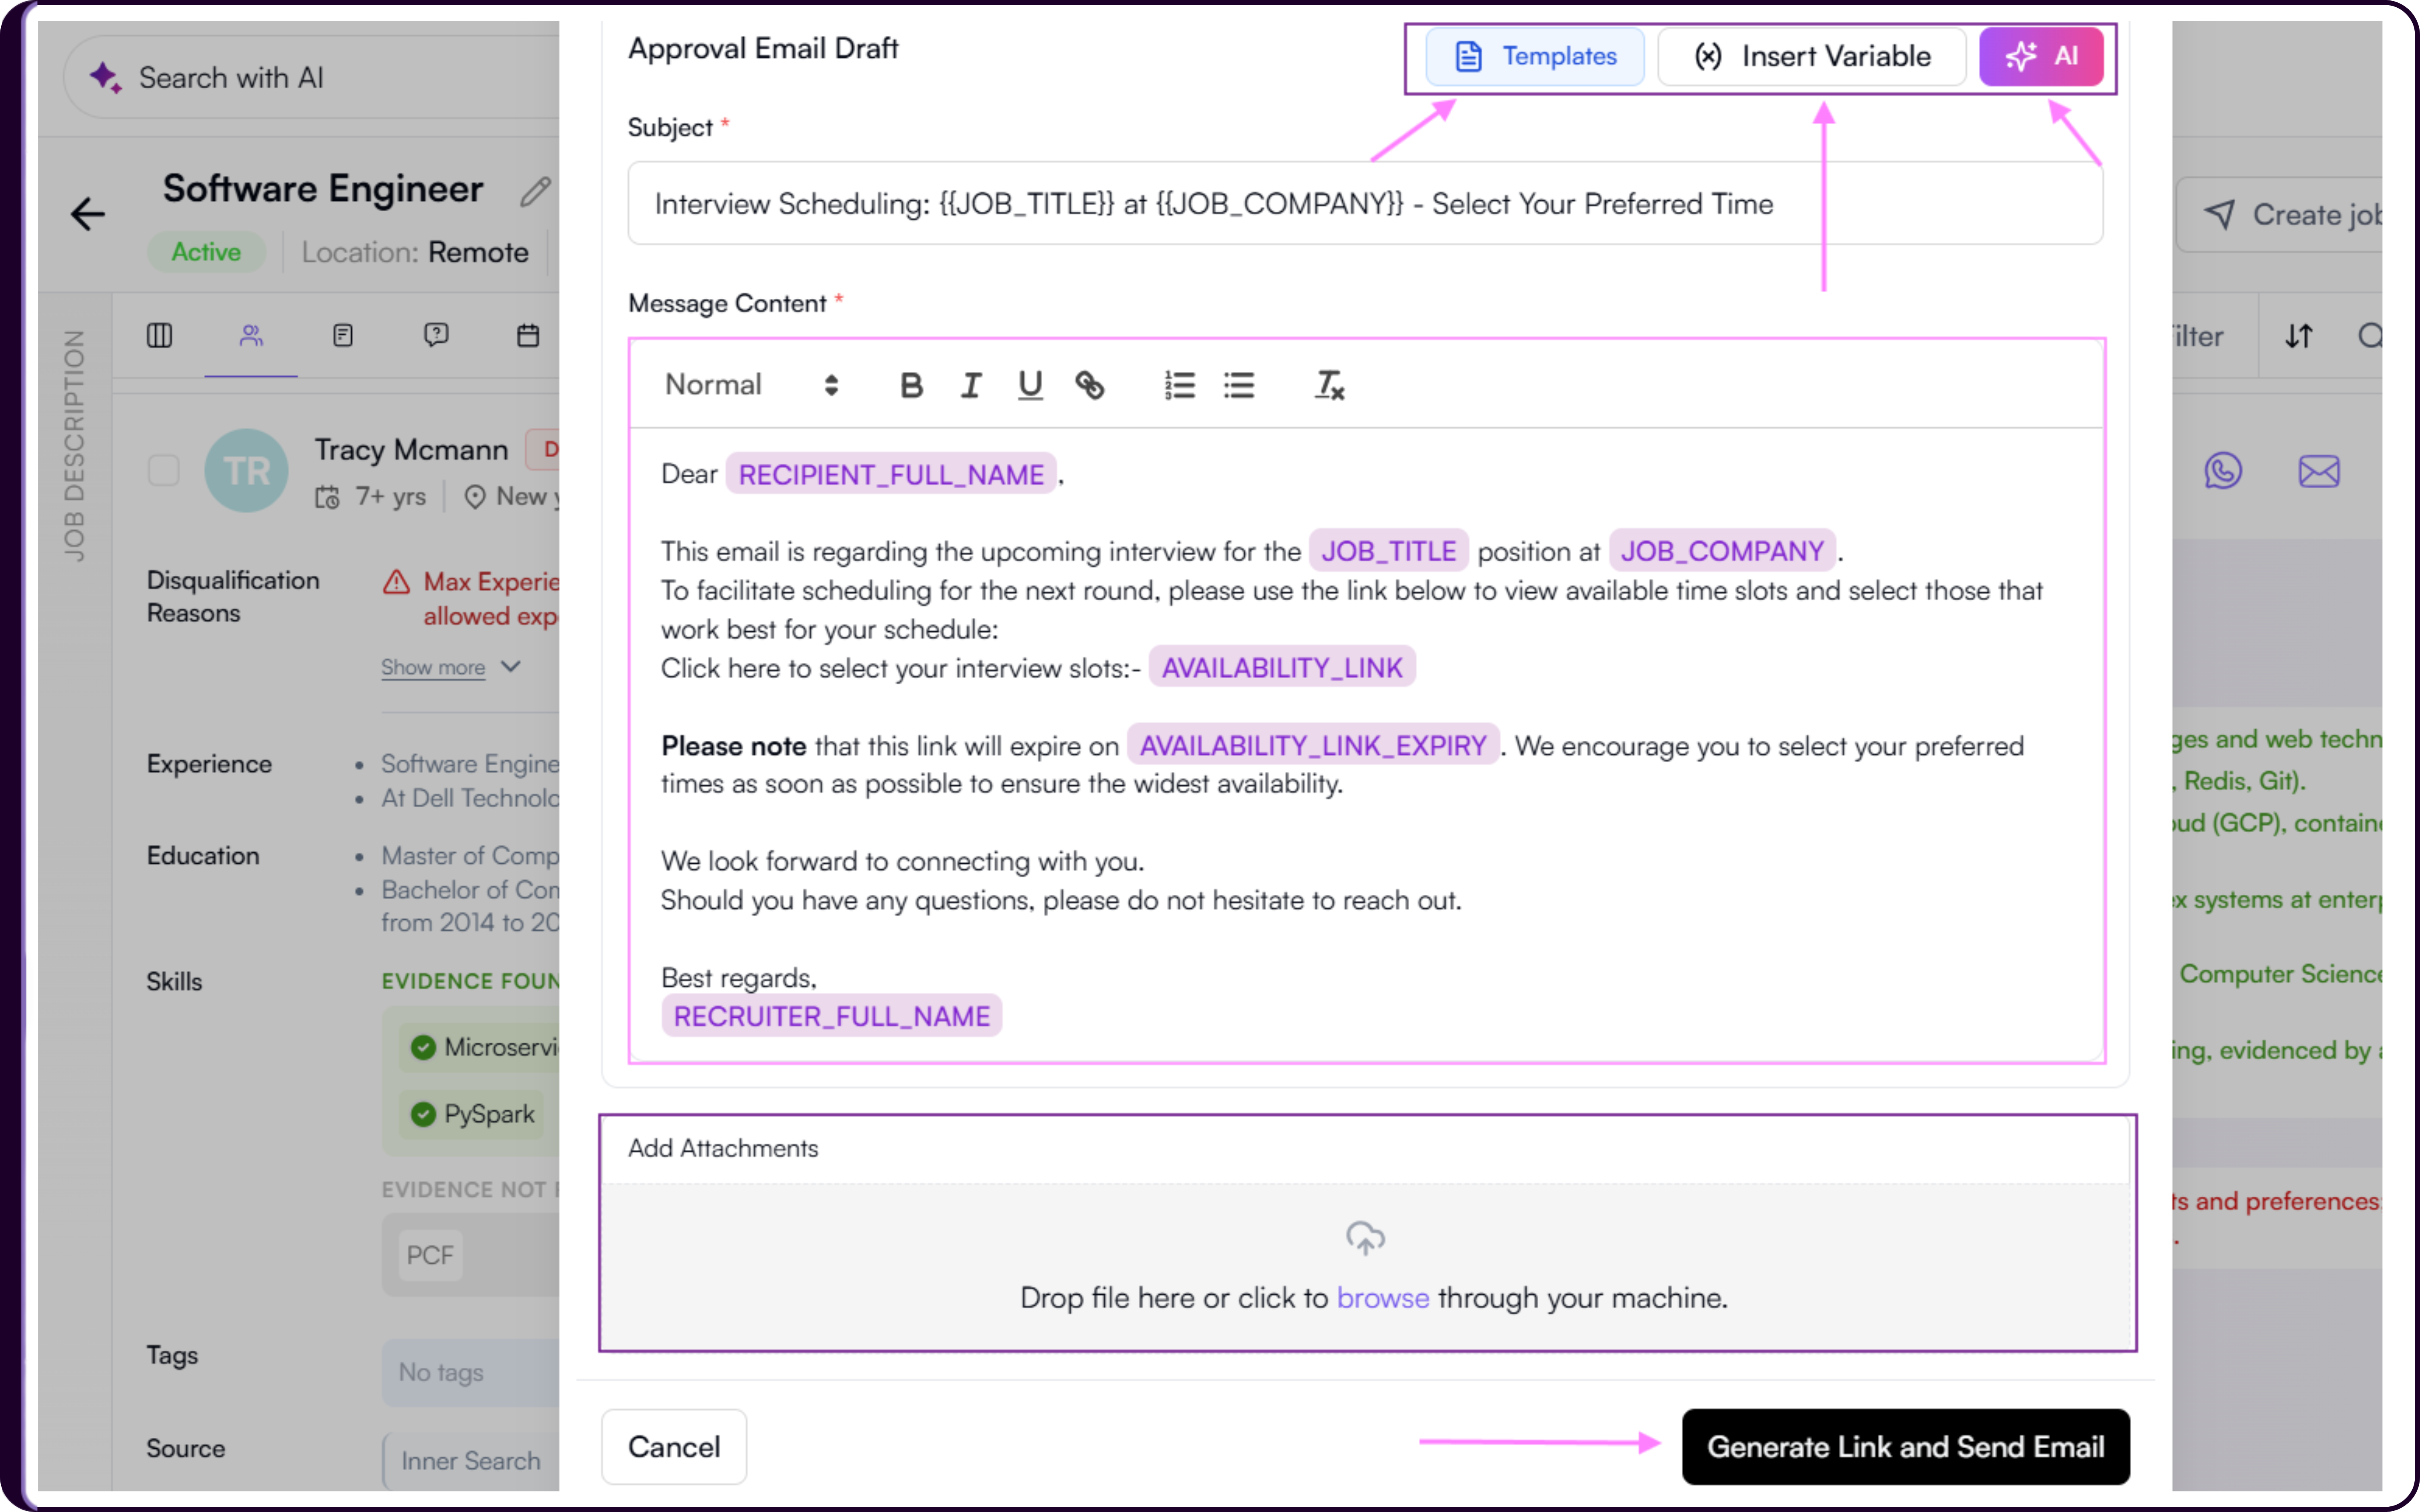
In the Approval Email Draft section, enter the Subject and Message Content for the email that will be sent to the candidate. Use Templates to load a saved template, Insert Variable to add dynamic placeholders such as {{JOB_TITLE}} or {{JOB_COMPANY}}, or click AI to generate a draft automatically.
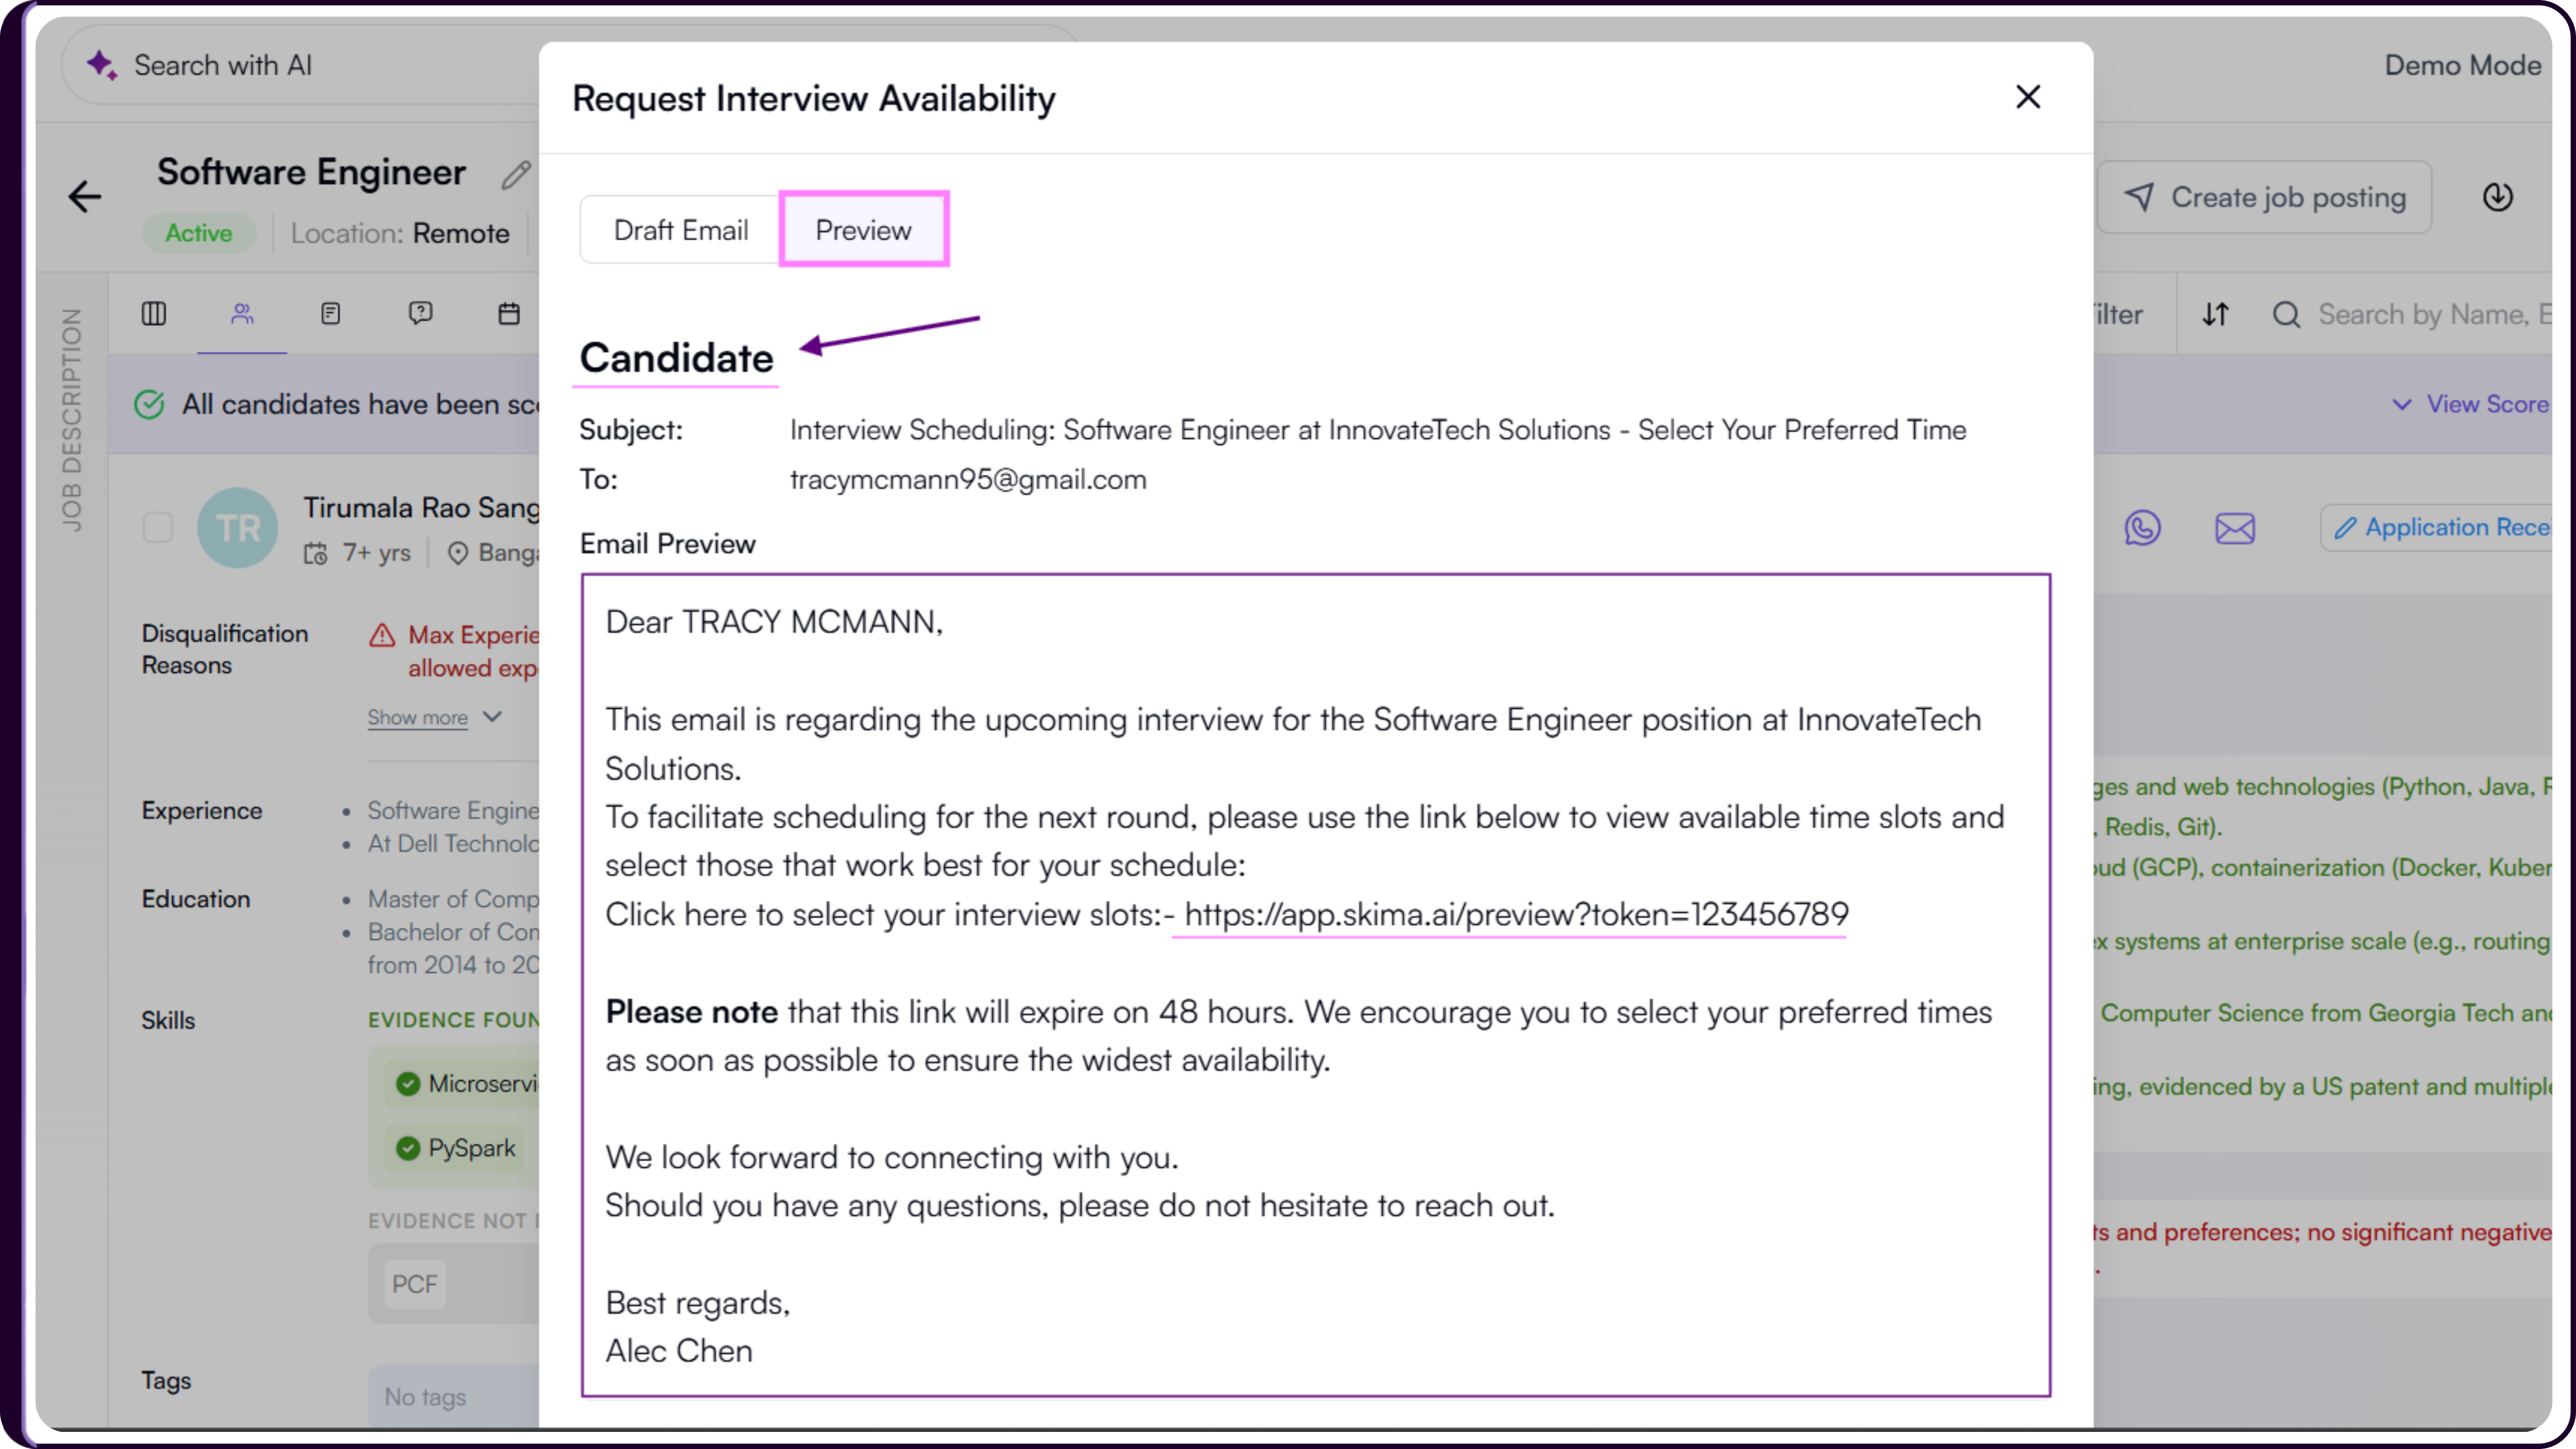
Preview Tab
Once the required fields are filled, click on 'Preview' to review how the emails will appear to both the candidate and the interviewer before sending.
The preview is split into two sections.
Candidate shows the subject line, recipient email, and the full email body exactly as the candidate will receive it. The scheduling link, link expiry notice, and any dynamic variables are rendered with real values so you can verify the message before it goes out.
Interviewer shows the same email structure sent to the interviewer's address so they can confirm and select their available slots.
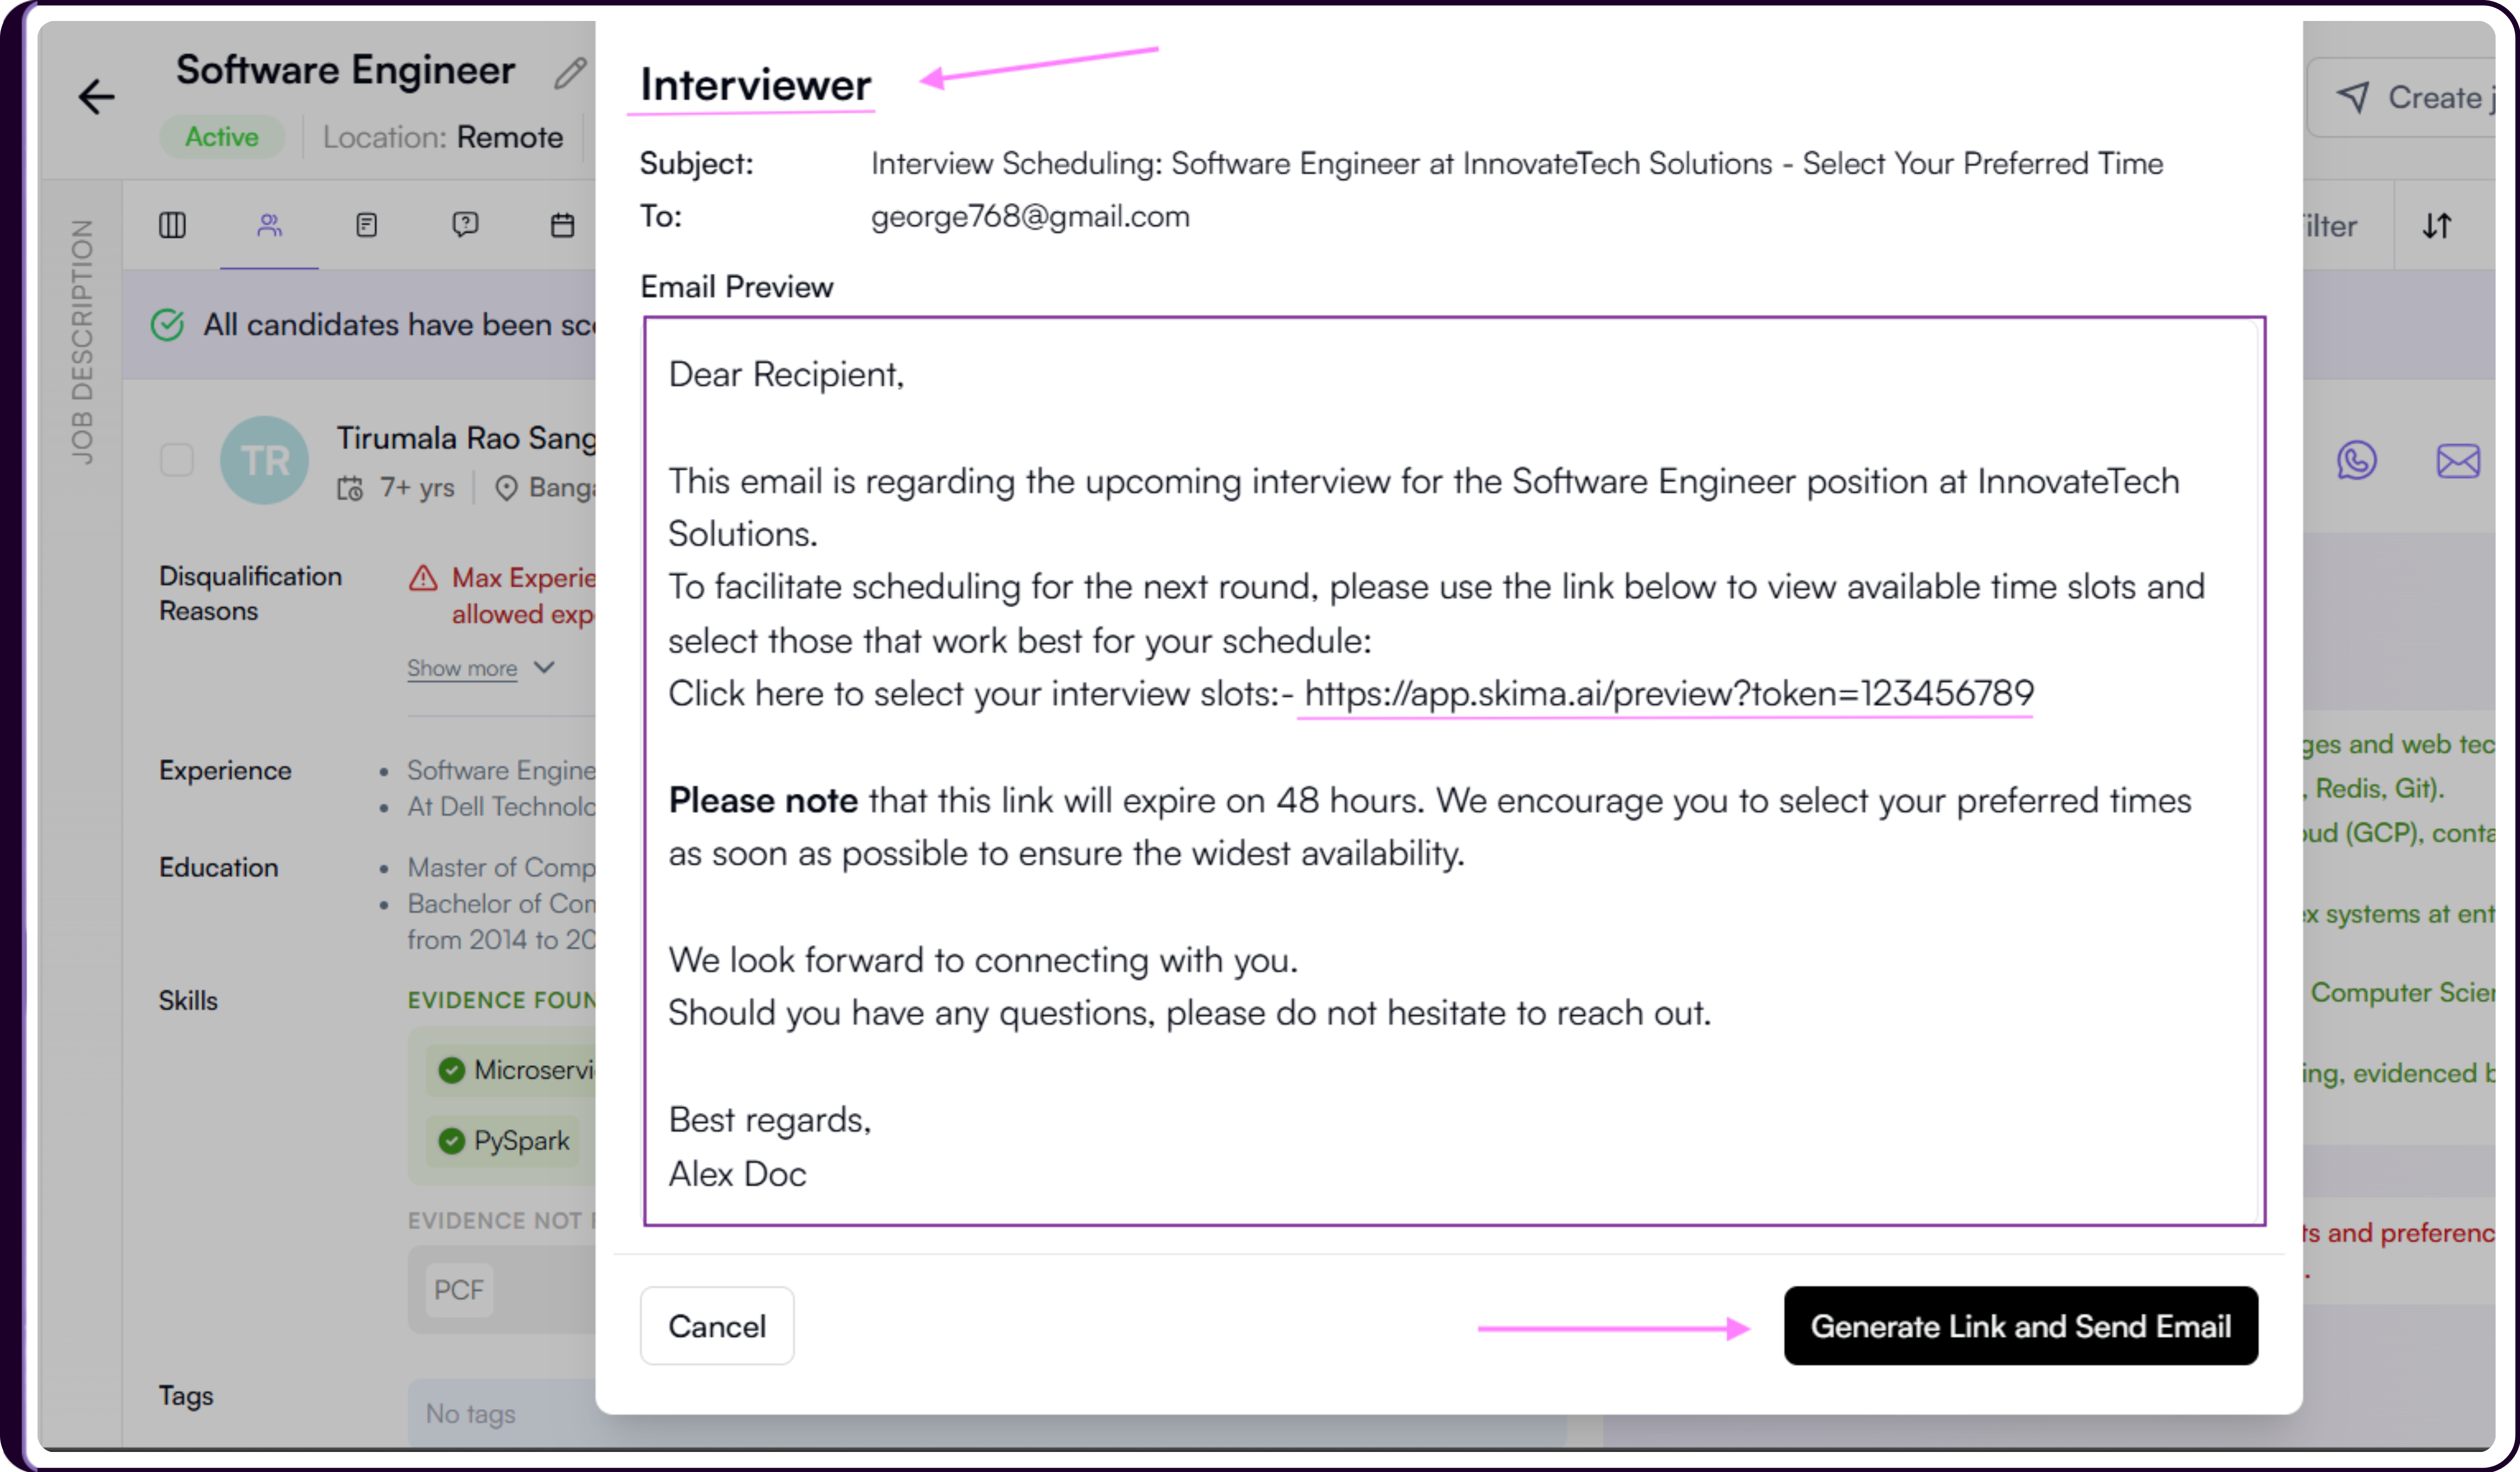
After reviewing both previews, click 'Generate Link and Send Email' to send the scheduling emails and generate the availability links.
Skima AI generates two links: one for the interviewer to confirm their available time slots, and one for the candidate to select a slot that works for them. If the candidate wants to propose a different time, they can do so from their link. Any updated request from the candidate will appear in the interviewer's link for the hiring team to review and finalize.
2. View Kanban
The View Kanban tab provides a visual recruitment pipeline where recruiters can track, organize, and move candidates across different hiring stages for a job. This workspace helps hiring teams manage candidate progression more efficiently while maintaining complete visibility across the recruitment workflow.
View more
Access the Kanban View
Navigate to ‘Jobs’ from the left sidebar.
Open any job to access its hiring workflow workspace.
Click on the ‘View Kanban’ tab.
Recruiters will now see all linked candidates displayed in a Kanban board format organized across recruitment stages configured for the role.
Example stages may include:
- Applied
- Hiring Manager Review
- Assessment
- Screening
- Interview
This layout helps recruiters quickly understand where candidates currently sit within the hiring pipeline.
Move Candidates Between Stages
Recruiters can update candidate stages directly from the Kanban board without opening individual candidate profiles by using simple drag-and-drop interactions.
Recruiters can also use the 'three-dots' quick action menu available on each candidate card to perform additional actions including:
- View Profile: to review complete candidate resume details and AI insights
- Add Notes: to leave internal hiring feedback or evaluation comments
- Schedule Interviews: to directly begin interview coordination workflows
- Unlink from Job: to remove the candidate from the current hiring pipeline
Hide Recruitment Stages
i) At the top-right corner of each stage column, recruiters will see an arrow icon.
ii) Clicking this arrow hides that particular stage from the current Kanban view, helping recruiters reduce visual clutter and focus only on active workflow stages.
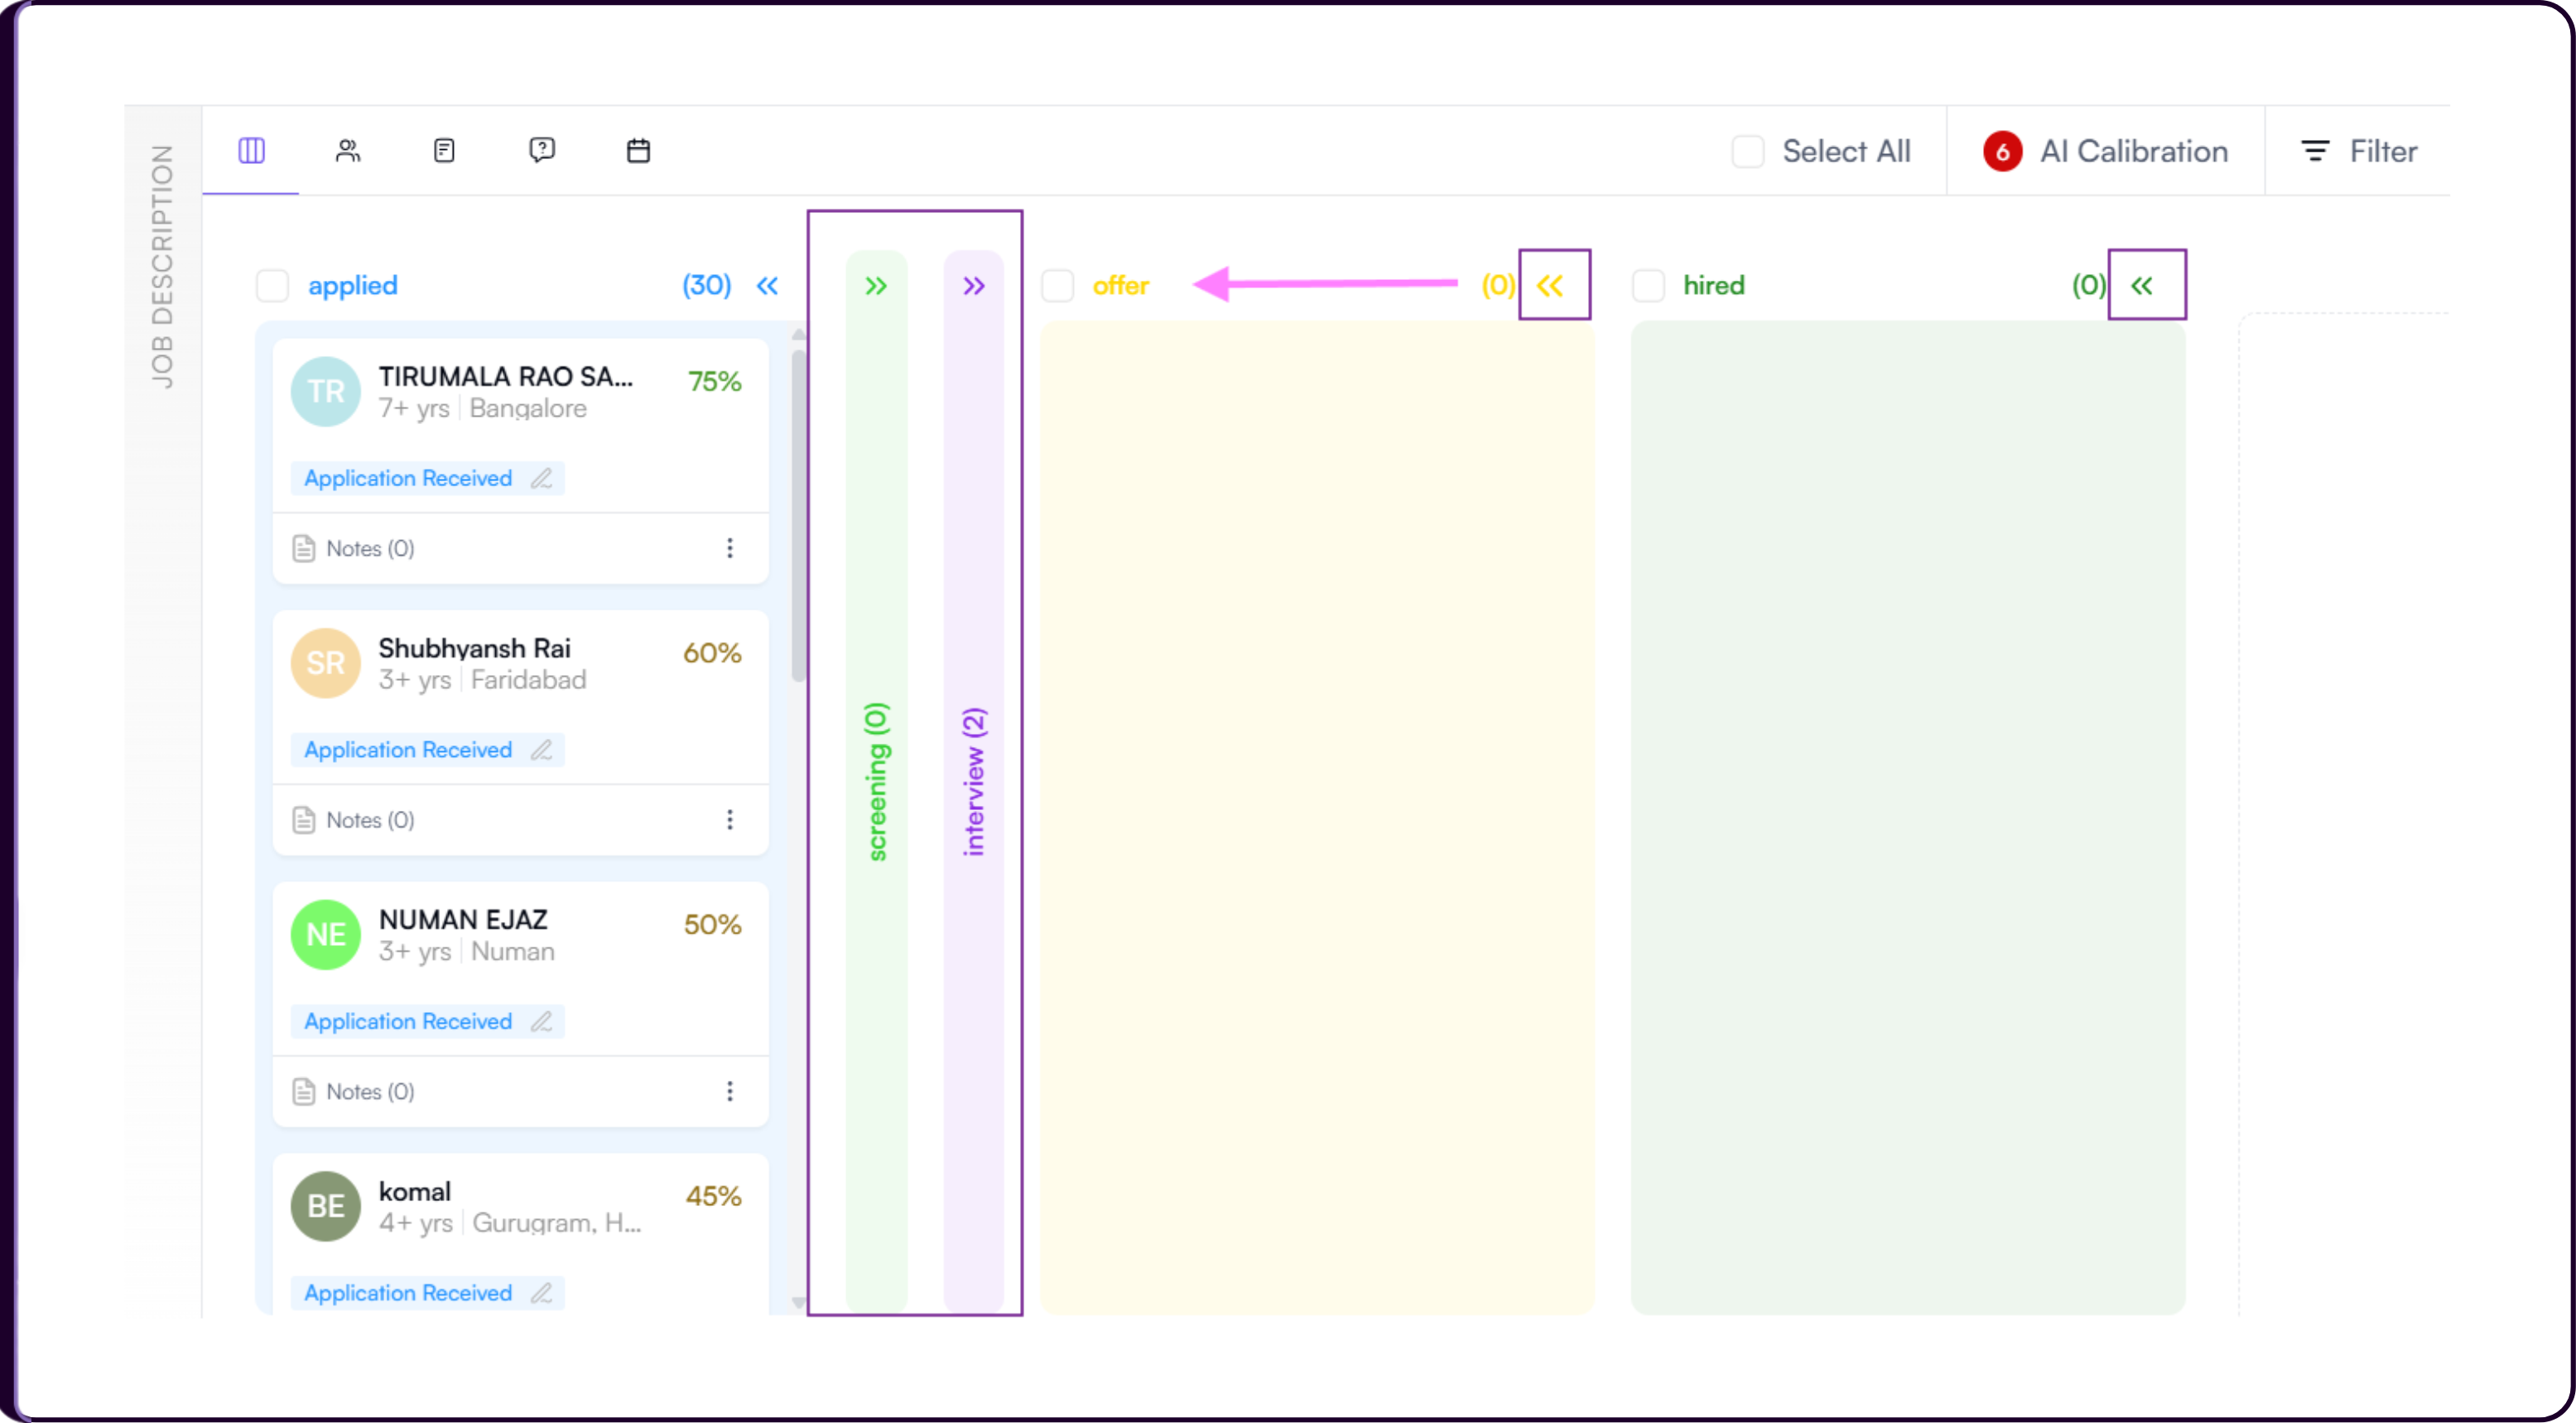
iii) Hidden stages can be expanded again anytime whenever required.
Create New Recruitment Stages
i) At the end of the horizontal Kanban stage list, recruiters will see a ‘+’ button.
ii) Clicking this button opens the ‘Add Stage’ modal where recruiters can create additional custom workflow stages for the role.
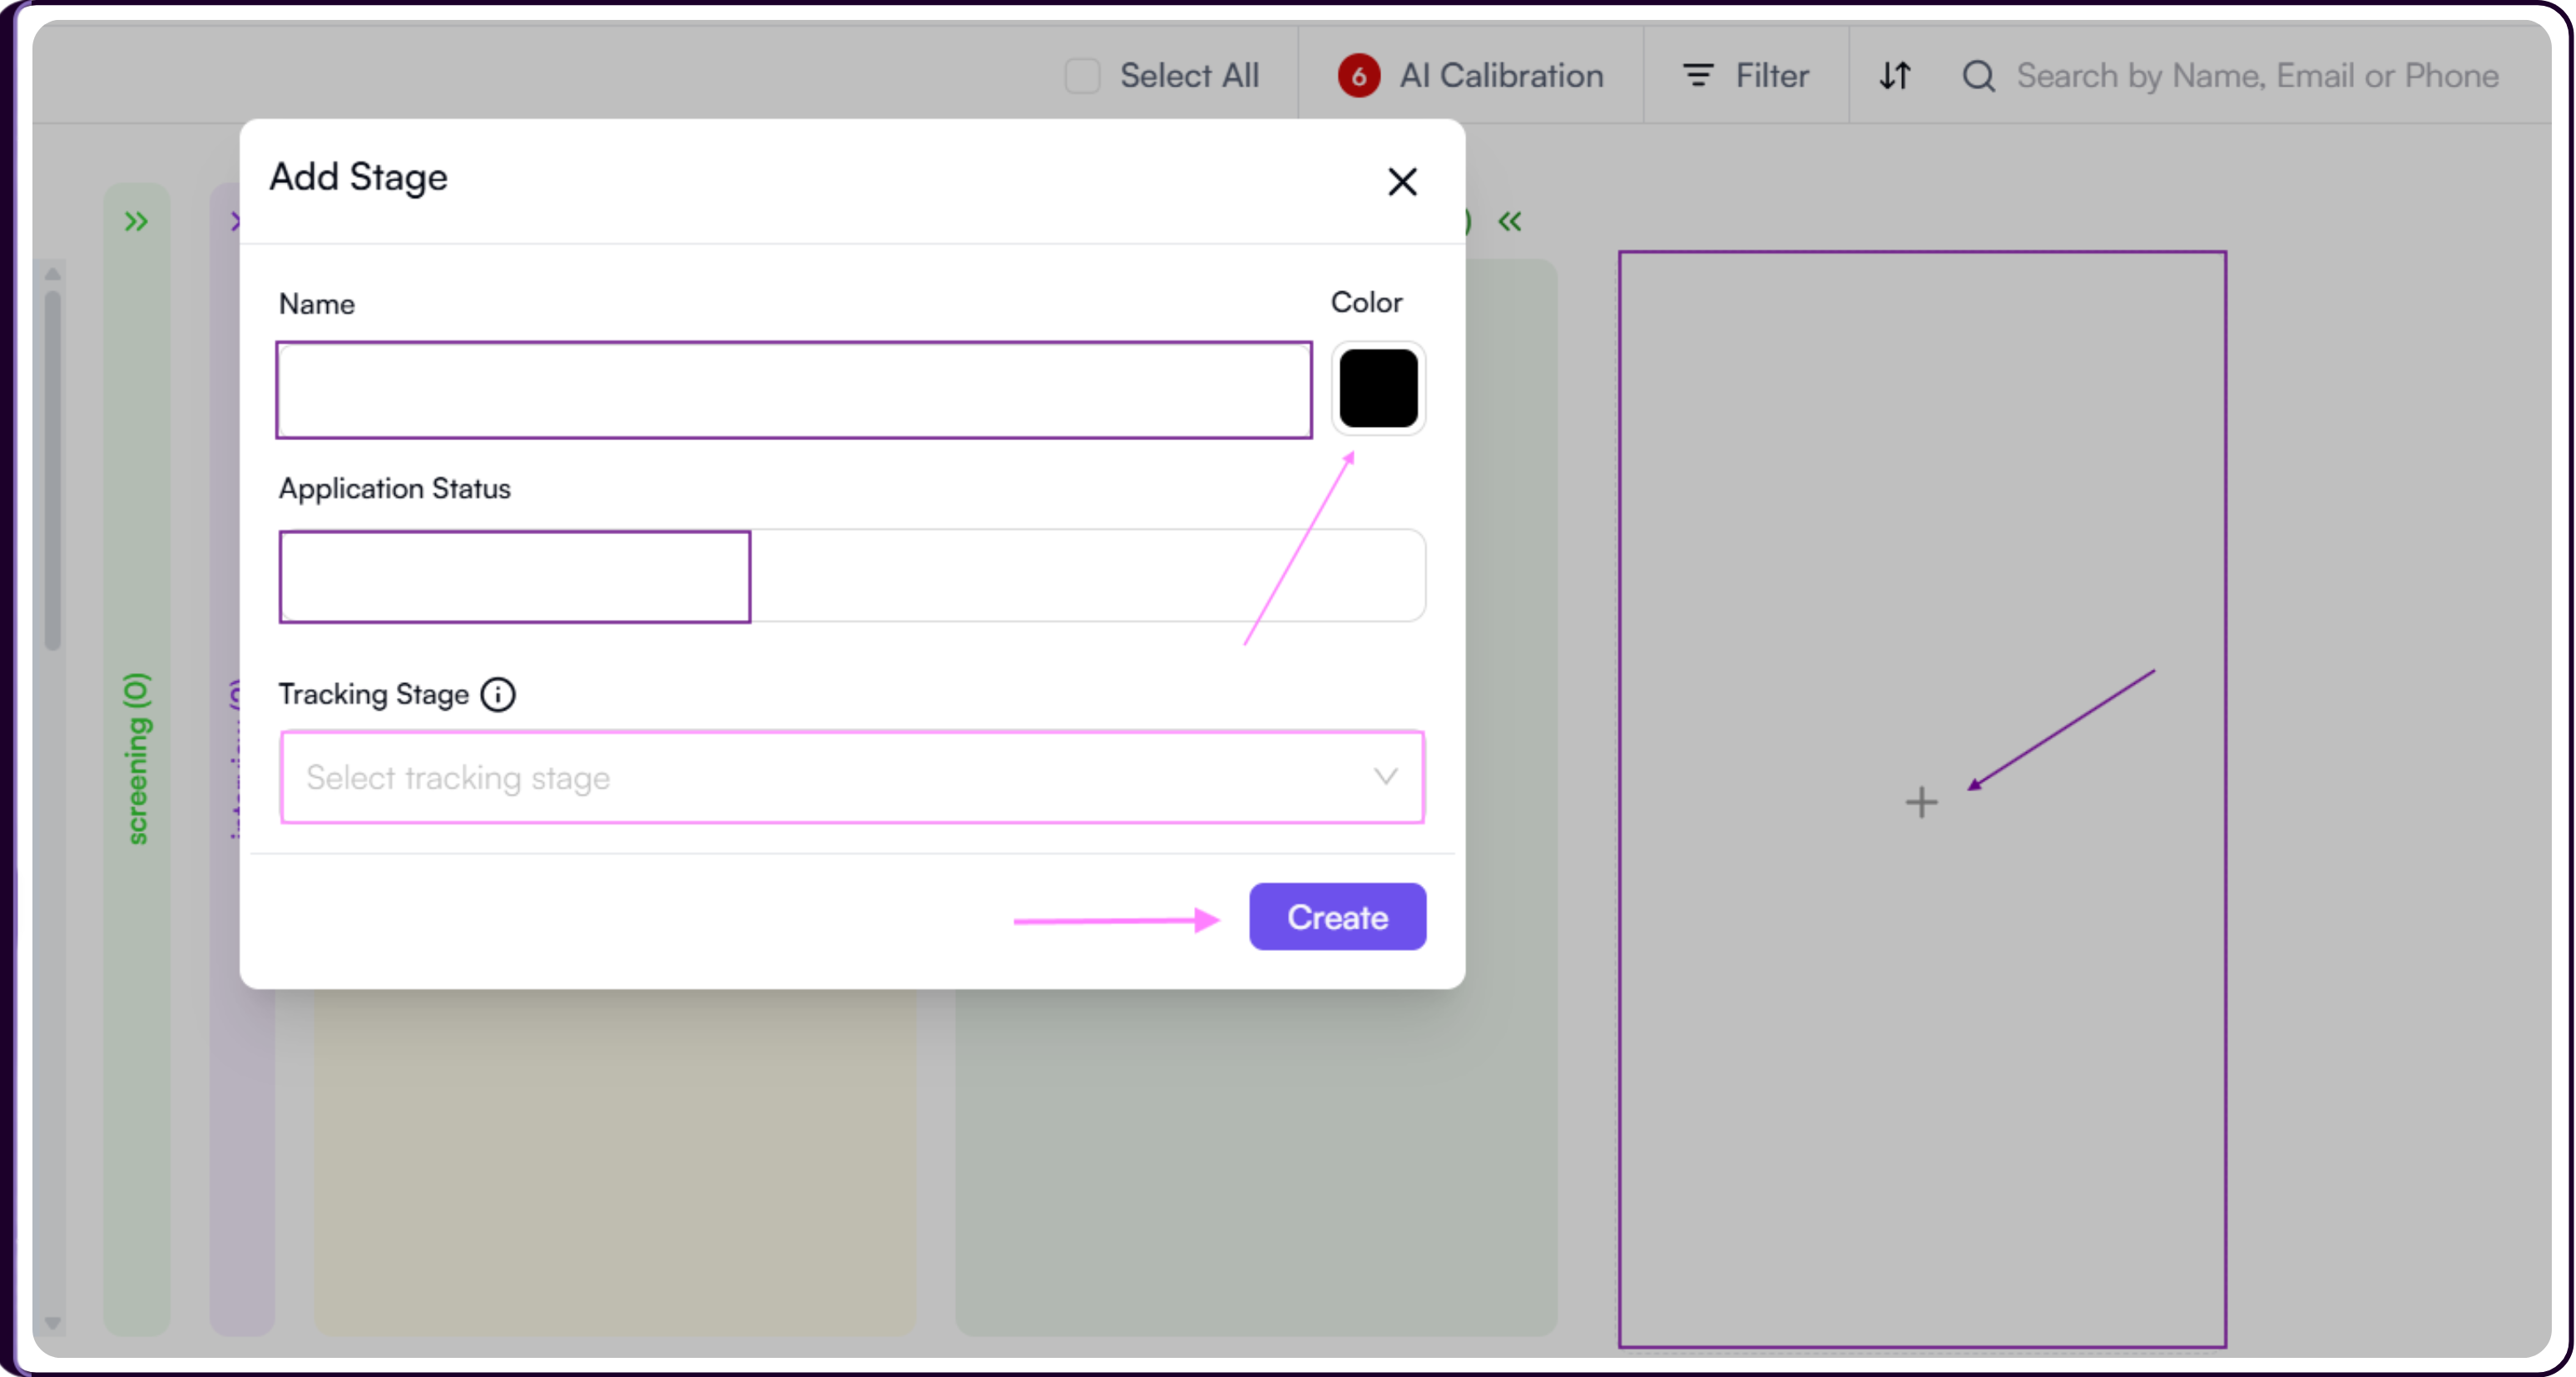
iii) Recruiters can configure:
- Stage Name: the title of the workflow stage
- Color: the display color used for the stage column
- Application Status: the status linked to the stage
- Tracking Stage: the workflow tracking category associated with the stage
iv) Once configured, click on ‘Create’ to add the stage to the recruitment workflow.
This flexibility allows teams to customize hiring pipelines according to their internal recruitment process.
3. View JD
The View JD tab is the central workspace where recruiters can review, refine, calibrate, and optimize the Job Description after the role has been created. This section directly impacts candidate scoring quality, AI matching accuracy, knockout filters, and overall screening performance inside Skima AI.
View more
Access the View JD Workspace
i) Open any job from the Jobs List View.
ii) Navigate to the ‘View JD’ tab from the job workspace navigation.
iii) Recruiters will now be able to view the complete Job Description currently being used by Skima AI for candidate screening and AI evaluation.
This workspace acts as the source of truth for how candidates are assessed against the role.
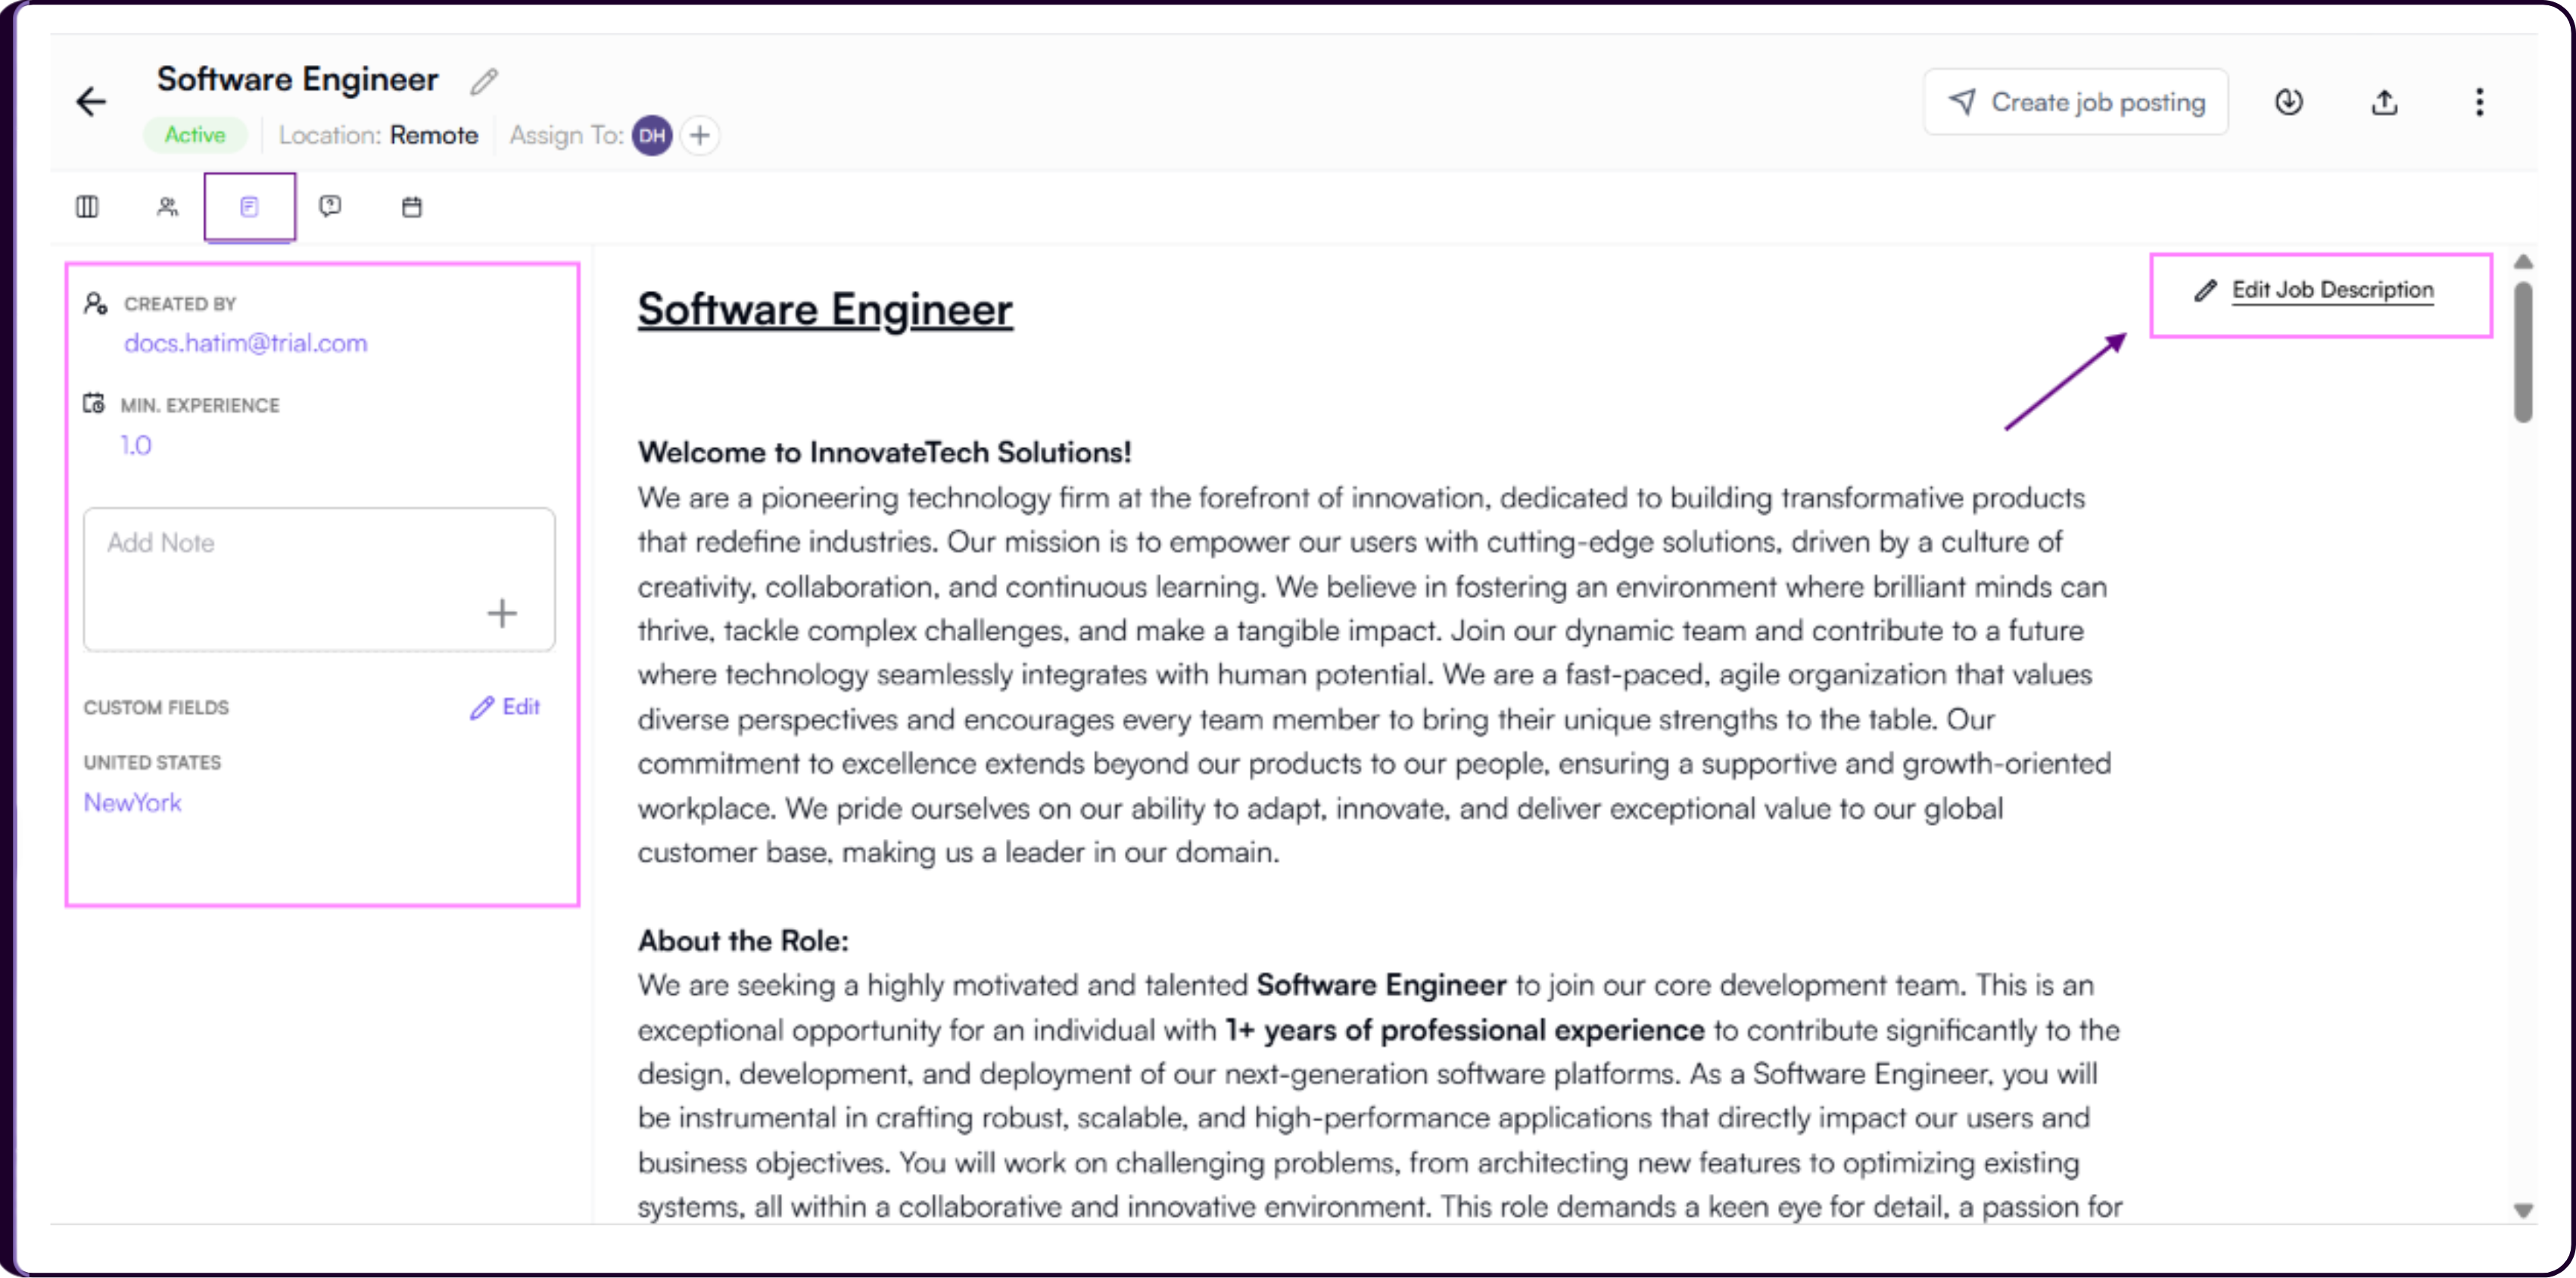
Job Requirement Controls
i) On the left-side panel inside the View JD workspace, recruiters will see additional job-level controls and requirement settings used during candidate screening and calibration.
ii) The MIN. EXPERIENCE field displays the minimum experience requirement configured for the role. Recruiters can update this value anytime by editing the JD.
iii) Recruiters can also click on ‘Add Note’ to include internal hiring instructions, recruiter observations, or calibration context associated with the role.
iv) Below this section, recruiters will find CUSTOM FIELDS where additional structured job fields can be added or edited directly from the View JD workspace.
These custom fields help teams capture organization-specific hiring information and make the recruitment workflow more structured across different roles and departments.
Edit the Job Description
i) Recruiters can click on ‘Edit Job Description’ to modify or improve the existing Job Description at any time.
ii) This is commonly used when hiring requirements evolve or when recruiters want to improve screening precision after reviewing candidate quality.
iii) Recruiters may update details such as:
- Communication requirements
- Industry experience expectations
- Domain expertise requirements
- Hiring preferences or exclusions
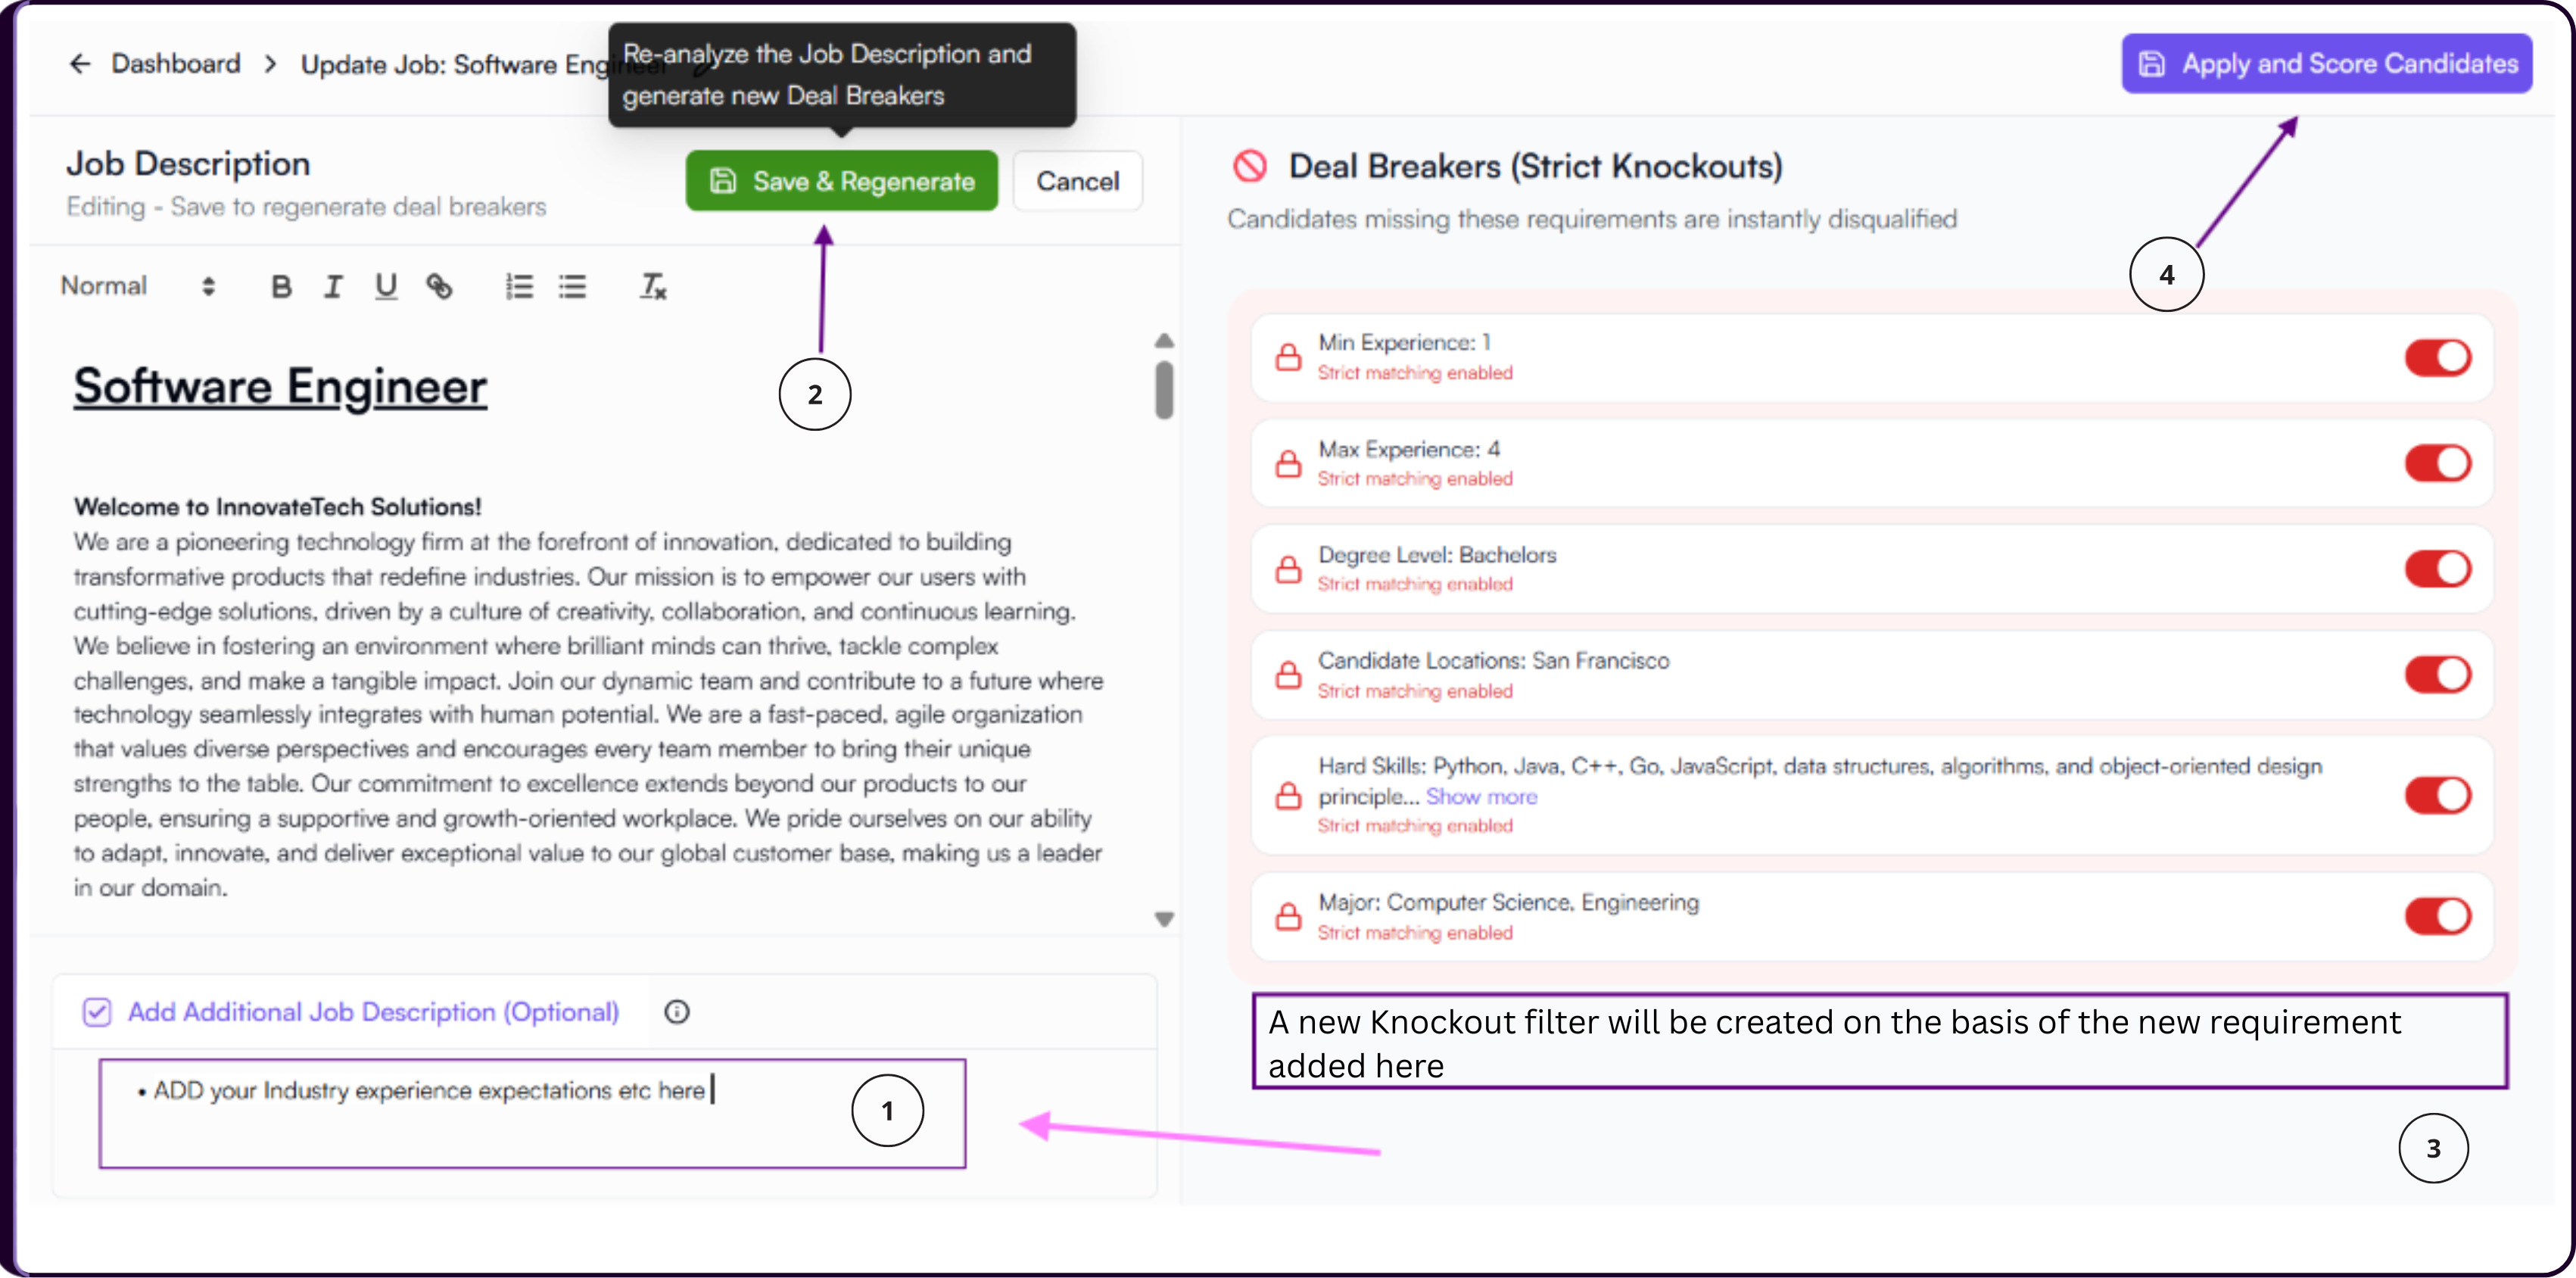
iv) Any updates made to the Job Description can be viewed by the candidates on your public job posting. If you dont want the candidates to view these, use the 'Additional Job Description' section below.
Save and Regenerate Screening Logic
i) After editing the Job Description or Additional JD section, recruiters must click on ‘Save and Regenerate’.
ii) Skima AI will then reassess the role and automatically regenerate:
- Knockout filters
- AI screening conditions
- Candidate matching logic
- Scoring logic
- Candidate ranking conditions
iii) This ensures the updated hiring expectations are immediately reflected across the candidate pipeline.
Apply and Score Candidates
i) Once the calibration process is complete, recruiters can click on ‘Apply and Score Candidates’.
ii) Skima AI will immediately apply the updated screening logic to all linked candidates for the role.
iii) Candidate scores, qualification status, ranking order, and disqualification conditions will refresh according to the latest Job Description logic.
4. View Screening Questions
The View Screening Questions tab helps configure and manage the screening questions shown to candidates during job applications. These questions help collect structured candidate responses, improve qualification quality, and support better screening before manual review begins.
View more
Add Screening Questions
i) When no screening questions have been added yet, the following empty state will appear inside the tab:
You don’t have any questions added for Screening candidates.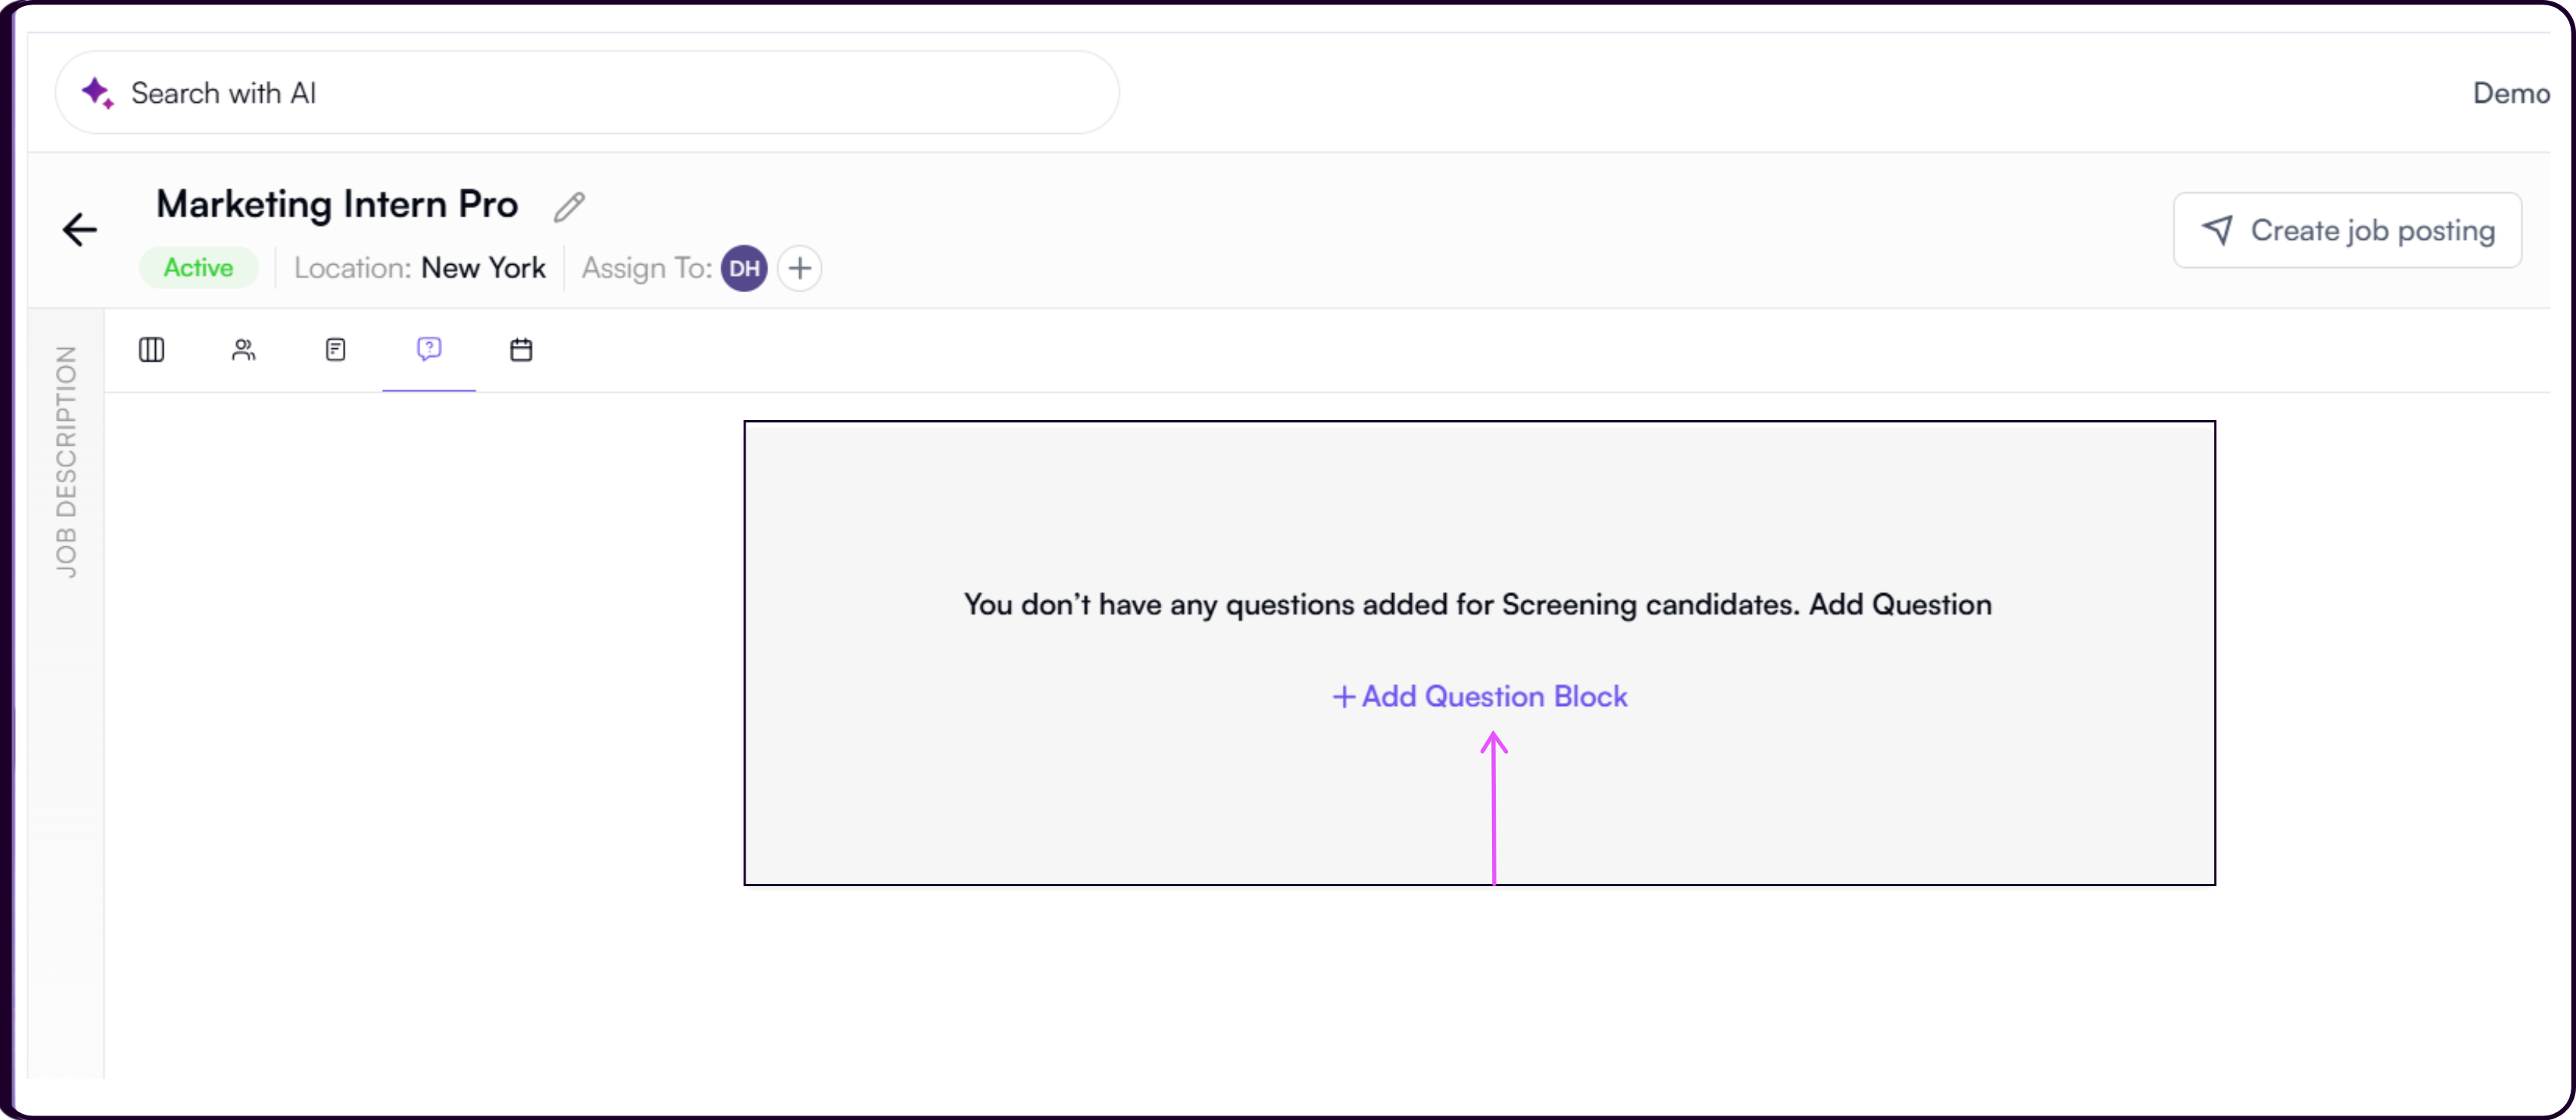
ii) To begin creating screening questions, click on ‘Add Question Block’
iii) Click here on Set Screening Questions to open the detailed guide for creating and configuring screening questions for the job.
Preview Screening Questions
i) Before saving, you can preview how the screening questions will appear to candidates on the live job posting page.
ii) This helps validate the candidate experience, question structure, and overall screening flow before publishing the role publicly.
iii) Once the screening questions are finalized, click on ‘Save’.
Manage Saved Screening Questions
i) After saving, all configured screening questions for the job will appear inside the View Screening Questions tab.
ii) Questions can be reviewed, edited, reorganized, or updated anytime before the job is published.
iii) Once a job has already been published, the screening questions can no longer be edited directly.
iv) To make changes again, the job must first be unpublished.
Refer to the Deleting Published Jobs section for the detailed steps required to unpublish a job before editing screening questions again.
5. View Interviews
The View Interviews tab helps manage and track all interviews scheduled for a specific job inside Skima AI. This workspace provides complete visibility into interview schedules, interview status, meeting platforms, and candidate interview activity from a single location.
View more
Search Candidates
i) The search bar at the top of the page helps quickly locate interviews by searching for the candidate’s:
- Name
- Email address
ii) This is useful when managing large interview pipelines or reviewing a specific candidate’s interview activity.
Filter Interviews
i) Clicking on ‘Filter’ opens the interview filtering panel.
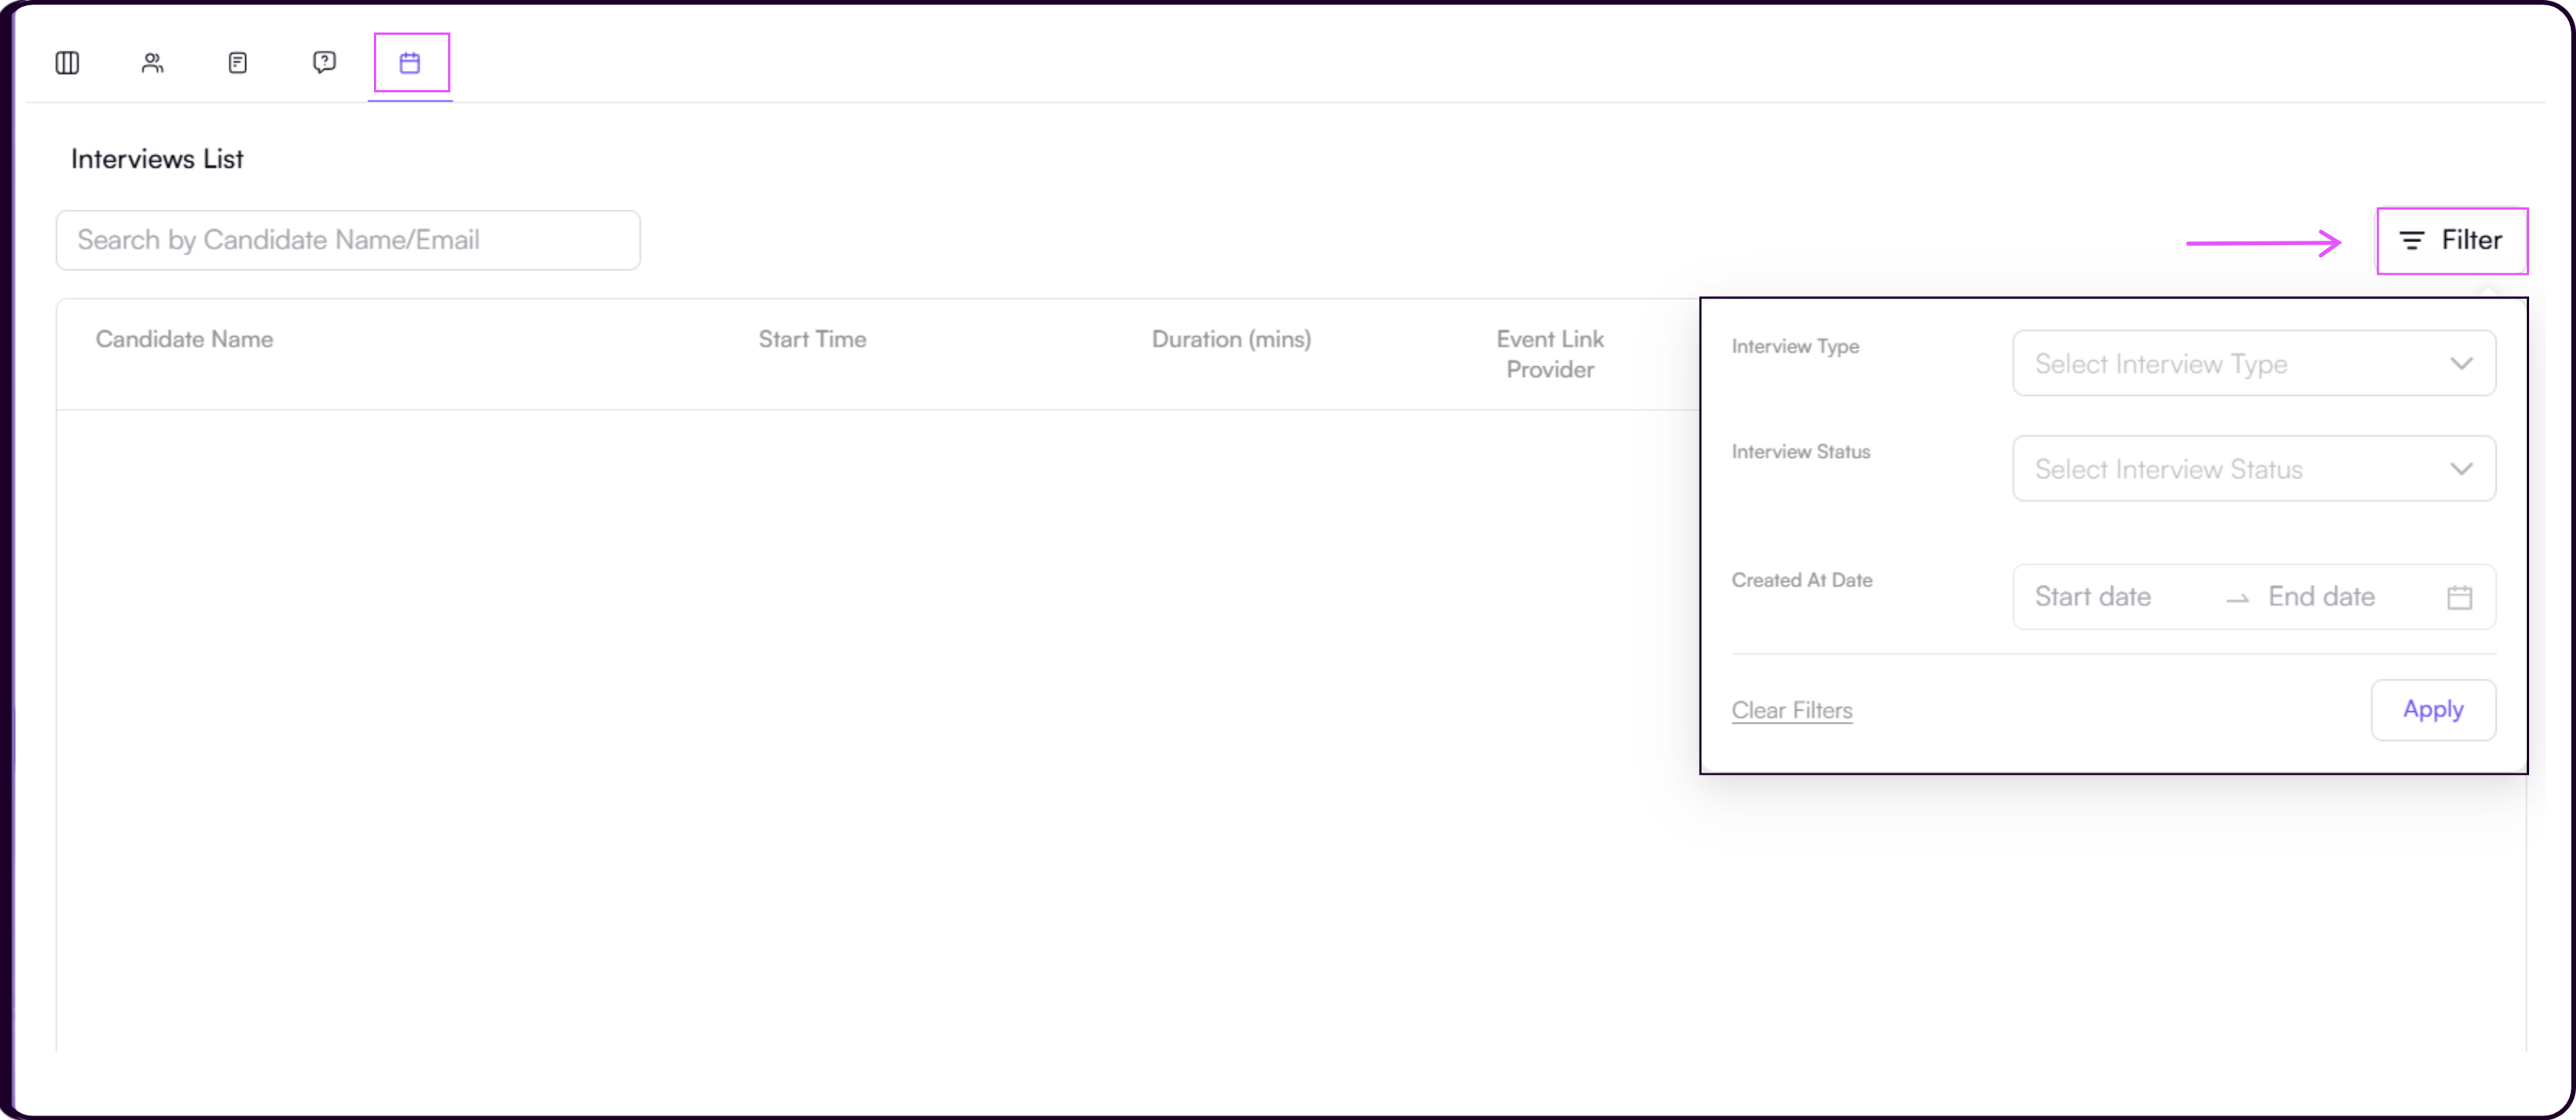
ii) Interviews can be filtered using:
- Interview Type to filter interviews based on the meeting provider such as Google Meet, Zoom, or other configured platforms.
- Interview Status to narrow interviews by statuses such as Pending, Rescheduled, Processed, or completed stages.
- Created At Date to filter interviews based on the interview creation date range.
iii) After selecting the required filters, click on ‘Apply’ to update the interview list.
iv) Click on ‘Clear Filters’ anytime to reset all applied filters.
Interview Table
All scheduled interviews for the selected job appear inside the interview table. The table provides visibility into the following details for every scheduled interview:
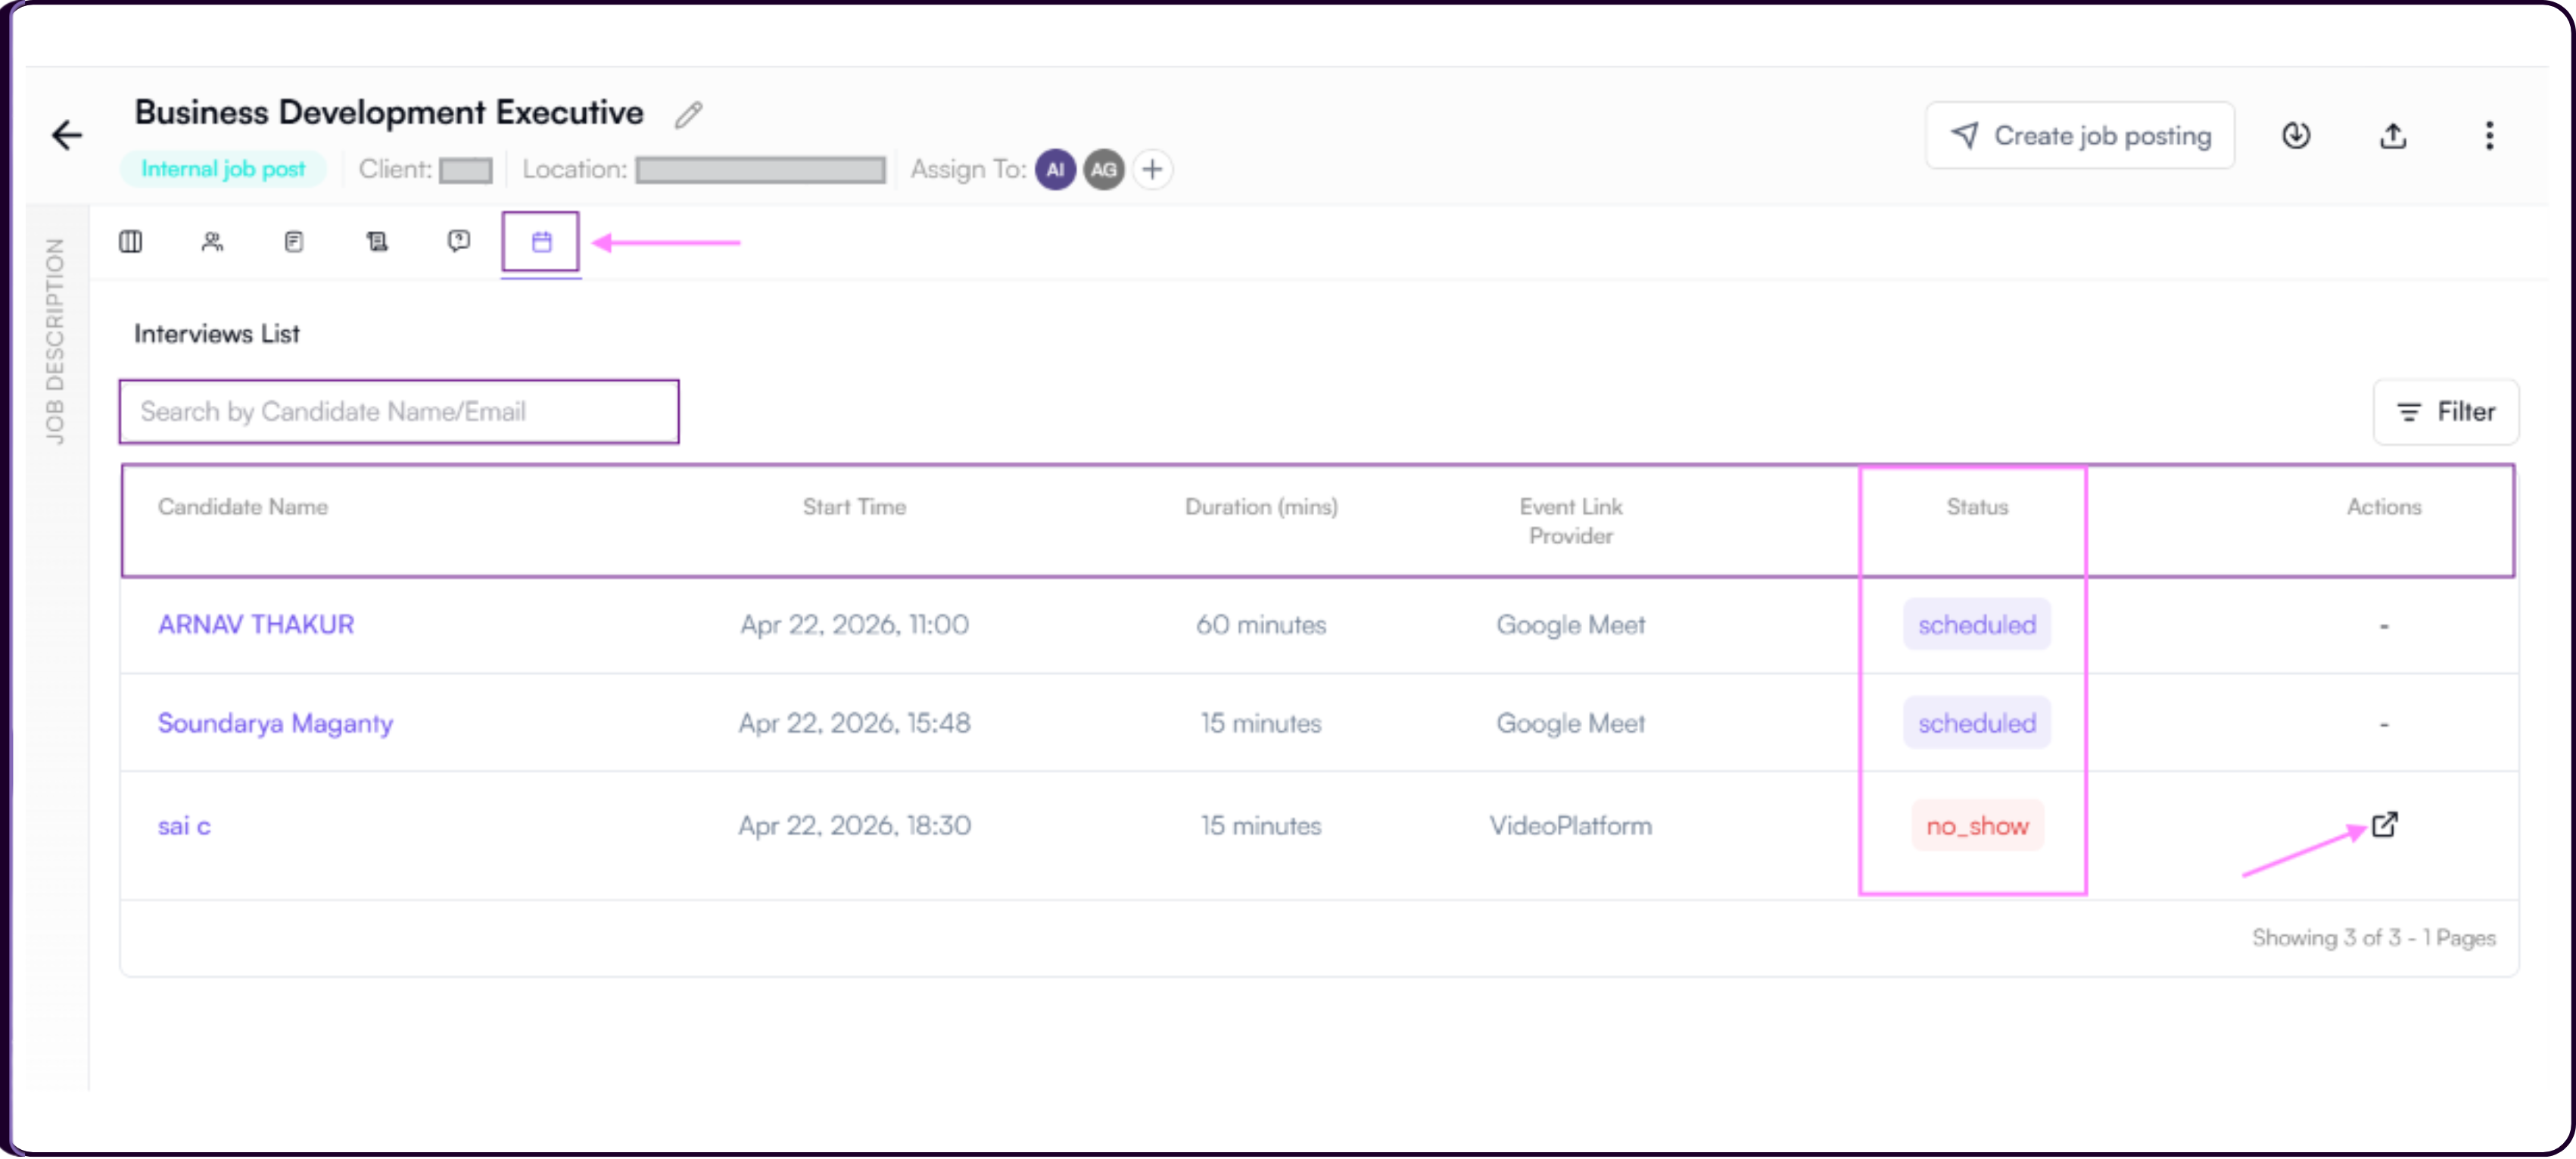
- Candidate Name: Identifies the candidate linked to the interview.
- Start Time: Shows the scheduled interview start date and time.
- Duration (mins): Displays the planned interview duration.
- Event Link Provider: Shows the meeting platform used for the interview.
- Status: Displays the current interview scheduling status.
- Actions: Provides additional interview management options.
This helps monitor interview progress, identify pending interviews, and manage scheduling workflows directly from a centralized interview management view.